4.6.1 Promotion list
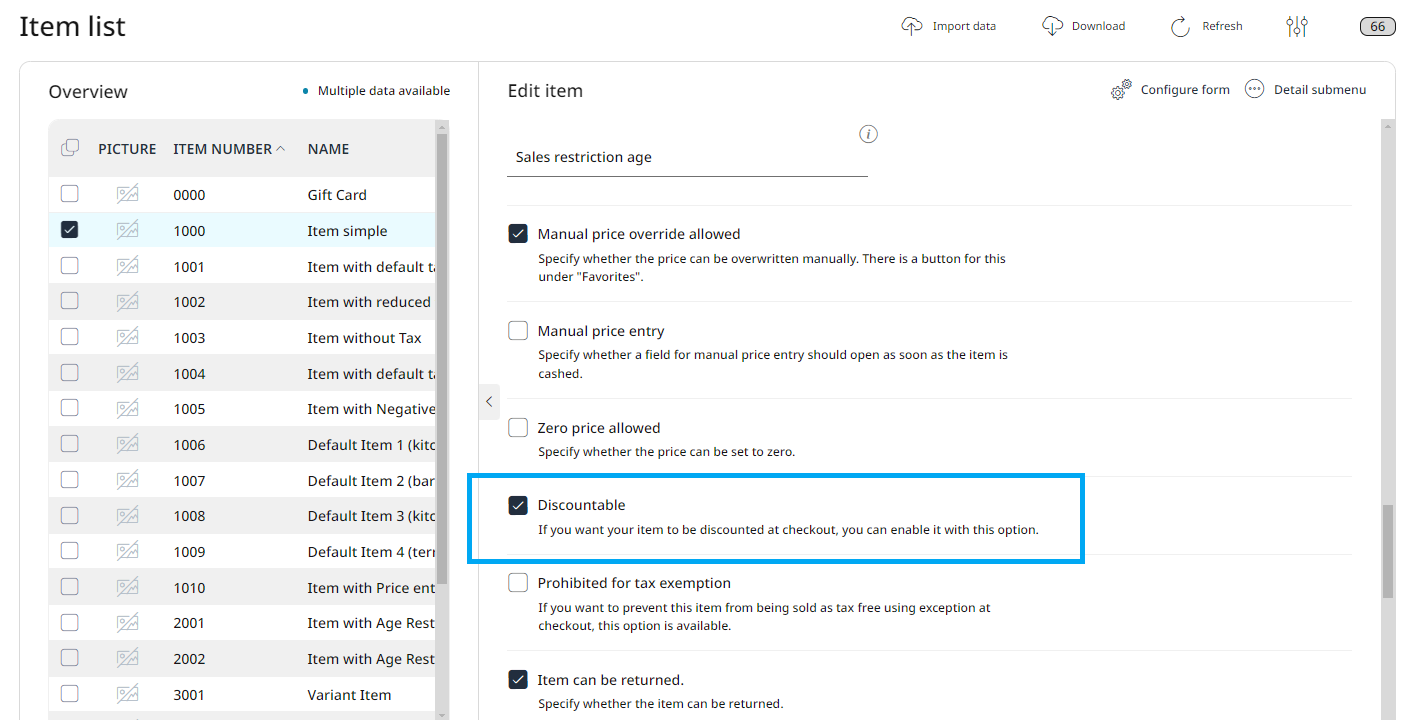
Promotions and discounts can be used to combine different items and discount types. To do this, simply create the desired promotion, apply it to the required items or item groups, and the RETAIL7 system calculates the associated prices independently. In addition, the app displays whether the item is eligible for this discount promotion. Thus, it is possible to activate each item individually for promotions under Menu → Master data → Items → Item list.
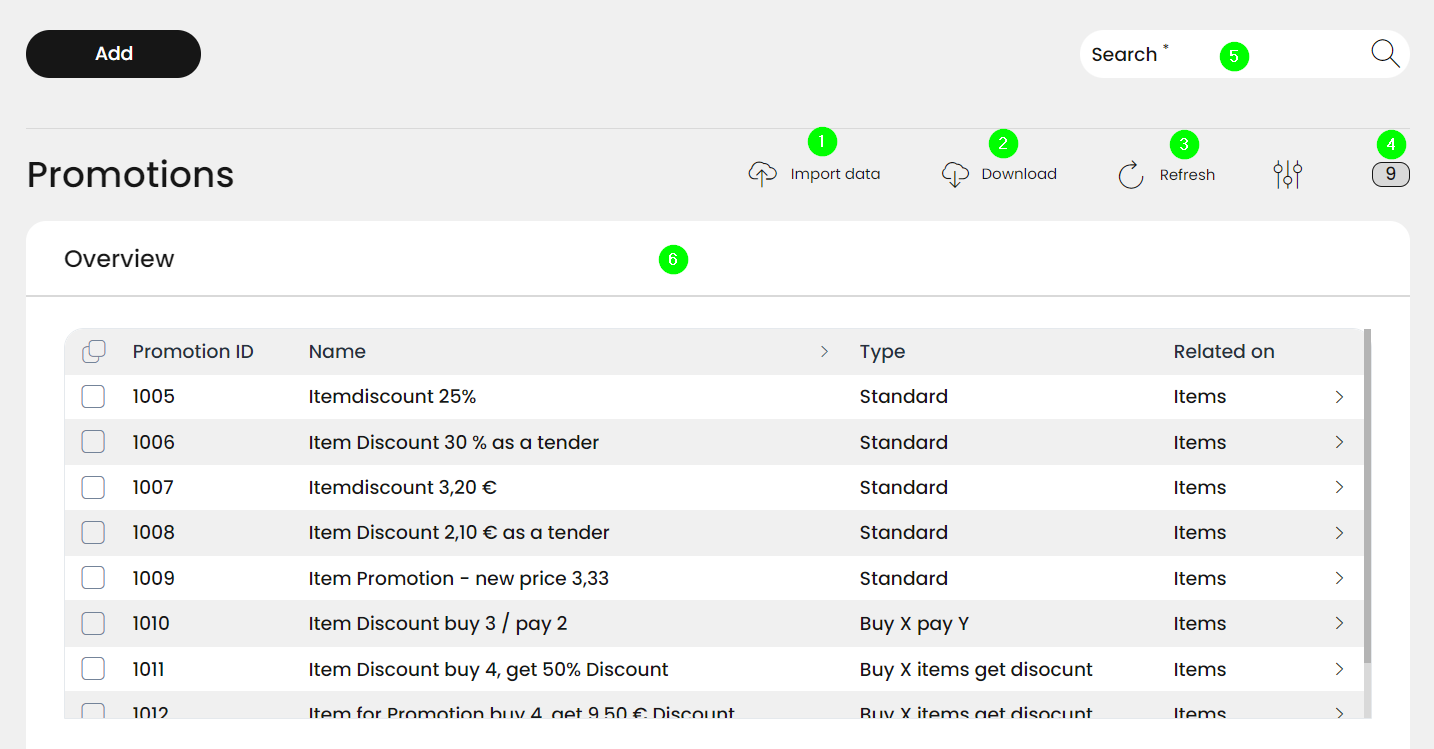
Managing promotions
Import promotion
Download promotions
Update list
Number of promotions
Search for promotions
Information about promotions
Adding promotions
With this function, new promotions can be created or configured. After a successful saving, it is possible to filter out promotions using the Search function. Thus, it´s possible quickly navigating through the overview.
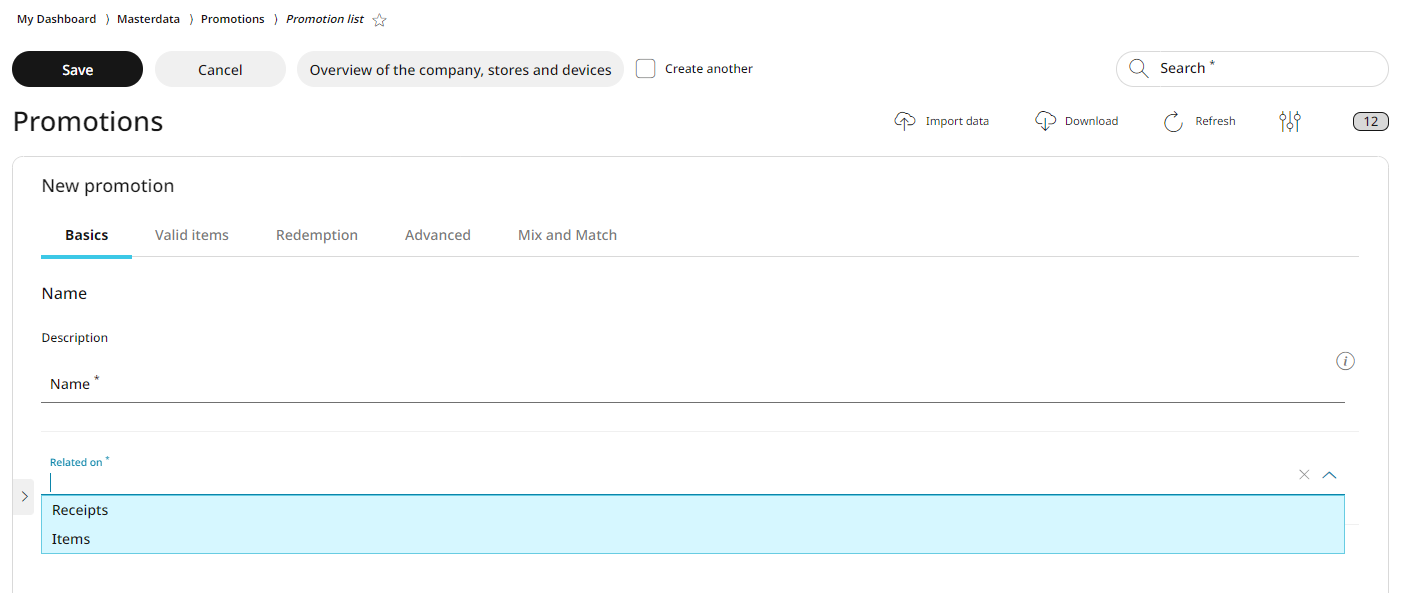
Open the Menu → Master data → Promotions → Promotion list.
Click on Add.
On the Basics tab add a name as a description.
The Basics tab is automatically opened and must be filled in first before the other submenus are available: as you can see, the tabs beside the Basics are still inactive. That´s because the configuration of the promotions is based on the setting of the assignment, i.e. if the promotion is related on receipt or item. Depending on the setting, the following configuration will change.
Select the assignment for the promotion.
Promotions for the receipt
Follow the steps in the Add promotion section.
Select the receipt as the related on basis.
Specify the value which must be reached for triggering the promotion for the receipt.
Define the corresponding unit.
Here you can specify whether the value is based on currency or percentage.
EXAMPLE 1: The value is 10.00 and the unit is set as currency, then 10.00 of the minimum turnover must be reached.
EXAMPLE 2: The value is 15.00 and the unit is set as percentage, then 15% of the minimum turnover must be reached.
Enter a value to the minimum turnover field, which must be reached for the promotion to be available.
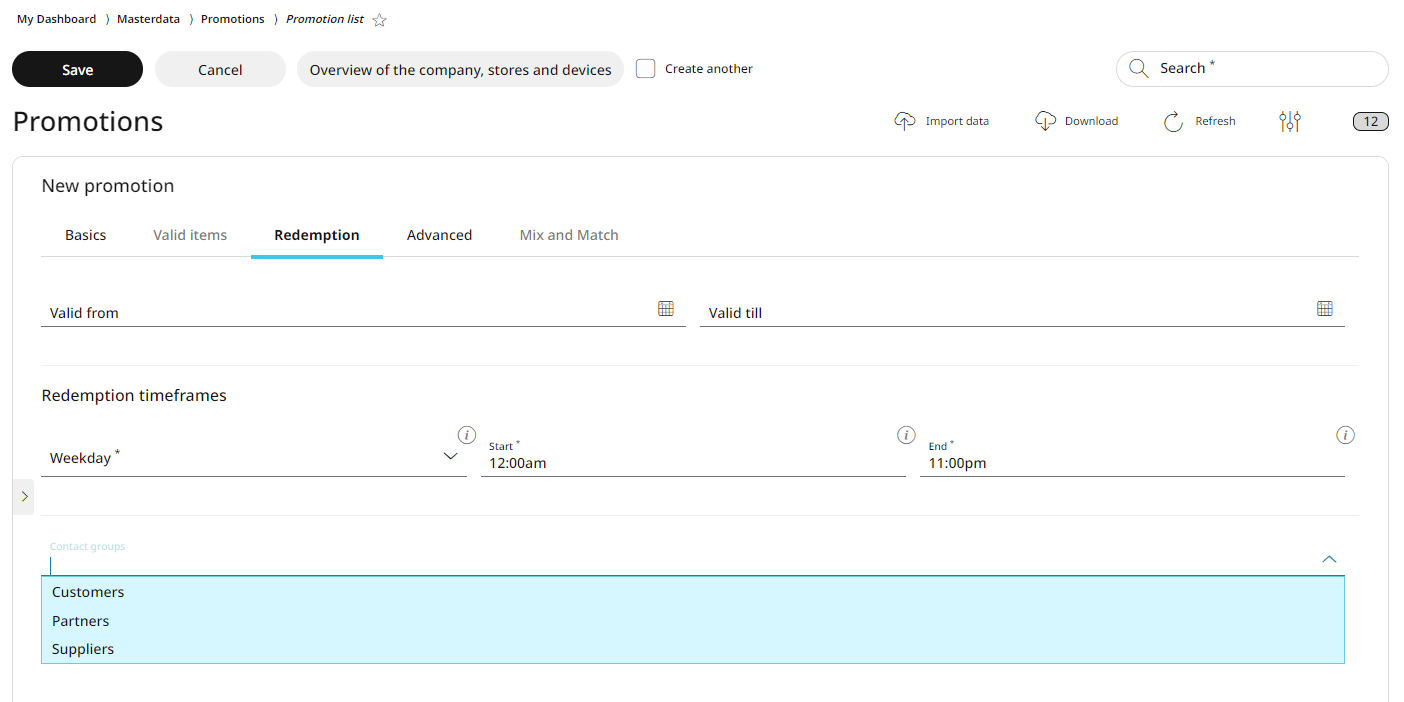
Move forward to the Redemption tab and specify the valid from-valid till time period of the promotion.
Now the promotion is valid (is possible to redeem) only during this period. If a customer tries to use the discount, e.g. via a coupon, after this period has expired, the RETAIL7 POS system will display a notification that the promotion is not available.
Specify the redemption timeframe by specifying the day of the week and the time period. If you would like to add several more timeframes, you can do it by clicking on + Add. Thus, it is possible to specify that e.g. a discount of 15% on the lunch menu only available on every Sunday at noon. Also, there could be other different promotions only for Saturday, or for Sunday, but just from 7pm. At this point there are many possible combinations of date, time and weekdays.
Define the maximum redemption per receipt value, which is the number of receipts that can be redeemed for the promotion
You can assign promotion groups to a promotion, if there are any created before, under Promotion group menu (see more about this in the 4.6.2 Promotion group chapter. This can be useful when some promotions are intended for different items, with different redemption numbers. Adding a promotion group will overwrite the validity of the originally entered number of redemption, which means that it is no longer the number of maximum redemption per voucher that applies, but the (higher or lower) number of redemption that was selected in the assigned promotion group.
Specify which contact groups can have this promotion, if you would like to limit the validity of the promotion only to a special group of clientele (see more about contact groups in the 4.3.2 Contact groups chapter).
Move forward by opening the Advanced tab.
Check the box if the negative price is allowed for the discount.
If the setting is active, it means that the receipt can be a negative amount (e.g. - 5,50€) after deducting the promotion. In this case the customer will receive a credit of 5,50€. If this box is not checked, the option is not active and the total amount on the receipt must not fall below zero. This option is possible, for example, when a minimum turnover must be reached, which can never fall below zero after the promotion is completed.
Specify the value of sequence and resolution.
Select the desired rounding rule you want to apply to this promotion. More about rounding rules, their types and exact details in chapter 4.6 Promotions.
Select the prorate: choose between the default and share options.
By checking the box, you can specify if a trigger coupon needed.
After saving this new promotion, it is available to be used on the POS right away.
Promotions for items
When configuring a new promotion, start it as described previously in the Add Promotion section, but select the Item option at the Related on step.
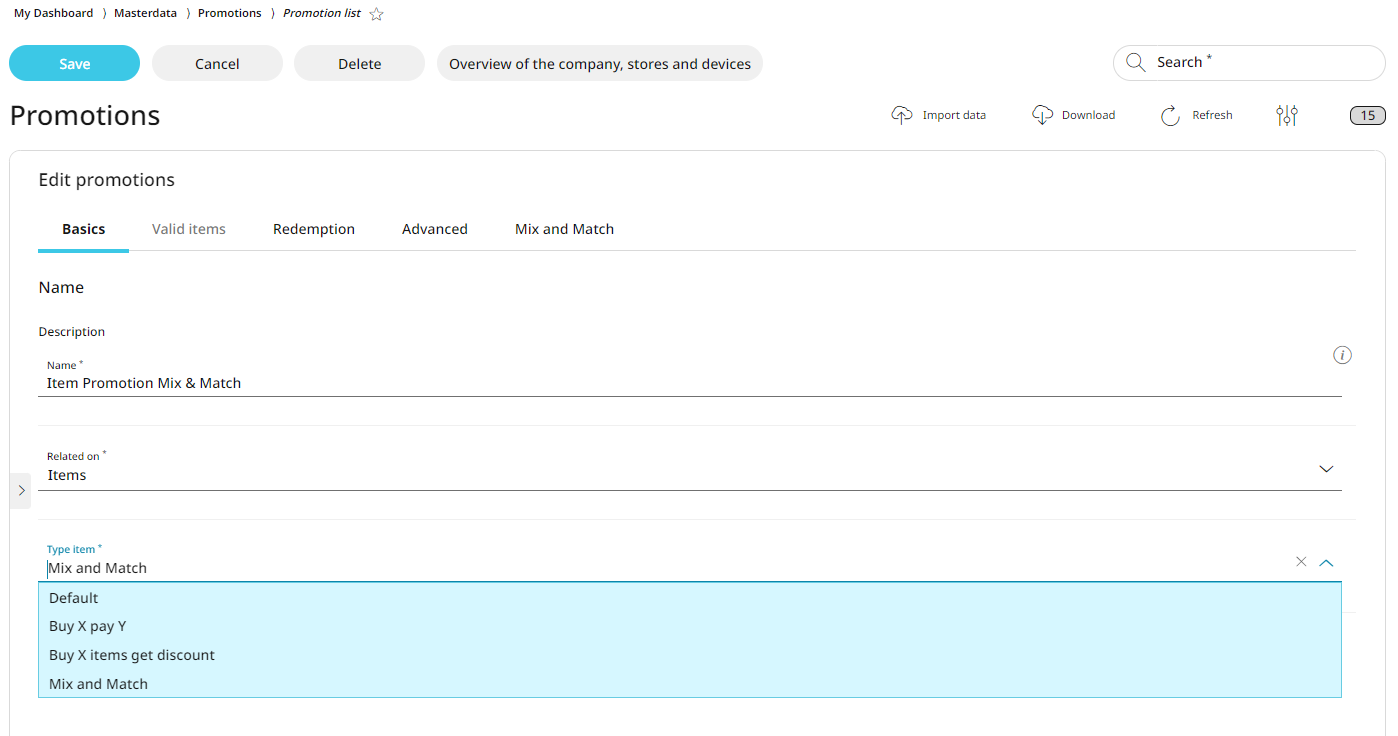
At this point a new setup option of the Basics tab is displayed, called Type item. With its scroll-down menu, you can determine, which combination of items will trigger the promotion and what type of promotion it is. Depending on the type, the processing options change.

Example for a Default promotion is to get a 10% discount on a purchase.
Example for a Buy X and pay Y is, buy 3 items and pay 2.
Example for a Buy X and get discount is, to get 5% discount if a value is reached.
Example for a Mix & Match promotion is, to buy the two defined components and get a discount.
Promotions for item - Default promotion
When configuring a new promotion, start it as described previously in the Add Promotion section, select the Item option at the Related on step, and select Default as the discount type at the Type item field.
By doing this, two new fields are getting available, where you can specify the value and the associated unit of the promotion.
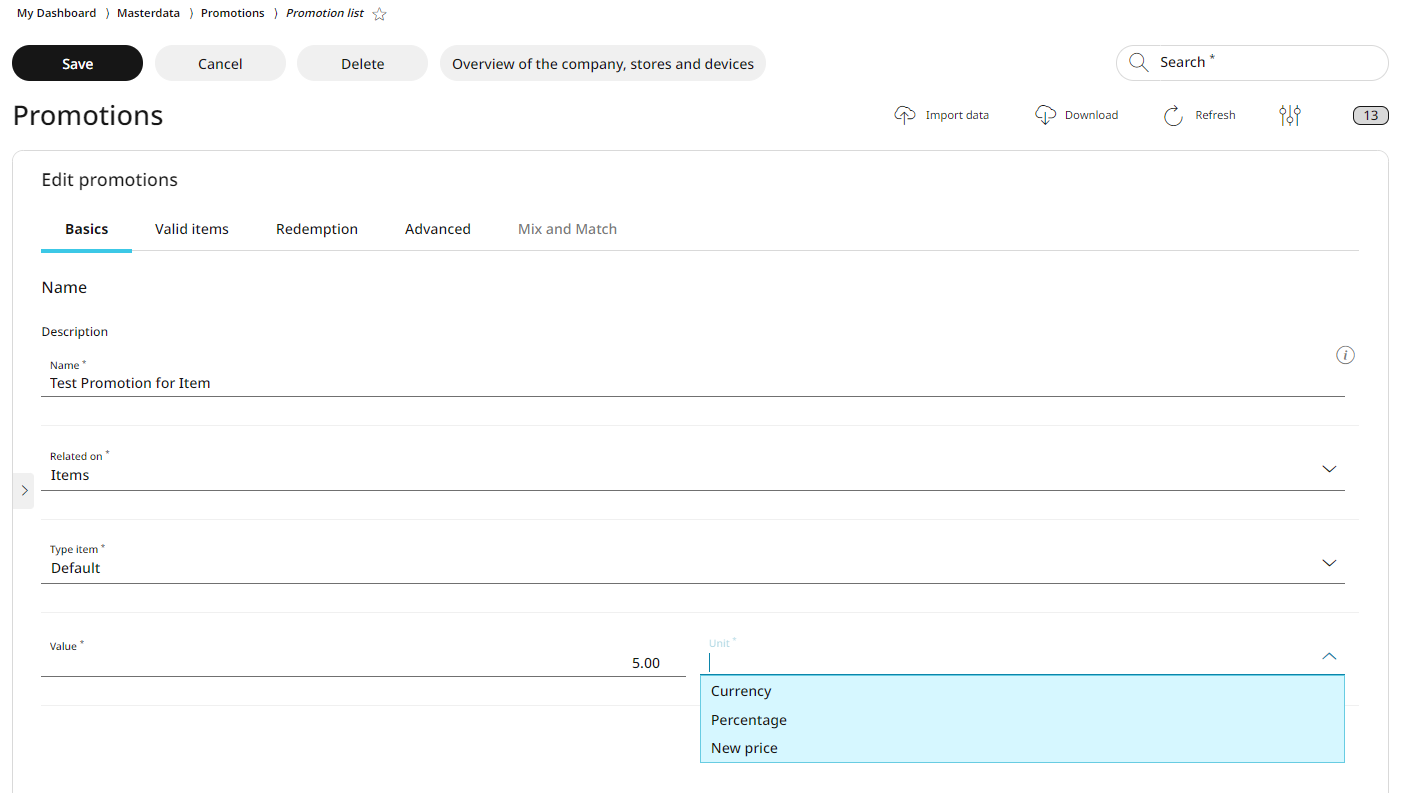
Here you can decide whether the value you entered, is based on a currency, a percentage, or if it´s a new price for the item that is the subject of the promotion.
Example for currency unit: 10.00 is entered as a value, then 10.00 EUR of the minimum turnover must be reached.
Example for percentage unit: 10.00 is entered as a value, then 10% of the minimum turnover must be reached.
Example for new price unit: 10.00 is entered as a value, then this will be the applied price for the time period of the promotion.
By now the Valid items, Redemption and Advanced tabs are active beside the Basics tab, except Mix and Match.
Click on Valid items tab and select the the item and item group to be assigned to this promotion from the rolldown menus.
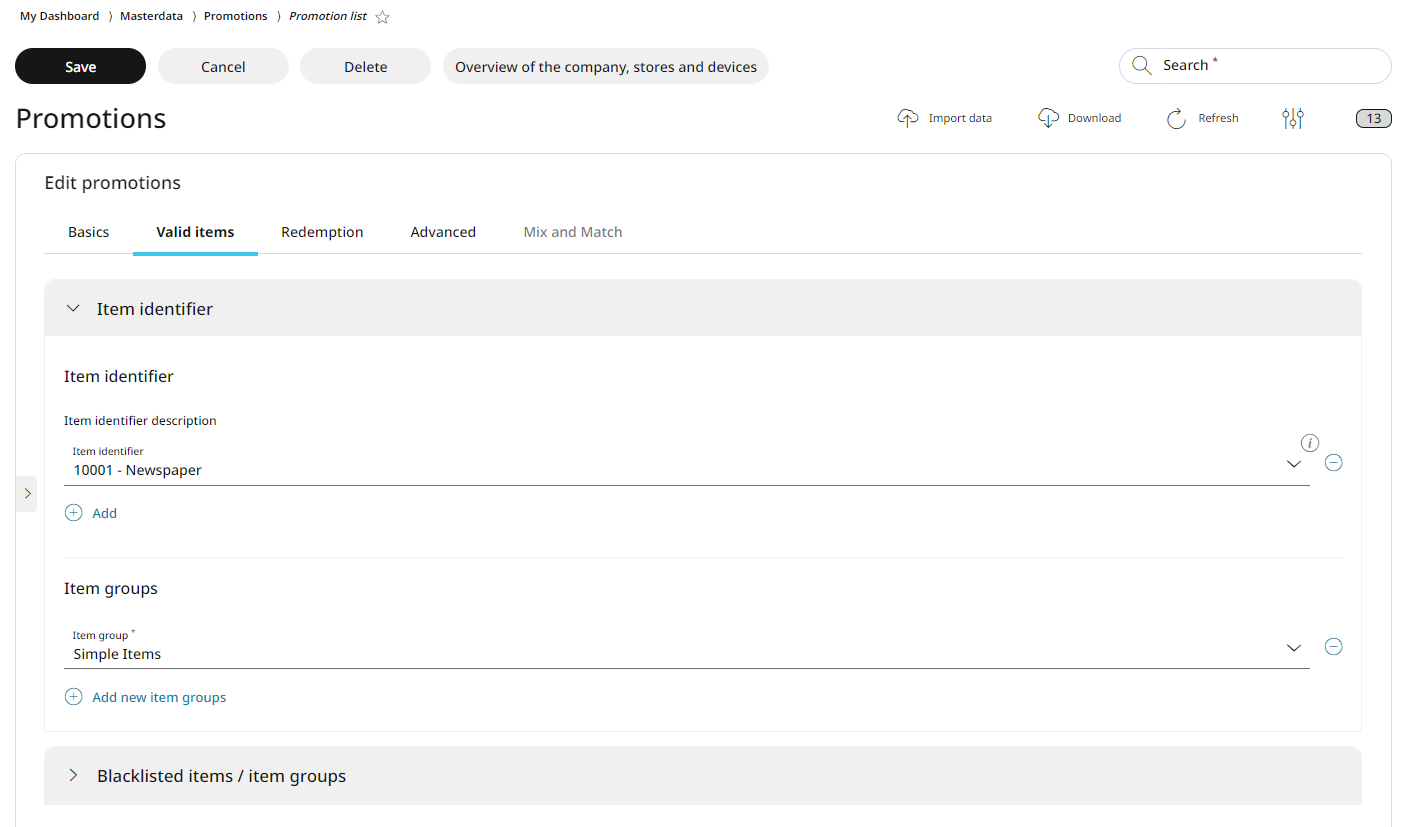
Specify blacklisted items and blacklisted item groups, if needed. By clicking the Add button, you can add several other blocked items and item groups. These blacklisted items and item groups are excluded of this promotion, and the system will notify the cashier on the POS if a promotion cannot be applied to an item or item group. It is possible to configure each item or item group separately. NOTE: When the item group is blocked, all items that are part of the group are automatically blocked as well.
Move forward to the Redemption tab and specify the valid from-valid till time period of the promotion.
Now the promotion is valid (is possible to redeem) only during this period. If a customer tries to use the discount, e.g. via a coupon, after this period has expired, the RETAIL7 POS system will display a notification that the promotion is not available.
Specify the redemption timeframe by specifying the day of the week and the time period. If you would like to add several more timeframes, you can do it by clicking on + Add. Thus, it is possible to specify that e.g. a discount of 15% on the lunch menu only available on every Sunday at noon. Also, there could be other different promotions only for Saturday, or for Sunday, but just from 7pm. At this point there are many possible combinations of date, time and weekdays.
Define the maximum redemption per receipt value, which is the number of receipts that can be redeemed for the promotion
You can assign promotion groups to a promotion, if there are any created before, under Promotion group menu (see more about this in the 4.6.2 Promotion group chapter. This can be useful when some promotions are intended for different items, with different redemption numbers. Adding a promotion group will overwrite the validity of the originally entered number of redemption, which means that it is no longer the number of maximum redemption per voucher that applies, but the (higher or lower) number of redemption that was selected in the assigned promotion group.
Specify which contact groups can have this promotion, if you would like to limit the validity of the promotion only to a special group of clientele (see more about contact groups in the 4.3.2 Contact groups chapter).
Move forward by opening the Advanced tab.
Check the box if the negative price is allowed for the discount.
If the setting is active, it means that the total of the receipt can be a negative amount (e.g. - 5,50€) after deducting the promotion. In this case the customer will receive a credit of 5,50€. If this box is not checked, the option is not active and the total amount on the receipt must not fall below zero. This option is possible, for example, when a minimum turnover must be reached, which can never fall below zero after the promotion is completed.
Specify the value of sequence and resolution.
Select the desired rounding rule you want to apply to this promotion. More about rounding rules, their types and exact details in chapter 4.6 Promotions.
Select the prorate: choose between the default and share options.
By checking the box, you can specify if a trigger coupon needed.
After saving this new promotion, it is available to be used on the POS right away.
Promotions for items - "Buy X and pay Y" promotion
When configuring a "Buy X and pay Y" promotion, start it as described previously in the Add Promotion for Item section, select the Item option at the Related on step, and select Buy X and pay Y as the discount type at the Type item field.
It is now possible to specify how many items can be purchased and what amount will be paid for them in the Buy X Quantity and Pay Y Quantity fields that now open below it.
Enter a value of how many x items must be purchased and how many y items are paid.
A typical example would be, buy 3 items and pay 2 items. Thus, the customer buys 3 items, but pays only the 2 highest priced ones. Therefore, the sales of the store will be boosted and more space can be created in the warehouse as more items are sold.
By now the Valid items, Redemption and Advanced tabs are active beside the Basics tab, except Mix and Match.
Click on Valid items tab and select the the item and item group to be assigned to this promotion from the rolldown menus. You can assign more items and item groups to this promotion by clicking Add.
Specify blacklisted items and blacklisted item groups, if needed. By clicking the Add button, you can add several other blocked items and item groups. These blacklisted items and item groups are excluded of this promotion, and the system will notify the cashier on the POS if a promotion cannot be applied to an item or item group. It is possible to configure each item or item group separately. NOTE: When the item group is blocked, all items that are part of the group are automatically blocked as well.
Move forward to the Redemption tab and specify the valid from-valid till time period of the promotion.
Now the promotion is valid (is possible to redeem) only during this period. If a customer tries to use the discount, e.g. via a coupon, after this period has expired, the RETAIL7 POS system will display a notification that the promotion is not available.
Specify the redemption timeframe by specifying the day of the week and the time period. If you would like to add several more timeframes, you can do it by clicking on + Add. Thus, it is possible to specify that e.g. a discount of 15% on the lunch menu only available on every Sunday at noon. Also, there could be other different promotions only for Saturday, or for Sunday, but just from 7pm. At this point there are many possible combinations of date, time and weekdays.
Define the maximum redemption per receipt value, which is the number of receipts that can be redeemed for the promotion.
You can assign promotion groups to a promotion, if there are any created before, under Promotion group menu (see more about this in the 4.6.2 Promotion group chapter. This can be useful when some promotions are intended for different items, with different redemption numbers. Adding a promotion group will overwrite the validity of the originally entered number of redemption, which means that it is no longer the number of maximum redemption per voucher that applies, but the (higher or lower) number of redemption that was selected in the assigned promotion group.
Specify which contact groups can have this promotion, if you would like to limit the validity of the promotion only to a special group of clientele (see more about contact groups in the 4.3.2 Contact groups chapter).
Continue on the Advanced tab and check the box if the negative price is allowed for the discount.
If this setting is active, it means that the total price can be a negative amount after deducting the promotion, e.g. - 5,50€. In this case the customer will receive a credit of 5,50€. If the option is not active, the total amount on the receipt must not fall below zero. This option is possible, for example, when a minimum turnover must be reached, which can never fall below zero after the promotion is completed.
Specify the sequence and resolution.
Select the desired rounding rule.
Specify if the the prorate is default or share.
Check the box if a trigger coupon is needed.
By checking the box, you can specify if a trigger coupon needed.
After saving this new promotion, it is available to be used on the POS right away.
Promotions for items - "Buy X items and get a discount" promotion
When configuring a new promotion, start it as described previously in the Add Promotion for Item section, select the Item option at the Related on step, and select "Buy X items and get discount" as the discount type at the Type item field.
Specify a value of how many x items needed to be purchased for the discount.
A typical example would be, buy 3 items and get 15% discount or from a merchandise value of 69€ you get 10% discount. This ensures that a certain value or number must be reached before the promotion is active. This promotion increases the buying behavior of customers and the total revenue increases.
Specify a value and indicate the unit required.
The value can be applied on the basis of a currency or percentage. For example, a percentage is when you get 10% discount from a value of 89€. A currency, on the other hand, is when the customer receives a discount of 10€ from a value of 89€.
By now the Valid items, Redemption and Advanced tabs are active beside the Basics tab, except Mix and Match.
Click on Valid items tab and select the the item and item group to be assigned to this promotion from the rolldown menus. You can assign more items and item groups to this promotion by clicking Add.
Specify blacklisted items and blacklisted item groups, if needed. By clicking the Add button, you can add several other blocked items and item groups. These blacklisted items and item groups are excluded of this promotion, and the system will notify the cashier on the POS if a promotion cannot be applied to an item or item group. It is possible to configure each item or item group separately. NOTE: When the item group is blocked, all items that are part of the group are automatically blocked as well.
Move forward to the Redemption tab and specify the valid from-valid till time period of the promotion.
Now the promotion is valid (is possible to redeem) only during this period. If a customer tries to use the discount, e.g. via a coupon, after this period has expired, the RETAIL7 POS system will display a notification that the promotion is not available.
Specify the redemption timeframe by specifying the day of the week and the time period. If you would like to add several more timeframes, you can do it by clicking on + Add. Thus, it is possible to specify that e.g. a discount of 15% on the lunch menu only available on every Sunday at noon. Also, there could be other different promotions only for Saturday, or for Sunday, but just from 7pm. At this point there are many possible combinations of date, time and weekdays.
Define the maximum redemption per receipt value, which is the number of receipts that can be redeemed for the promotion
You can assign promotion groups to a promotion, if there are any created before, under Promotion group menu (see more about this in the 4.6.2 Promotion group chapter. This can be useful when some promotions are intended for different items, with different redemption numbers. Adding a promotion group will overwrite the validity of the originally entered number of redemption, which means that it is no longer the number of maximum redemption per voucher that applies, but the (higher or lower) number of redemption that was selected in the assigned promotion group.
Specify which contact groups can have this promotion, if you would like to limit the validity of the promotion only to a special group of clientele (see more about contact groups in the 4.3.2 Contact groups chapter).
Open the Advanced submenu.
Check the box if the negative price is allowed for the discount.
If the setting is active, it means that the receipt after deducting the promotion is e.g. - 5,50€. In this case the customer will receive a credit of 5,50€. If the option is not active, the total amount on the receipt must not fall below zero. This option is possible, for example, when a minimum turnover must be reached, which can never fall below zero after the promotion is completed.
Specify the sequence and resolution.
Select the desired rounding rule.
Specify if the the prorate is default or share.
Check the box if a trigger coupon is needed.
By checking the box, you can specify if a trigger coupon needed.
After saving this new promotion, it is available to be used on the POS right away.
Promotions for items - "Mix & Match" promotion
When configuring a new promotion, start it as described previously in the Add Promotion for Item section, and begin on the Basics tab by selecting the Item option at the Related on step, and selecting "Mix and Match" as the discount type at the Type item field.
For example, a Mix & Match promotion could consist of pasta and a delicious Bolognese sauce. Should the customer purchase these two components, the Mix & Match promotion will be activated and the customer gets them cheaper.
By choosing the Mix & Match as the discount type, the tabs Redemption, Advanced and Mix and Match are getting active, but not the Valid items. This is because the items which are part of this promotion, must be configured in a later step, on the Mix and Match tab separately.
First move to the Redemption tab and specify the valid from-valid till time period of the promotion.
Now the promotion is valid (is possible to redeem) only during this period. If a customer tries to use the discount, e.g. via a coupon, after this period has expired, the RETAIL7 POS system will display a notification that the promotion is not available.
Specify the redemption timeframe by specifying the day of the week and the time period. If you would like to add several more timeframes, you can do it by clicking on + Add. Thus, it is possible to specify that e.g. a discount of 15% on the lunch menu only available on every Sunday at noon. Also, there could be other different promotions only for Saturday, or for Sunday, but just from 7pm. At this point there are many possible combinations of date, time and weekdays.
Define the maximum redemption per receipt value, which is the number of receipts that can be redeemed for the promotion
You can assign promotion groups to a promotion, if there are any created before, under Promotion group menu (see more about this in the 4.6.2 Promotion group chapter. This can be useful when some promotions are intended for different items, with different redemption numbers. Adding a promotion group will overwrite the validity of the originally entered number of redemption, which means that it is no longer the number of maximum redemption per voucher that applies, but the (higher or lower) number of redemption that was selected in the assigned promotion group.
Specify which contact groups can have this promotion, if you would like to limit the validity of the promotion only to a special group of clientele (see more about contact groups in the 4.3.2 Contact groups chapter).
Continue on the Advanced tab submenu.
Check the box if the negative price is allowed for the discount.
If the setting is active, it means that the receipt after deduction of the promotion is e.g. - 5,50€. In this case the customer will receive a credit of 5,50€. If the option is not active, the total amount on the receipt must not fall below zero. This option is possible, for example, when a minimum turnover must be reached, which can never fall below zero after the promotion is completed.
Select the desired rounding rule.
Specify if the the prorate is default or share.
Check the box if a trigger coupon is needed.
If a trigger coupon is scanned, it activates the Mix & Match promotion. In this way, the RETAIL7 POS system recognizes whether the needed components for the active Mix & Match have been registered in the current transaction and gives the discount defined in the promotion.
Move forward to the Mix & Match submenu.
Select the unit of the promotion from the rolldown menu:
The unit as a currency is always based on the currency used in the store.
The unit as percentage will reduce the price in the promotion by a rate specified.
The unit as new price is valid only for the time of the promotion, after which the original price is active again.
Select from the rolldown menu, which combination code should control how the items are combined in the promotion: code AND, code OR or code OR + Quantity
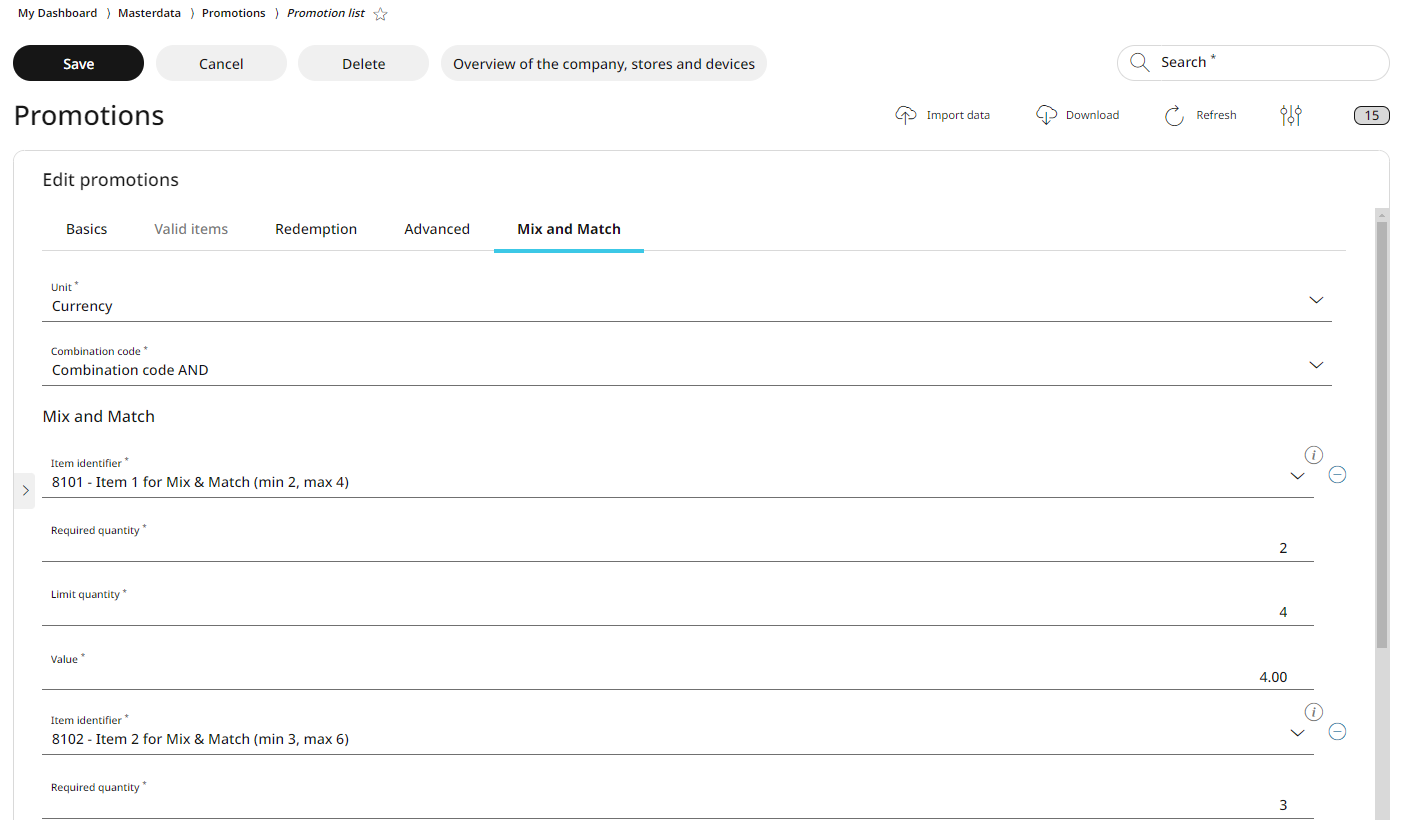
In the Mix and Match section, you can specify the items which must be purchased together to trigger the promotion.
Specify the item identifier for the first item.
Set the required quantity of items.
In this case, the article must be registered at least once, and the total number must be at least two of it, for triggering the Mix & Match promotion.
Select the limit quantity of items.
The configured item can only be used no more than this maximum number, to be covered by the Mix & Match promotion. This means that, in this case, that at least 2 items must be registered to trigger the promotion, but no more than 4 can have it. Nevertheless, it must consist of an even number, since Mix & Match is composed of pairs.
Specify these same information for the second item, since Mix & Match can be applied to 2 items combined only.
With Add, more items can be assigned to the promotion.
Enter a value as number of discounts, if you would like to limit the number of times the Mix & Match promotion can be applied in one transaction.
By checking the box, you can specify if a trigger coupon needed.
After saving this new promotion, it is available to be used on the POS right away.
Editing and deleting promotions
After a promotion has been successfully saved, it is possible to edit or delete it at any time. Deleting old promotions is recommended to keep the system up to date, as promotions that are no longer needed are removed from the overview. After a promotion has been edited, it is important to save it again, so no new information is lost.
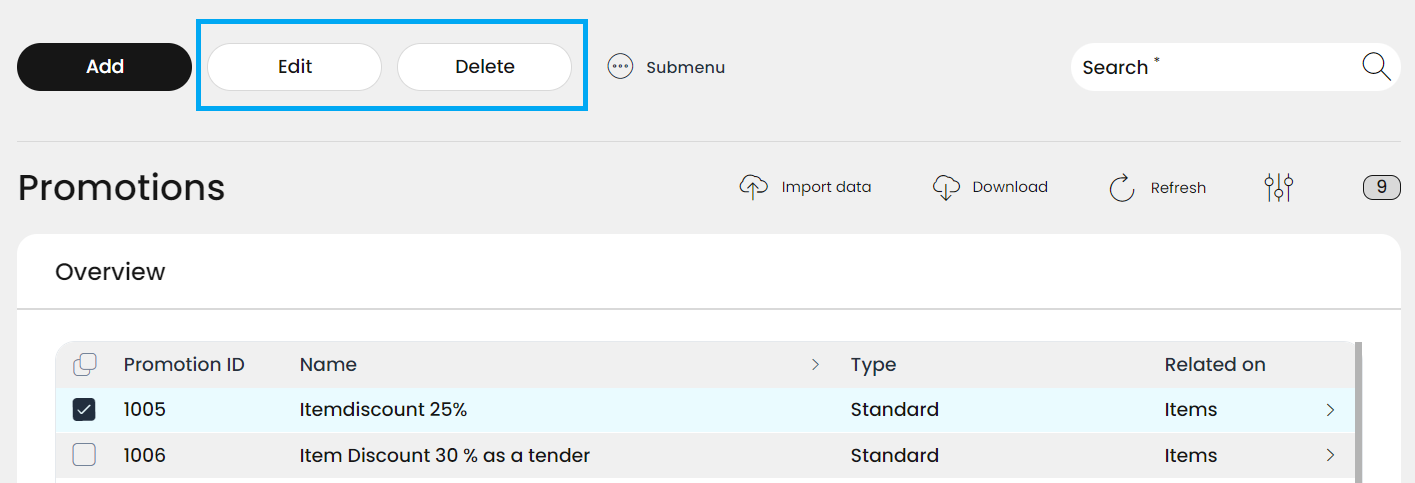
For editing or deleting a promotion, choose it by clicking into the box at the beginning of its row, so the Edit and Delete buttons appear.
In case a promotion needs to be edited:
Select the desired promotion from the list by clicking in the checkbox before its name in the row.
Click on Edit and make all the necessary changes.
Click Save.
in case a promotion needs to be deleted:
Select the desired promotion from the list by clicking in the checkbox before its name in the row.
Click on Delete.
Confirm the dialog box with Yes.
Click on No to cancel the deletion process.
Copying promotions
To create a promotion that is very similar to another one, copying is the obvious solution, for which the duplicate function can be used. This means that it is not necessary to create the entire promotion again, just to copy another one with all the associated settings. Afterwards, desired changes can be made and saved again. Be aware that the names of the promotions should not be repeated, to avoid confusion.
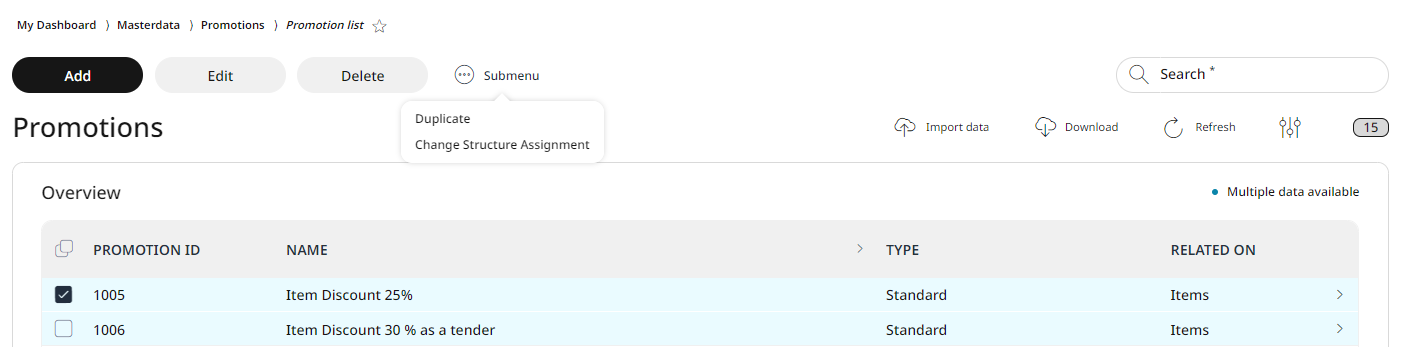
Select the desired promotion from the list.
Click on Submenu.
Select Duplicate.
The desired promotion is copied to the list with all defined settings.
Changing the structure assignment of a promotion
As with items or item menus, promotions also can be assigned to the organizational structure (for example, to only one or just some special stores). Reasons for this, that different stores have different stock, which needs different discounts e.g. for items close to expiry date, or just freeing up place in the store. This may make it necessary to stimulate customer interest with special promotions for those items in the particular store, but not in other stores.
Please note: changing the organizational structural assignment is part of a more complex system function, which you can find under the My Organization -> Units menu of the Management Console, and you can learn about it more under the My Organization chapter of this user documentation.
You can change a structure assignment of a promotion by selecting it and clicking on the three dots Submenu to get the Change structure assignment function.
Now you get the tree overview of the units, to which this particular promotion is assigned to.
As you can see, the "system-level" setup is pre-selected here, which means that the promotion is available and can be used in all stores.

First de-select them by clicking on any of the checkboxes.
Now click on the desired store(s) where you would like the promotion to be available and click Finish.
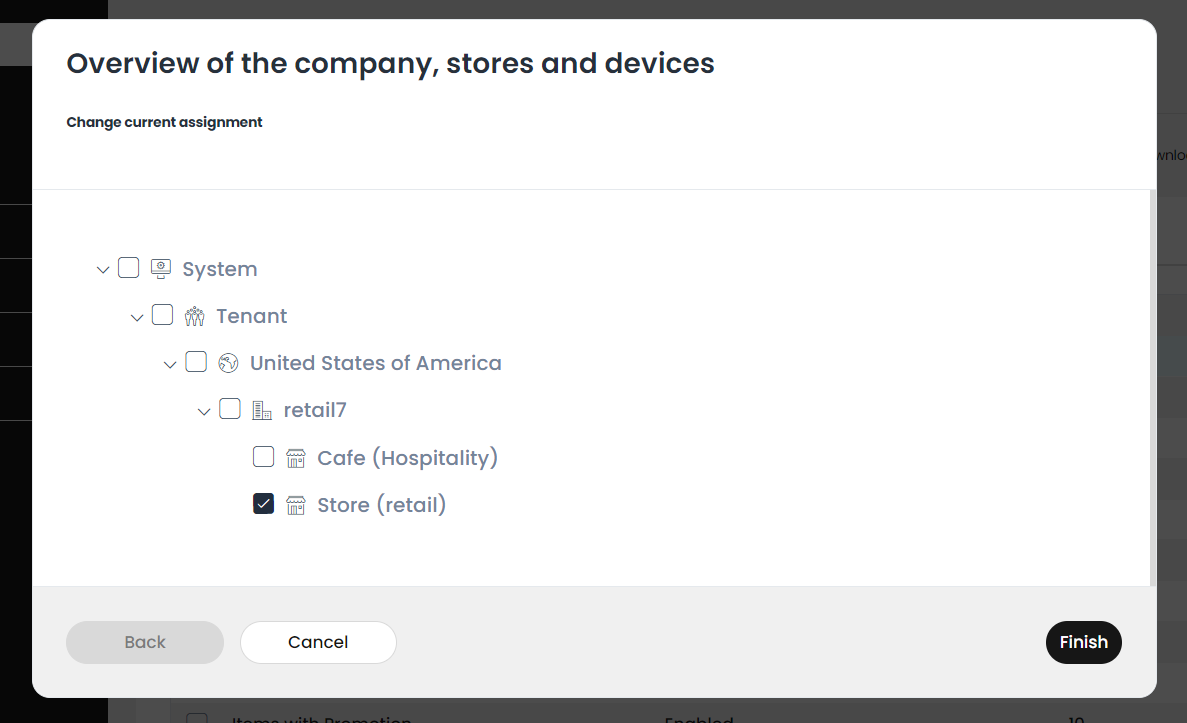
Your adjustments are now active only in the selected unit(s). The configuration of the promotion remains unchanged in all other stores.
Note: you can also change the structure assignment when editing an already existing promotion. For this, beside the Save, Cancel and Delete buttons, there will be an Overview of the company, stores and devices button displayed, which has this same function.
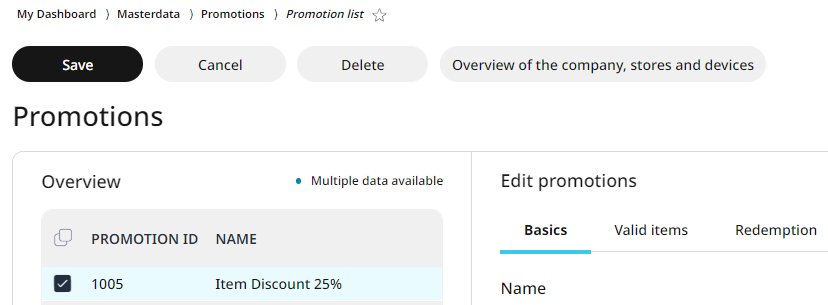
The only difference in this case is, that after clicking on the Finish button, you still have to click on the Save button, for the changes to be registered.