2. General operation
The following section provides a clearer understanding of the Management Console. This tool allows for configuration, master data maintenance, organizational structure administration, and more. It also offers an overview of transaction reports, cash and stock management, employee time tracking, contracts, and invoice data.
NOTE: Not all users have access to all menus and submenus, as the settings are governed by the role and rights system of the RETAIL7 POS software. Roles and corresponding rights are defined by the administrator, typically the person who registered the system or was assigned the administrator role. The administrator, with the highest user rights, is created automatically after registration. They can create additional users for management and employees with restricted rights and access. RETAIL7 POS provides role options such as Administrator, Store Manager, and Cashier to suit different responsibilities.
After logging in and adding the payment information, you will arrive at the user interface of your Management Console. The interface is divided into three main areas for easy navigation and efficient management.
Areas and functions of the Management Console
1. The Menü
The menu is positioned on the left side of the display and is displayed open by default, showing all menu items that allow you to customize your RETAIL7 system. When collapsed, it can be reopened using the hamburger menu button in the upper left corner. Clicking a menu item reveals its submenus (if available), and selecting a submenu displays the detailed settings and functions in the center of the Dashboard (area 3).
The main menu offers the following functions:
Masterdata
Items are the foundation of the cash register system. The RETAIL7 POS software allows you to create various types of items, each with a unique article ID for clear identification. Items can also be assigned to selection groups, enabling systematic sorting and organization. This flexibility ensures that the RETAIL7 POS software can be tailored to meet the needs of any industry without exception.In addition to configuring all possible aspects of your items, such as item groups, variants, identifications, and selection groups, the Masterdata section also provides tools for managing:
Media Playlists: Organize and customize playlists for in-store displays.
Customer Contact Data: Maintain and update customer details for communication and CRM purposes.
Stock Management: Monitor and control inventory levels seamlessly.
Promotions: Create and manage special offers, discounts, and campaigns.
Gift Cards: Handle the issuance, tracking, and redemption of gift cards.
This comprehensive functionality ensures that your POS system is versatile and ready to meet all operational needs.
Time Tracking
The time tracking function is essential for monitoring employee work hours. It records the check-in and check-out times of each employee across all stores. These entries can be conveniently logged either:
Directly through the RETAIL7 POS app, making it accessible for employees on the go.
Or via the Management Console, ensuring administrators have centralized control.
This dual functionality ensures accurate and flexible time management for your workforce.
Team calendar
To ensure seamless operations, effective shift and staff assignment planning is crucial. The Team Calendar section of the Management Console facilitates this by providing a clear and detailed scheduling tool:
Each employee is displayed in a separate column, allowing individual schedules to be planned and viewed in detail (hours and minutes).
The header enables you to select the store whose schedule you wish to view.
Flexible views are available, allowing you to display schedules in daily, weekly, or monthly formats for better planning and transparency.
This setup ensures clarity and efficient workforce management.
Reports
The RETAIL7 POS system provides a variety of reports and journals to support your business decisions. These tools enable detailed insights into various aspects of your operations.
In the following tutorials, we will explore the different types of aggregations the system can generate, helping you better understand and analyze your business performance.
My Organization
The RETAIL7 POS system is organized using a tree structure, which can be created under the My Organization menu. This structure allows you to design an individualized hierarchy, making navigation faster and more efficient. Additionally, specific settings can be assigned to each level, enabling precise customization and streamlined management.
Exports
Regular data export is highly recommended, even if not legally required, to ensure secure record-keeping and efficient data management. The Management Console provides several export options: allows you to transfer your master data for use in another system, provides transaction data in a format suitable for tax advisors, and offers a comprehensive export of all retail transaction data from the document system. These options ensure your data is well-organized and accessible for various business needs.
System settings
The Management Console serves as the central hub for configuring all system-relevant settings. Here, you can customize screen layouts, set up and manage printer use cases, configure import-export processes for seamless data handling, and define tax groups to ensure compliance. Specialized settings for the hospitality industry, such as configuring table shapes, designing floor plans, and managing the reservation calendar, are also available. This comprehensive functionality allows the system to be tailored to meet the specific needs of your business.
Access rights
Access rights menu allows you to define all permissions and settings for users who have access to the system. This section also enables you to add your invoice and account details, which are mandatory for using the RETAIL7 system. Additionally, you can create users and assign them different roles, such as Administrator, Store Manager, or Cashier, depending on their responsibilities within the organization.
2. The User menu
The user menu is located in the upper right corner of the display and provides functions directly related to the registered user. It allows access to relevant account information and includes options such as starting Support Mode or securely logging out of the Management Console. Support Mode temporarily grants the RETAIL7 team access to the console, enabling swift assistance in case of issues. An active internet connection is required for this function.
Some functions of the user menu are also accessible via Menu -> Access rights.
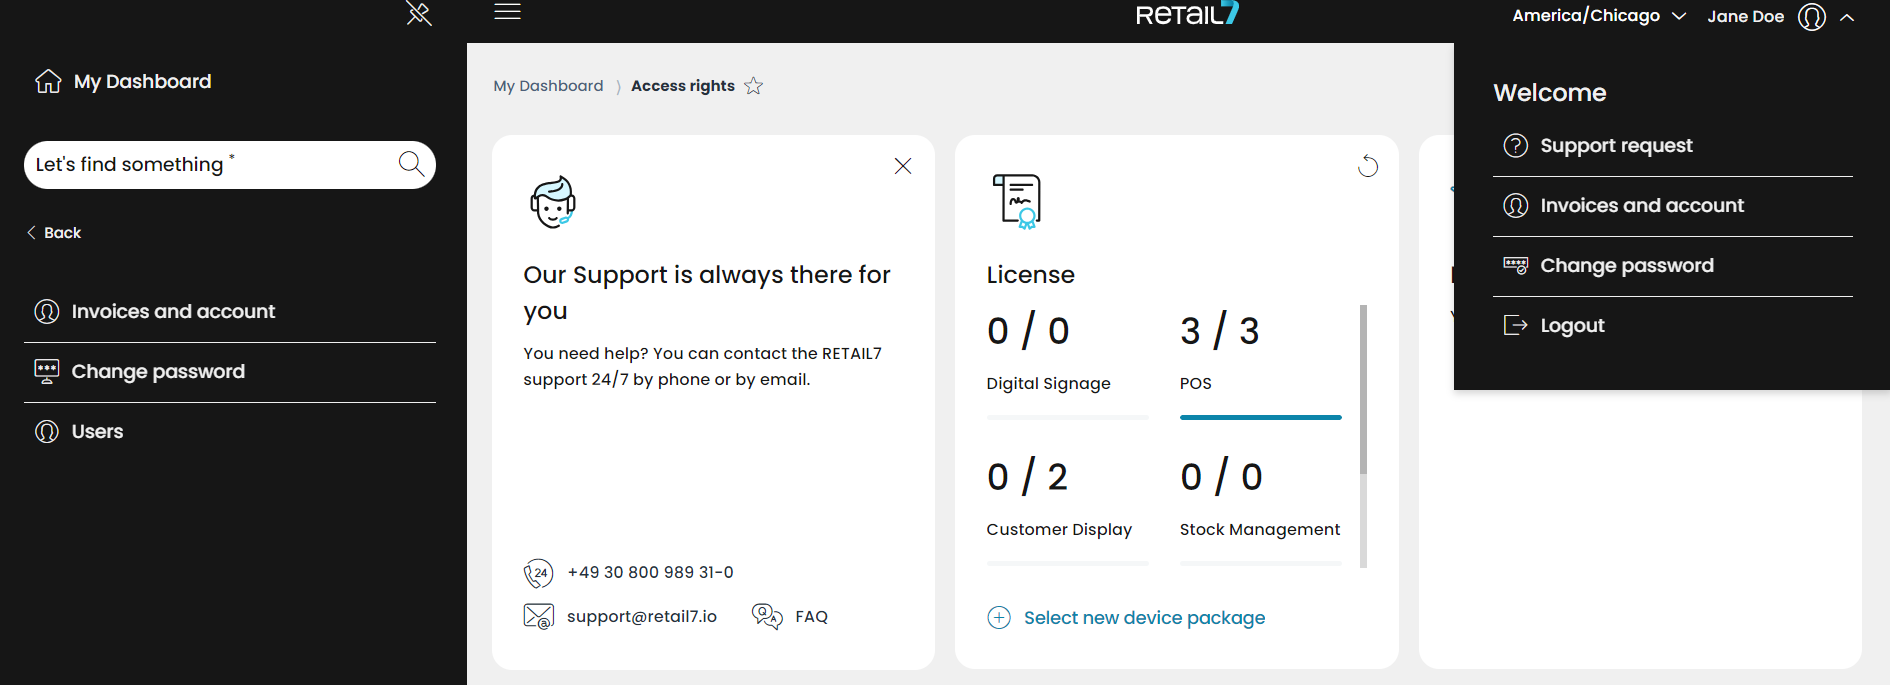
The user menu offers the following functionalities:
Support request
If you encounter any issues while using or working with our software, RETAIL7 provides a well-organized support system. You can request assistance, send error descriptions, and even receive remote support from our team to resolve your concerns effectively.
Invoices and account (payment data, invoice data, contracts with RETAIL7, licenses).
All invoice-relevant data related to the RETAIL7 POS software can be found here. Please note that the RETAIL7 system can only be used after entering the payment data. Upon registration, you will receive a license, allowing you to use the RETAIL7 app on one device. Additional licenses can be purchased via the Management Console to operate a customer display and/or another cash register on another device. This menu is also accessible via the Menu -> Access Rights.
Change password
In case your password has been compromised, it is an important safety measure to change it as soon as possible. You can easily access this function from here (and from Menu -> Access Rights).
Logout
Logging out of the Management Console is essential to prevent unauthorized access to your data. It is not advisable to simply close the browser window without logging out first, as this may leave you still logged in. Additionally, it is strongly recommended that you never write down or share your password with anyone.
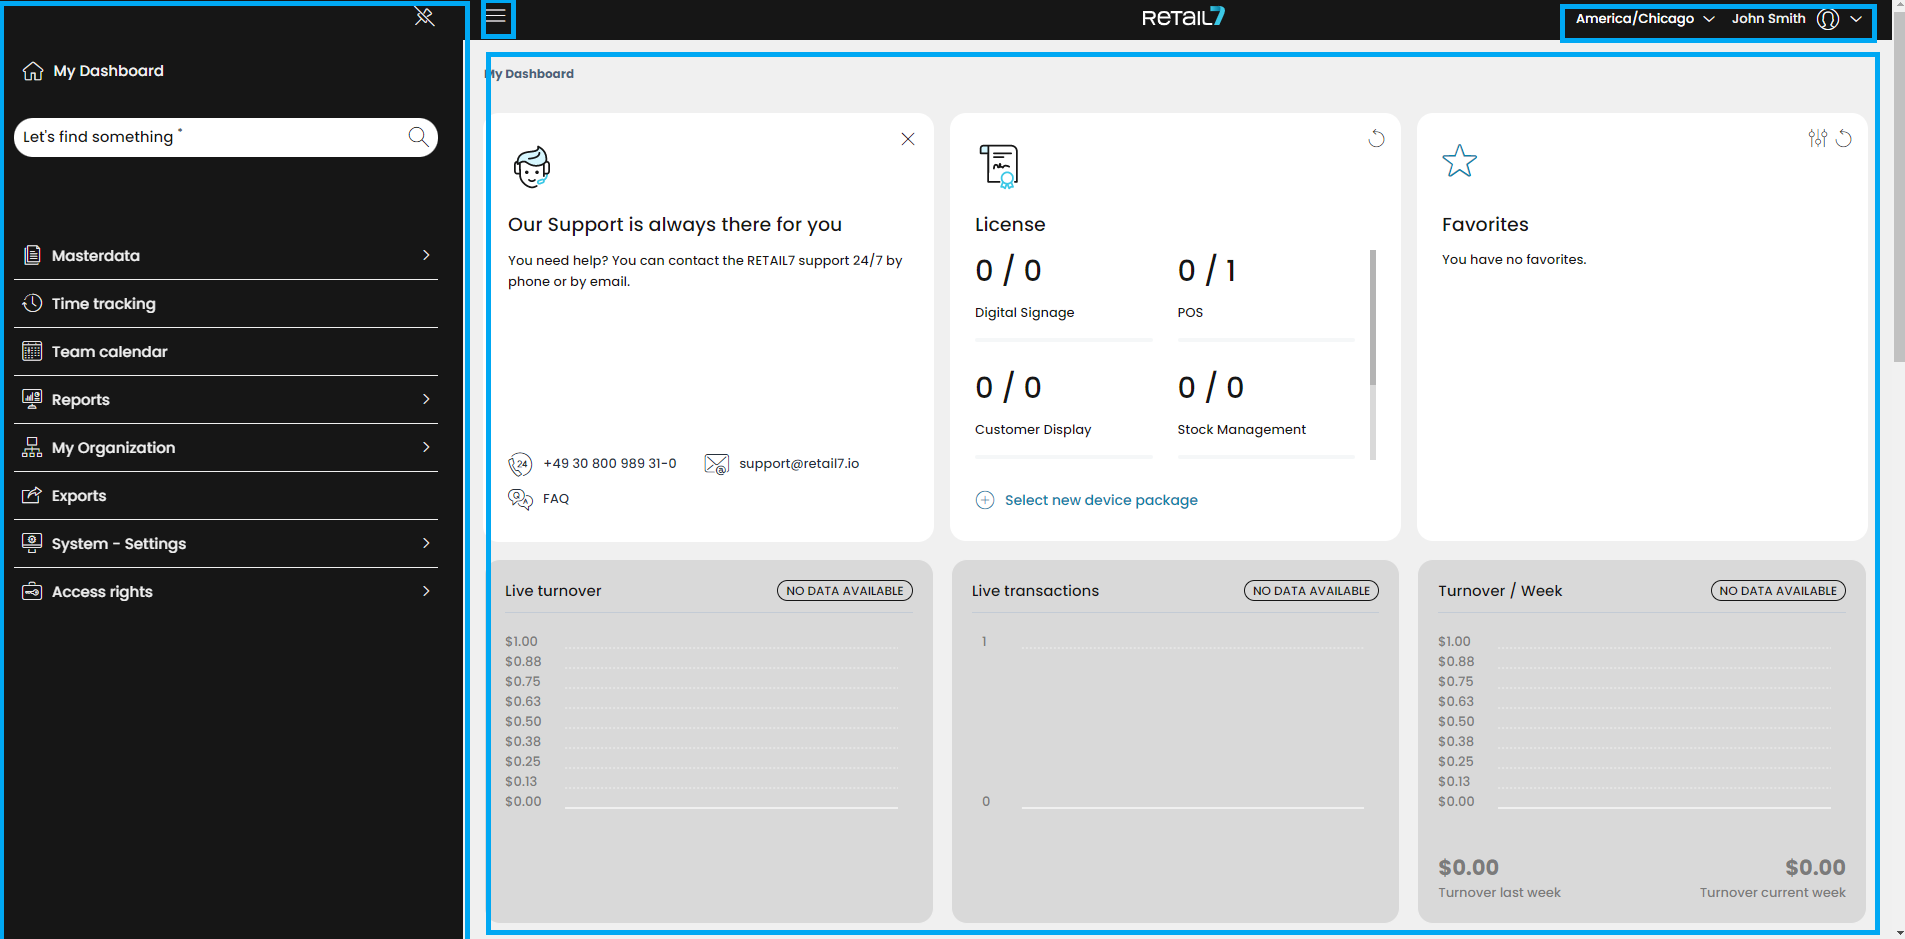
3. The Dashboard
The Dashboard area is located in the center of the Management Console. After logging in, it provides an overview of the most important reports created by the RETAIL7 system. Initially, the reports are empty because no transactions have been recorded yet, as no cash register is connected to the console. However, once you begin processing transactions at the cash register, the reports are automatically generated and displayed on the Dashboard.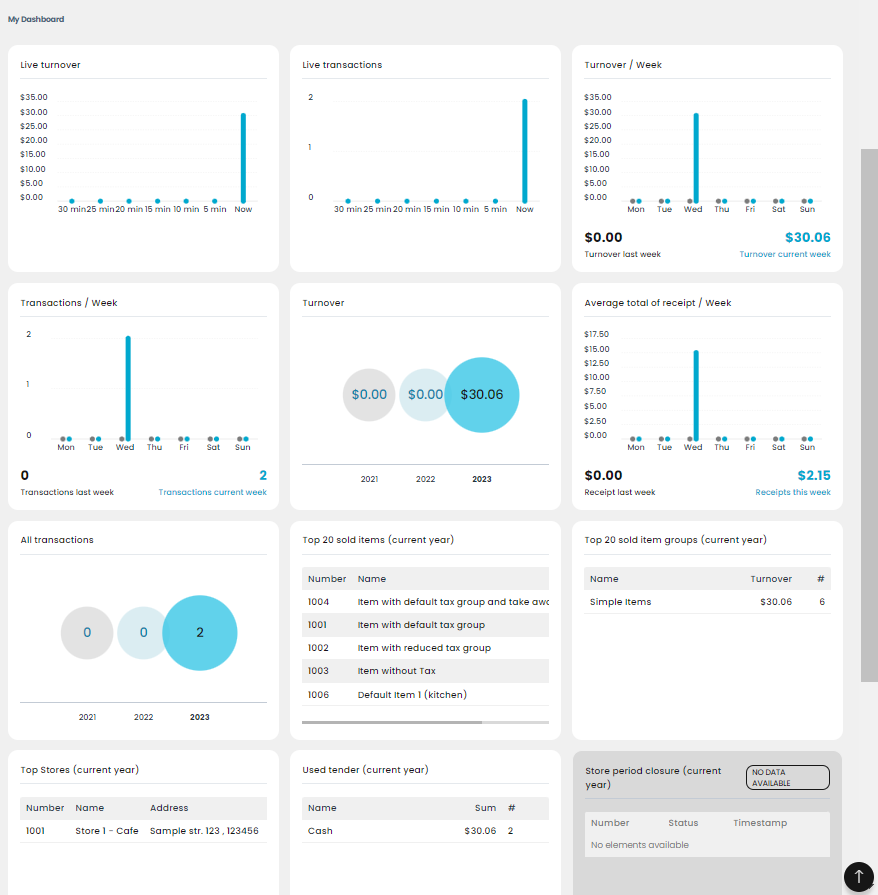
NOTE: The reports displayed on the Dashboard are just a subset of all the report and journal types available in the RETAIL7 system Management Console. For more detailed information and additional reporting options, please refer to the Reports section.
The following reports are available on the Dashboard:
Live turnover
The Live Turnover overview displays the turnover generated in the last 30 minutes in real time. As time progresses, the turnover is updated and older entries are pushed down the list, disappearing after 30 minutes. This overview shows the total turnover from all tills connected to the Management Console. If you purchase an additional license, you can configure another terminal via the same console, and it will also be included in the turnover calculations.
Live transactions
The Live Transactions overview shows the completed transactions for the last 30 minutes in real time. As time progresses, older transactions are pushed down the list and will no longer be displayed after 30 minutes. This overview includes the total completed transactions from all tills connected to the Management Console. If you purchase an additional license, you can configure another terminal through the same console, and its transactions will also be displayed in this overview.
Turnover per Week
The turnover per week overview shows the total turnover of the last two weeks in real time. Once the period expires, the turnover data is no longer visible.
The display is visually differentiated, with the turnover of the last week and the turnover of the current week shown in different colours. This overview includes the turnover from all tills connected to the Management Console. By purchasing an additional license, you can configure another terminal via the same console, and its turnover will also be displayed in this overview.Transactions per Week
The overview of transactions per week shows the executed transactions of the last two weeks in real time. Once the period expires, the transactions are no longer visible.
The display is visually differentiated, with the transactions of the last week and the transactions of the current week shown in different colours. This overview includes the transactions from all tills connected to the Management Console. By purchasing an additional license, you can configure another terminal via the same console, and its transactions will also be displayed in this overview.
Turnover (of the current and past years)
The overview of the turnover of the current and past years displays the total turnover for previous years in real time, presented in a circular diagram. Once the period has expired, the turnover data is no longer visible. This allows for a quick, visual comparison of turnover trends over the years, making it easier to analyze and assess business performance.
Average total of receipt per Week
The average receipt overview displays the average total of the generated receipts for both the past and current week in real time. Once the period has expired, the data is no longer visible. This average total includes receipts from all tills connected to the Management Console, providing a clear overview of the average receipt value across all transactions.
All transactions (of the current and past years)
The overview of the number of transactions displays the total number of transactions carried out in the last and current year. Once the period has expired, the data is no longer visible. This overview aggregates transactions from all stores connected to the Management Console, offering a comprehensive summary of all completed transactions during the specified periods.
Top 20 sold items (current year)
The overview of the Top 20 sold items highlights the articles that have been most frequently registered with the RETAIL7 POS software during the current year. This provides a clear view of the best-selling items, allowing you to track trends and make informed decisions based on your sales data.
Top 20 item groups (current year)
The overview of the Top 20 item groups shows which article groups have been most frequently processed through the RETAIL7 POS software during the current year. This data covers all branches connected to the Management Console. The report also includes insights into which specific items within those groups are the most popular. By purchasing an additional license, it is possible to configure another terminal within the same console, allowing you to track data across multiple devices.
Top Stores (current year)
The Top Stores overview displays the revenue of the best-performing stores in the current year, up to the current day. This overview is based on all transactions across the stores that are connected to the Management Console. It helps to quickly identify which stores are generating the highest revenue and allows for easy comparison of performance across different locations.
Used tenders (current year)
The overview of tenders used displays the payment methods utilized in the current year. It provides information on the number of transactions and the total amount settled for each payment method. This overview includes all transactions from all stores connected to the Management Console. By purchasing an additional license, you can configure another terminal within the same console to extend your payment method management.
Store period closure (current year)
The Store period closure overview displays the results of the End of Day closings, both successful and unsuccessful, for the current year, along with the exact timestamps of each closure. This overview includes all store closures across the stores connected to the Management Console.
Turnover yesterday per today
The Turnover yesterday per today overview compares the total amount of sales from the previous day to the current day. This overview includes all transactions from all stores connected to the Management Console.
Turnover per Month
The Turnover per Month overview compares the total sales of the current month with the previous month. This overview includes all transactions from all stores connected to the Management Console.
Additional functions on the Dashboard
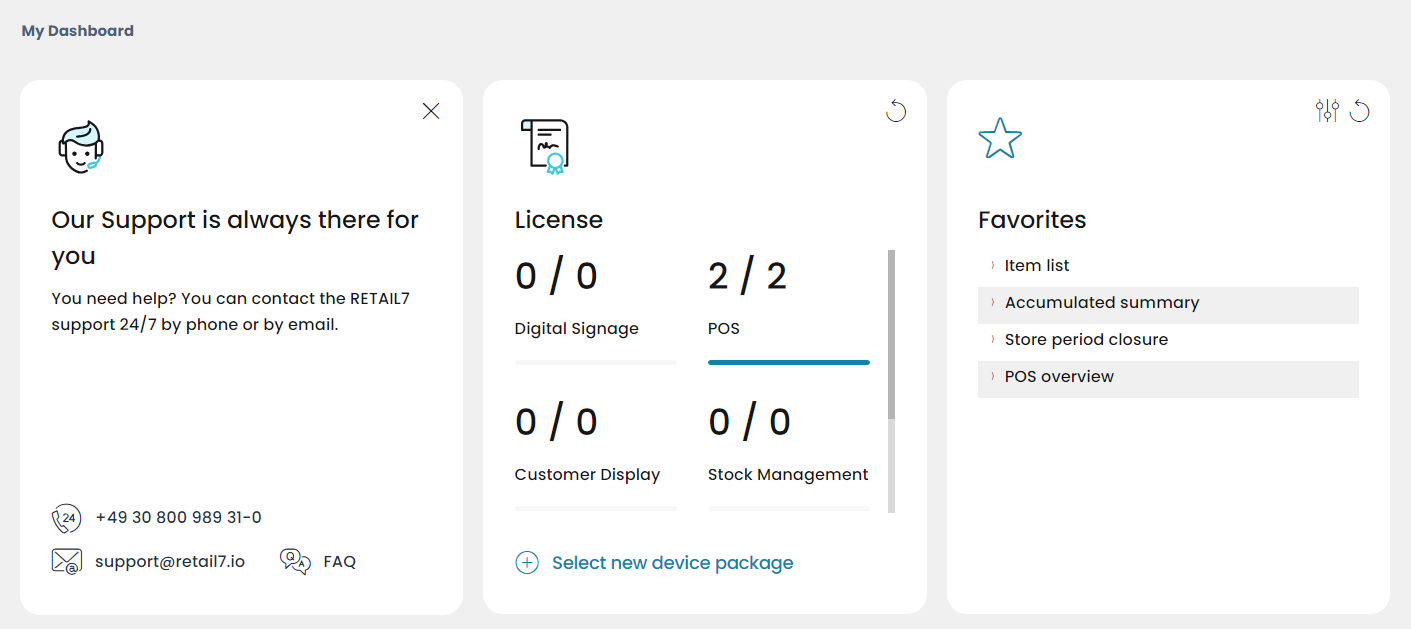
All the contact options of our support team
When needed, you can quickly access all relevant contact details from a tile, which also includes a link to our Frequently Asked Questions section. If you prefer to free up space, simply remove the tile by clicking the X in the upper right corner of the tile.
Licenses
After adding payment data in the Management Console, a POS license is issued for one device. If you want to use the RETAIL7 POS software on additional devices, such as another POS app or a customer display, you can purchase extra licenses. Simply click on the "Select new device package" link and choose from the available options!
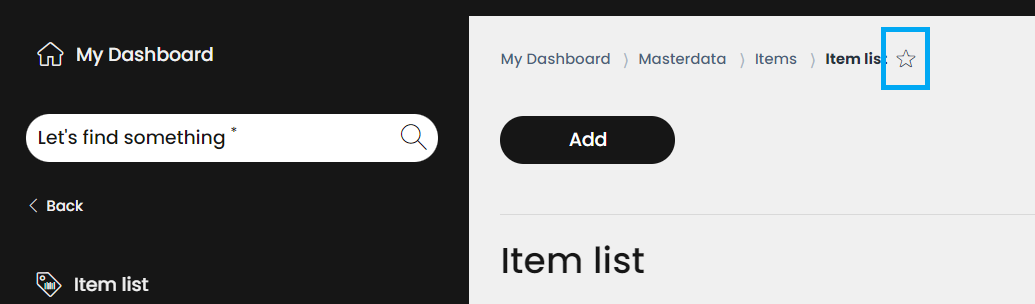
Favorites
If you have one or more menus and submenus that you use frequently and are tired of navigating through several menu items each time, you can easily add them to your dashboard as favorites. To do this, go to the desired menu and open the menu item you wish to add. At the top of the working area, you will see the path to this menu item, with a star icon at the end. By clicking on the star, this path will be added to your Favorites tile as a direct link, making it quicker and easier to access in the future.
How to download data and documents from the RETAIL7 system
Several types of data, such as reports, item lists, and more, can be manually downloaded from the RETAIL7 system via the Management Console. For security reasons, the data is not directly downloaded, but an email containing the requested attachment will be sent to the email address you registered with the system.
To download data from the RETAIL7 Management Console, click on the download button located at the header of the respective report or item list. In the next step, you can choose from various file formats, such as CSV, XLSX, PDF, or JSON, depending on the document type.
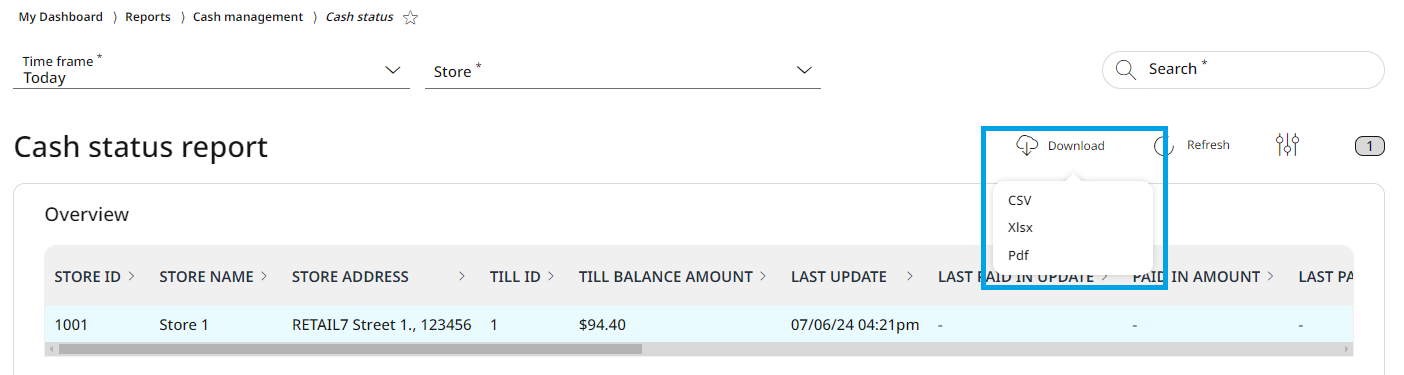
After you select the appropriate file format, the document will be sent as an attachment to the email address you registered with.
If the email does not arrive within a reasonable amount of time, please check your spam folder. Depending on your email provider, there are settings you can adjust to prevent our emails from landing in the spam folder. We've compiled the most important links for different platforms, or we provide step-by-step instructions on how to turn off this feature.
Google Mail:
With Gmail it is possible to easily add us to the whitelist.
In the mailbox, go to the gear icon in the upper right corner.
Open the settings there.
Go to the Filters and Blocked Addresses tab and press Create new filter.
Then enter our address [email protected] in the From field.
At the bottom press on Create filter with these search criteria.
Never dial to classify as spam.
Save the filter.
From then on our emails can be received regularly in the correct place of your inbox.
GMX Mail:
In the mailbox at the very bottom left click Settings.
There you will find the Whitelist function, which must be selected.
In the field that opens, enter our address [email protected].
Then just save the new setting and all emails from us will end up in the General Inbox.
Yahoo Mail:
NOTE: In order to whitelist our email address at Yahoo, an email from us is required first. There may already be a mail from us in the spam folder after the installation. This comes from the following e-mail address: [email protected].
Open the mail and click More in the bar of the email header.
Then select Filter mail there.
Give the filter an appropriate name.
Then enter our e-mail address under Sender.
Then select the inbox under Move Message and save the filter.
From now on, all our future emails should end up correctly in the inbox folder.
Web.de:
In the mailbox, go to Settings.
Under the Folder section, click on the Filter Rules function.
Next, select Move sender's email and write our email address [email protected] in the If field.
In the Then field, select the appropriate folder where our mail should end up in the future.
With one click on Set up filter rule save the filter and our mails will not end up in the spam folder anymore.
Apple Support:
In the mailbox, under Mail in the main menu, select Settings.
After that a window opens. In this window, under the Rules tab, select the Add rule function.
Then in the next field enter a name for the rule.
Upon fulfillment (...) of the following conditions then select all.
Then select From and Contains.
Then press in the field next to Contains and enter the e-mail address [email protected] there.
In the bottom line select Move message and select inbox.
Then save the settings with the OK button.
Outlook:
NOTE: In Outlook, a mail from us is needed first, which may already be in the spam folder. For example, our welcome mail after setting up your RETAIL7 system, which is sent from [email protected].
Open the mail. For the 2007 version, then click on Safe Address Lists in the email header.
Select Add the sender's domain to the Safe Senders List.
If the Outlook version is from 2010/2013 or later, just click on the Junk email folder and select Never block sender there. Our mails no longer end up in the spam folder.