8.2.9 Cashdrawers
With RETAIL7 system, cash drawers are connected via the printer. To enable this, you must use a printer that is either supported by our software or equipped with EPSON Print technology. Additionally, the printer must have a compatible connection for the specific cashdrawer.
Cashdrawers are configured during the installation of the POS application on a device. Within the installation steps, there is a dedicated section where cashdrawers can be added and configured. When the installation is finished on the device, you can customize further the cashdrawer's settings via the Management Console under My Organization → Units → Cashdrawers.
Once the setup is complete, the cashdrawer connects automatically to the system server through the printer of the assigned device. The cashdrawer will then appear in two locations within the Management Console:
My Organization → Units → Devices.
My Organization → Units → Cashdrawers.
From these sections, the cashdrawer can be edited or deleted.
Functions on the overview

Import data or own configuration
Download data or configuration to your own system
Update the list view
Activate/deactivate table fields
Number of list items
Search
Information about the cashdrawers
Adding cashdrawers
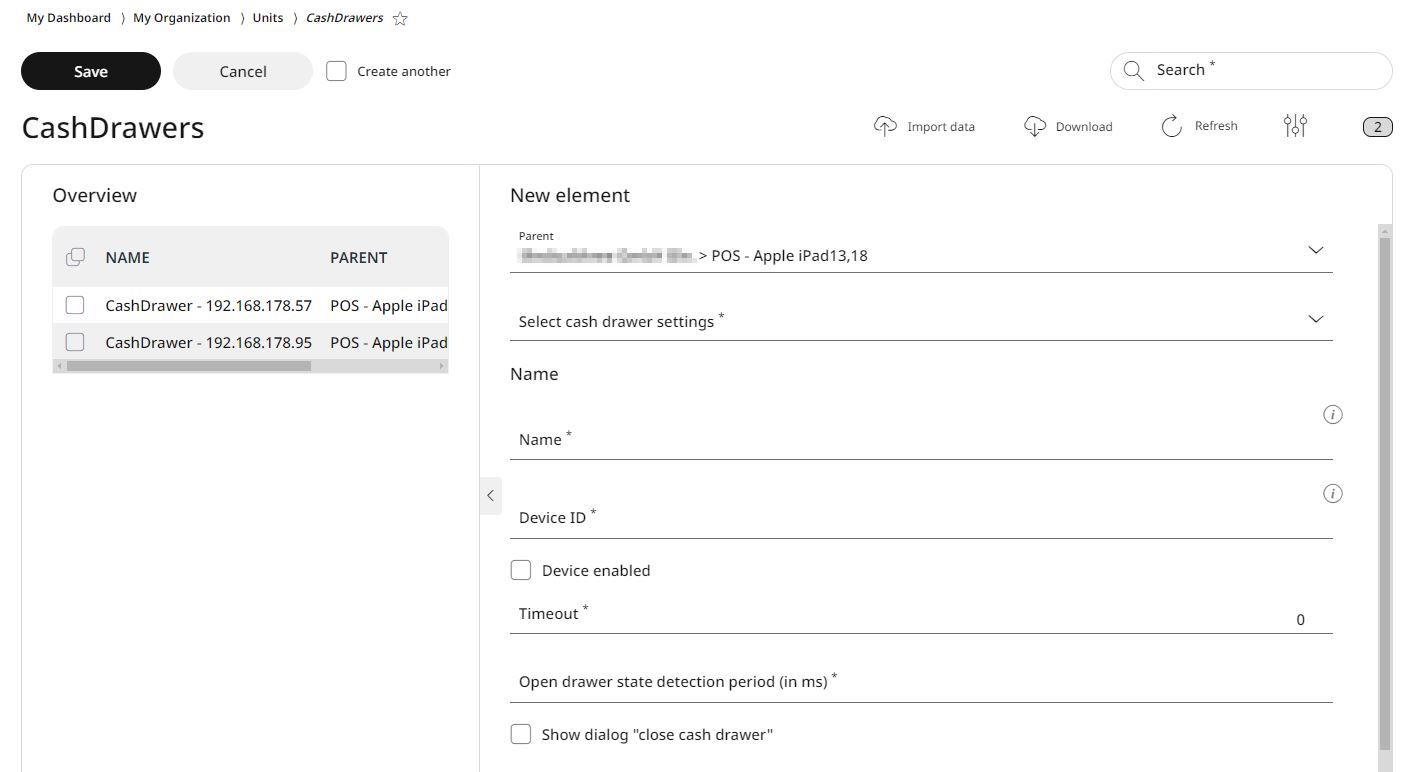
For adding a new cashdrawer, go to menu → My organization → Organizational units → Cashdrawers and click Add.

Specify the parent element for the cashdrawer.
With the help of the assignment of the levels, the drawers are displayed systematically in the tree structure. Settings can be assigned to individual levels via the tree structure. These also apply to the associated sublevels.
Select the drawer type from the rolldown menu.
Enter a name for the drawer.
With the help of the name, the drawers can be filtered out via the search function. The name should be unique to avoid confusion.
After the drawer type is selected, a corresponding submenu for the printer is displayed. Enter all the necessary information here.
Enter a device ID. This ID is assigned to the device only once, ensuring its unique identification within your system. No other device in your system will have the same ID.
Enable the cashdrawer for use by checking the activation box. If the box is left unchecked, the drawer remains inactive and cannot be used.
Set a timeout duration for the drawer. After this period of inactivity, the drawer switches to a timeout state and becomes inactive. The drawer will only reactivate when it is used again..
Define the open drawer detection period (in milliseconds) to ensure the timely detection of an open drawer. This helps ensure the drawer is promptly closed, reducing the risk of unauthorised access or theft.
Check the box if you want to display a notification prompting the user to close the drawer.
Select Save.
Editing and deleting cashdrawers
With RETAIL7, all saved drawers can be edited or deleted to keep the system up to date. This ensures the system stays up to date by removing unnecessary drawers. Remember to save after editing to retain changes.
To edit a cashdrawer:
Select the desired drawer from the list.
Click Edit.
Make the necessary changes.
Click Save to confirm the updates.
To delete a cashdrawer:
Select the desired drawer from the list.
Click Delete.
In the confirmation dialog box click Yes to delete the drawer, or click No to cancel the deletion process.