7.4.1 Cash register
In this area, all necessary settings can be made that are related to the end device for the retail7POS system. Pay particular attention here, as the cash register can also be used by other users who have been defined via the retail7 roles/rights system. However, only users have access to the POS system if they know the access data. For security reasons, these should not be written down.
7.4.1.1 Item menu
Item menus contain several items stored in the system. For a systematic overview, items are created in the system and then assigned to a higher-level menu. This structure corresponds to a tree structure. Thus, the system level is at the top. All other levels are below it. This can be configured as desired, as we explain in the section My Organization.
 1 Search function
Enter the desired search term in the search.
Click on the magnifying glass.
Wait for the result and select a desired setting.
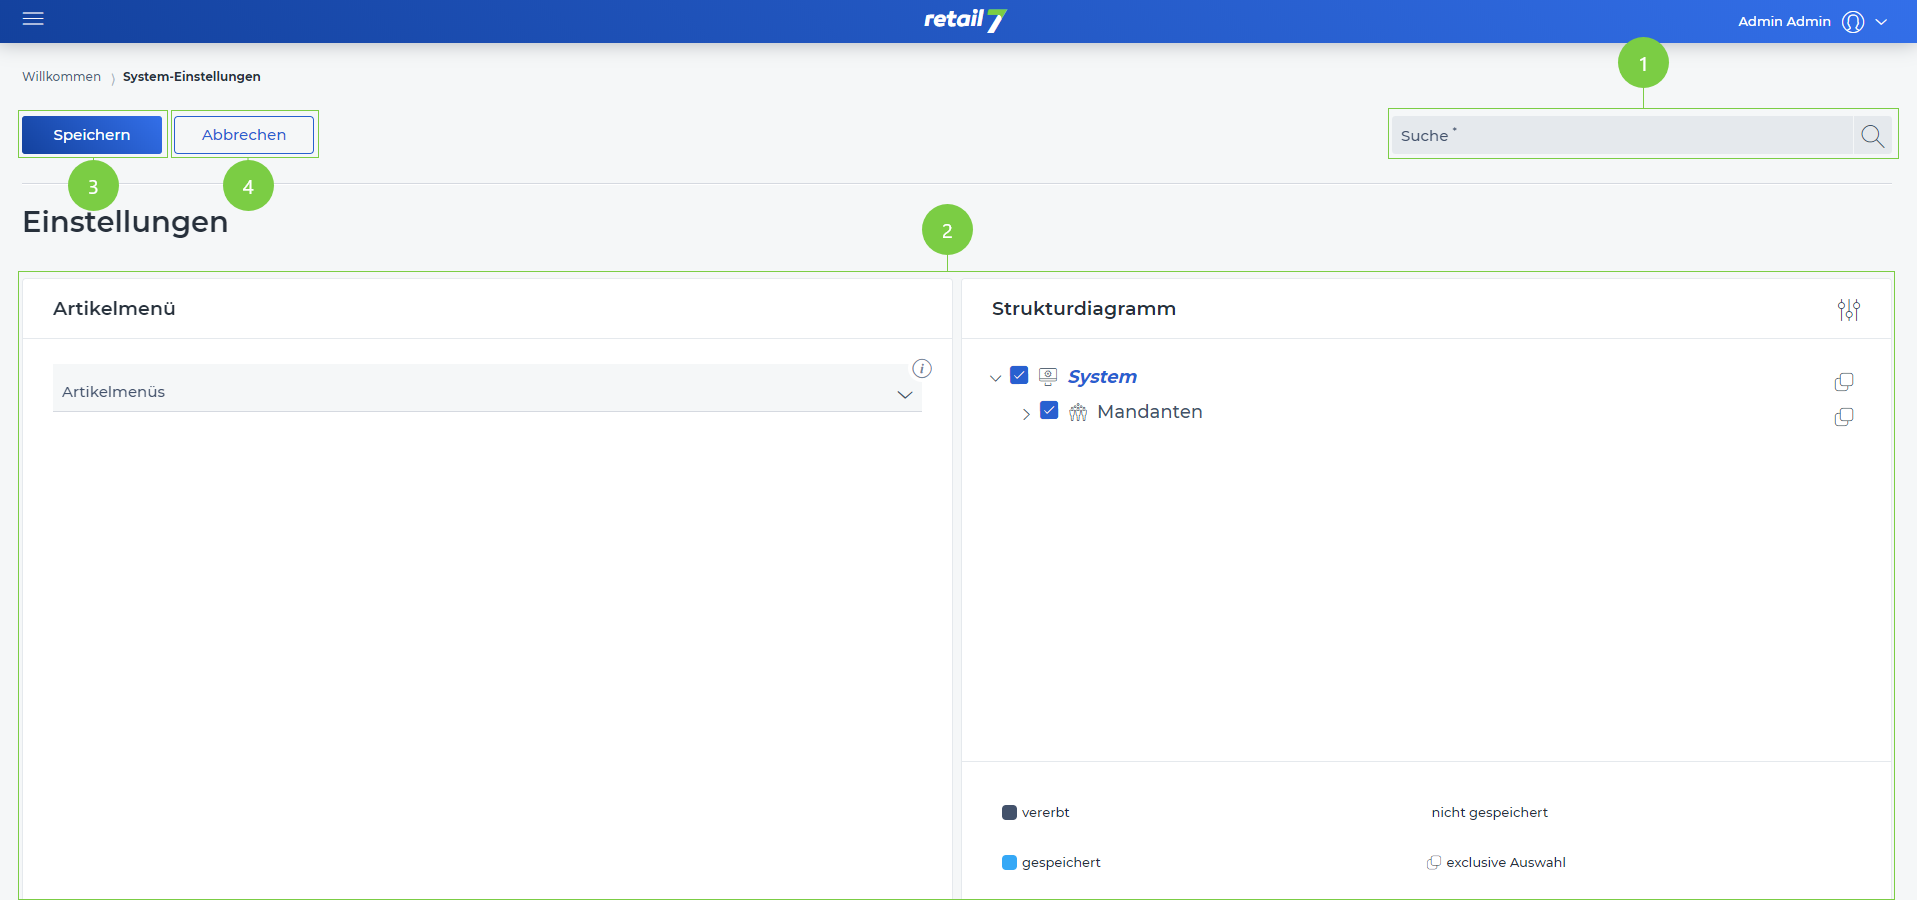
2 Editing window
3 Save entries
4 Close editing window
7.4.1.1.1 Add item menu
In retail7, items can be assigned to an item menu. This function serves to provide a structured overview of the items required. In addition, new item menus can be created at any time. The structure diagram is displayed on the right-hand side. This consists of all levels that have been defined under My Organization. In addition, the store with all sublevels is automatically inserted after the retail7 app has been set up.
 ATTENTION: In the structure diagram the top level (system) is automatically selected, thus the item menu applies to all elements of the structure.
For example, if Store 1 is selected, the item menu will apply only to that store and not to the entire system.
Open the menu → System settings.
Click on the Items menu under the Cash register menu.
Open the item menu.
4. Select the desired item menus.
Several item menus can be stored at this point. Article menus can be configured under Menu → Master data → Item menu.
5. Click Save.
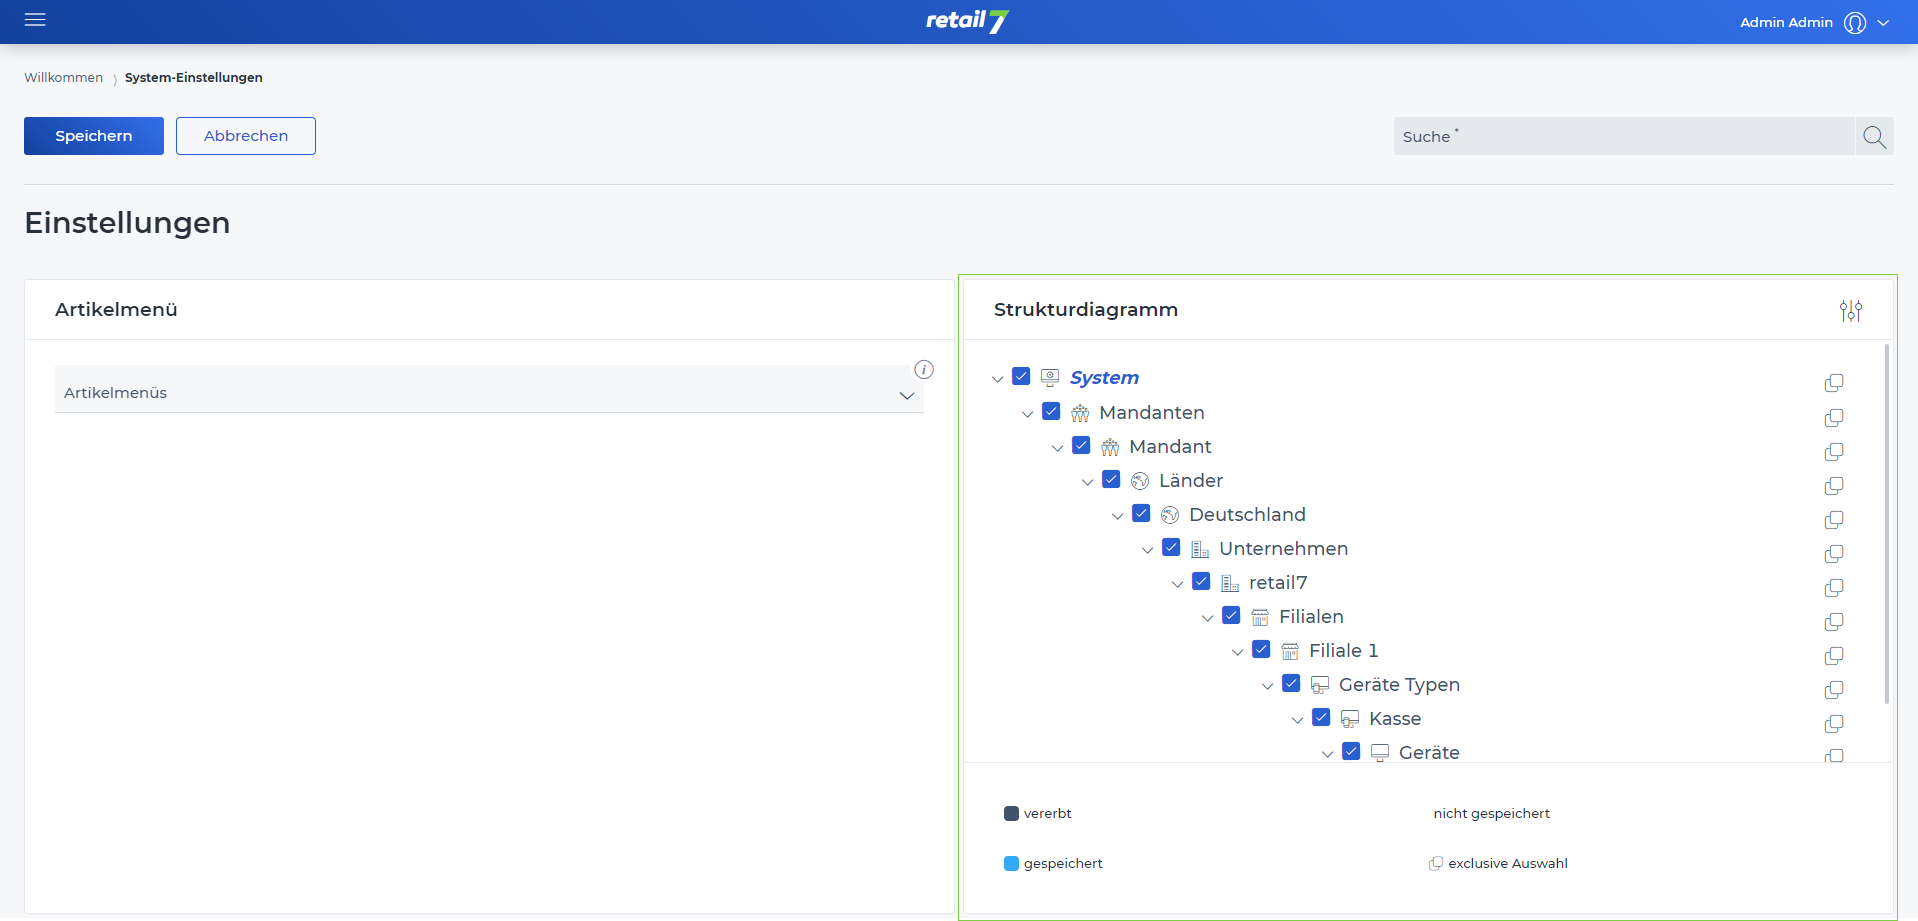
7.4.1.1.2 Assign item menu structure diagram
The retail7 POS software is based on a tree structure, so that a quick and clear navigation in the system is possible. Therefore, the structure can be created and configured as desired under My organization. This structure is displayed for all further setting menus. Here you assign the function to the individual levels, which then also applies to all sublevels.
Open the menu → System settings.
Click on the Items menu under the Cash register menu.
Open the structure diagram.
All created organizational units can be seen here. These can be configured under Menu → My Organization.
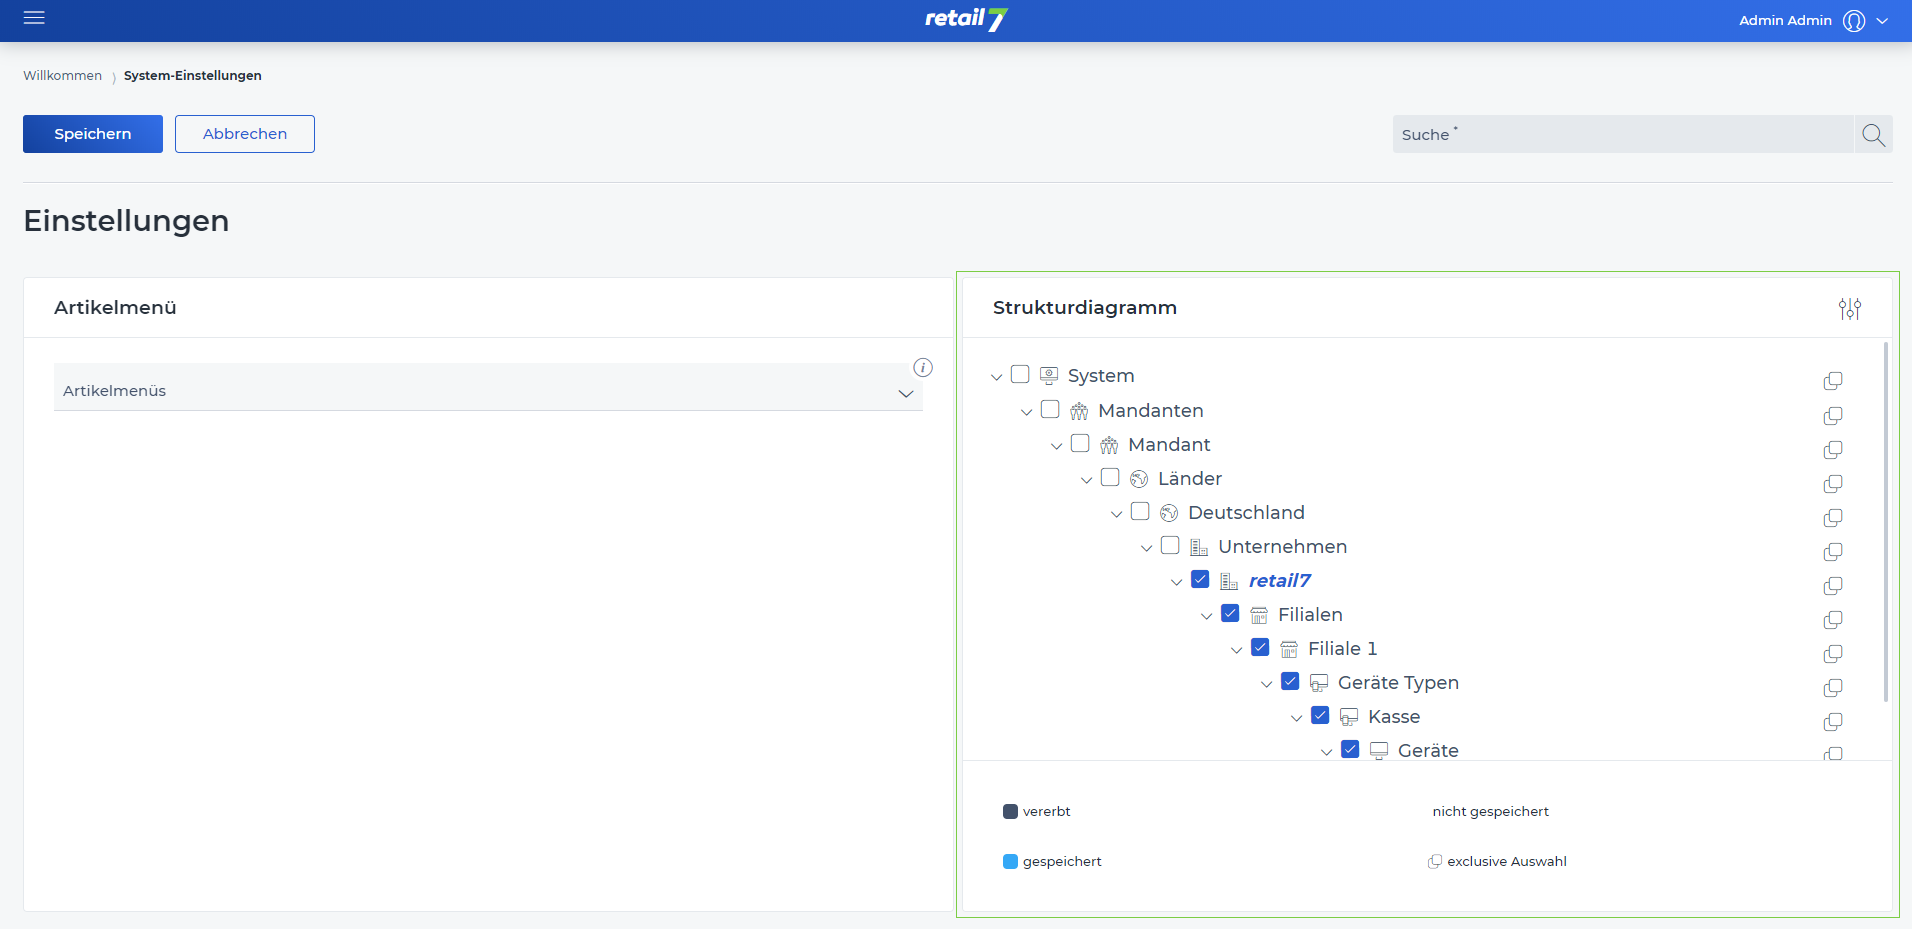
4. Select the level to which the item menus are to be assigned.
All sub-levels are automatically selected and thus the item menu is assigned here as well. On the screenshot, only the retail7 company receives the settings, i.e. all other companies in Germany retain their originally defined system settings.
5. Open the item menu.
6. Select the desired item menus.
Several item menus can be stored at this point. Item menus can be configured in Menu → Master data → Item menu.
7. Click on Save.
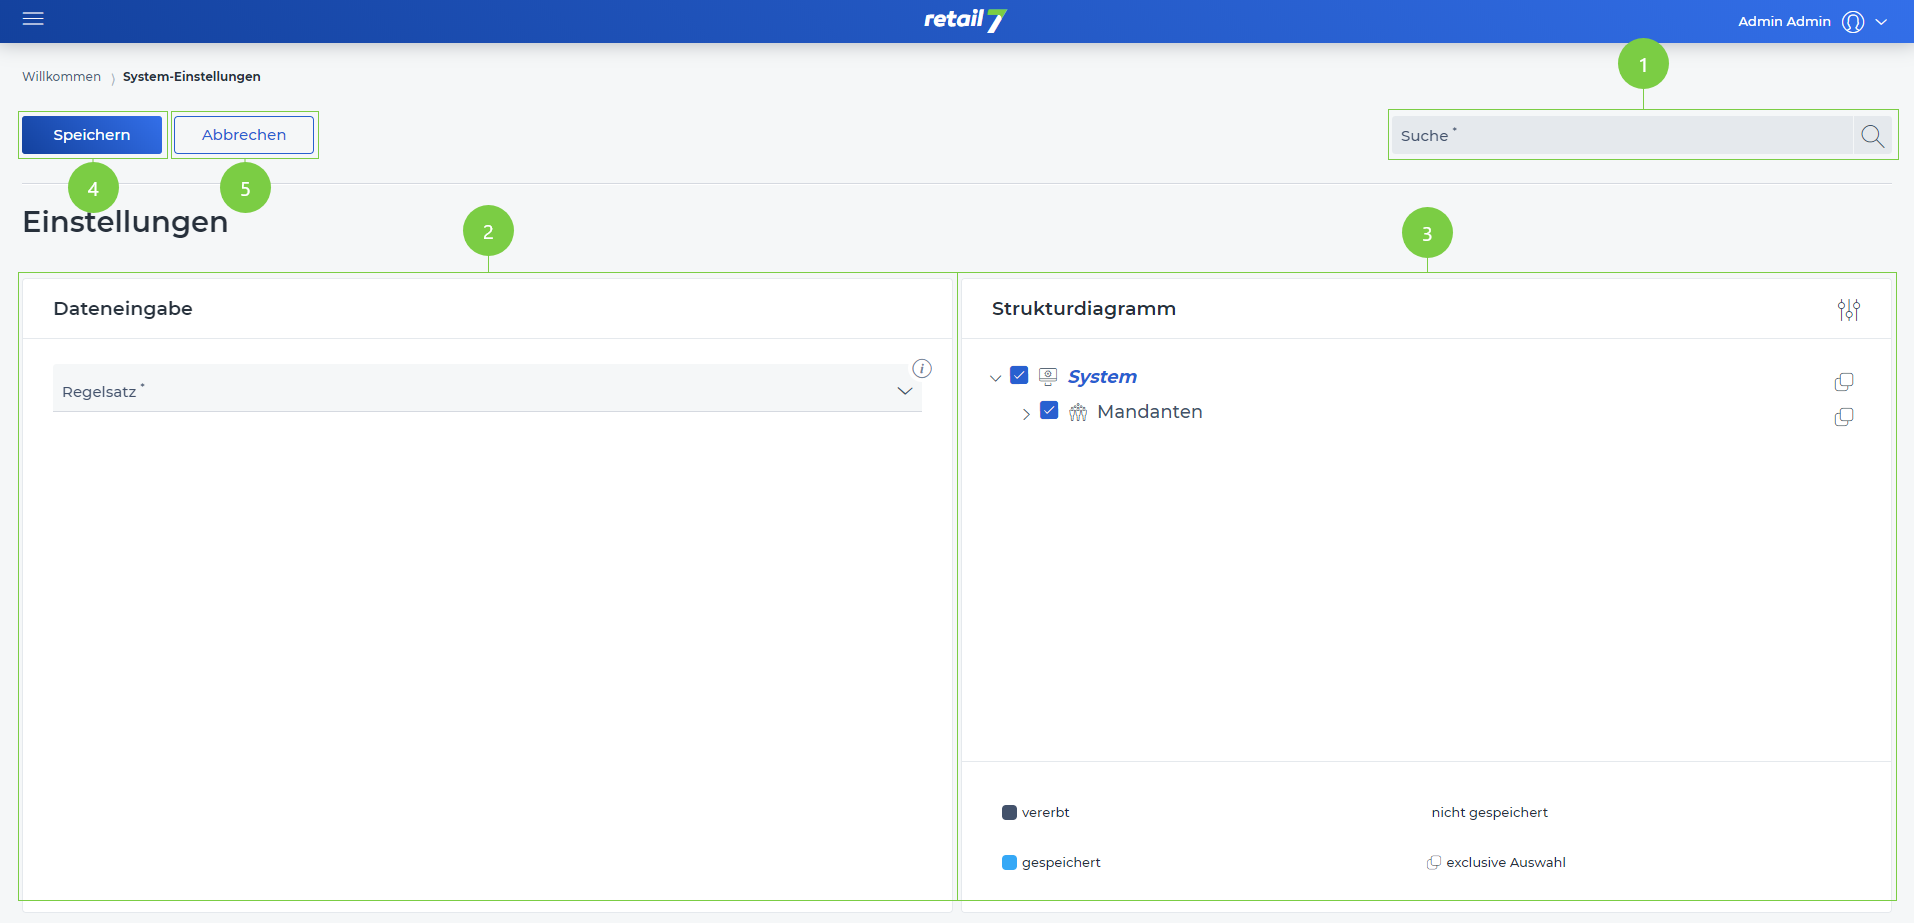
7.4.1.2 Data entry
Data can be entered into the system via scanners, for example. To do this, a barcode is scanned from an item and then the data is processed in the system or displayed on the checkout interface of the end device. In addition, information can be transferred to the POS system via the retail7 app interface.
 1 Search function
Enter the desired search term in the search.
Click on the magnifying glass.
Wait for the result and select a desired setting.
2 Editing window
3 Structure diagram
4 Save entries
5 Close editing window
7.4.1.2.1 Add data entry
This function can be used to specify which rules are applied to the data entry. It is also possible to select which data entry applies to which system level. Thus, it is possible that an entry is possible in store 1, but not in store 2. With retail7, new data entries can be added at any time.

ATTENTION: In the structure diagram, the top level (system) is automatically selected, thus the data input applies to all elements of the structure.
It is also possible to select another layer, in which case the setting will apply to that layer and all sublayers.
Open the menu → System settings.
Click Data entry under the Cash register menu.
Select the desired rule set.
Configure the data input under Menu → System Setting → Keyboard/Scanner Entry.
4. Click Save.
7.4.1.2.2 Data entry assign structure chart
Based on the tree structure, settings can be assigned to the individual levels. These then apply to the selected level as well as the associated sublevels. The structure can be created under My organization.
Open the menu → System settings.
Click Data Entry under the Cash Register menu.
Open the structure diagram.
All created organizational units can be seen here. These can be configured under Menu → My Organization. With retail7, the system can be structured as desired.
3. Select the level to which the data entry is to be assigned.
All sublevels are automatically selected and the data entry is assigned here as well.
4. Select the desired rule set.
This rule set applies to data input from scanners, for example.
5. Select the desired data entry.
The data entry can be configured under Menu → System setting→ Keyboard/Scanner entry. The entry can be made, for example, via a keyboard or the scanner. This way, the cash register receives the information it needs to process the data.
6. Click on Save.
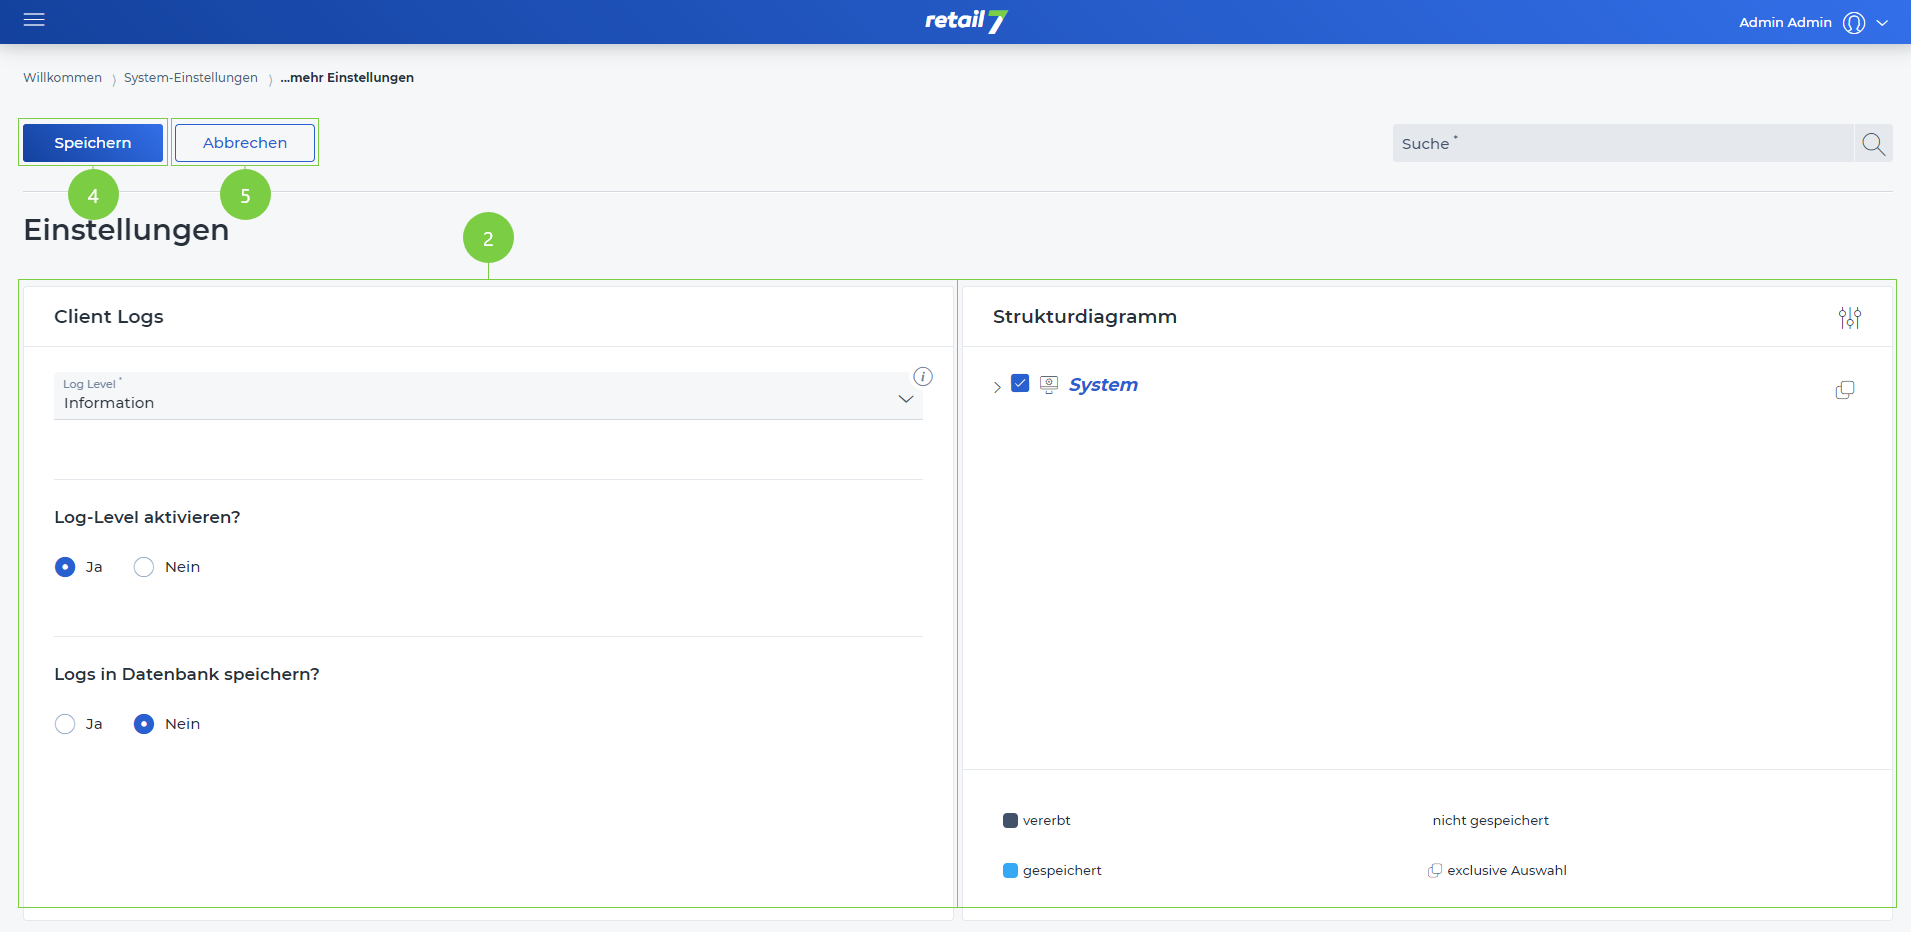
7.4.1.3 Client Logs
Logs are messages displayed to the user when the system registers errors, warnings or other information. The messages are displayed for the user for a certain period of time. Afterwards, they are stored in the system so that it is always possible to trace which logs have been registered.
 1 Search function
Enter the desired search term in the search.
Click on the magnifying glass.
Wait for the result and select a desired setting.
2 Editing window
3 Save entries
4 Close editing window
7.4.1.3.1 Add client logs
Here you can define which logs are to be displayed for which level. It can be defined here, for example, whether information is only displayed for the branch. It is also possible to activate errors or warnings for one company but not for the other.
 ATTENTION: In the structure diagram the top level (system) is automatically selected, thus the client logs apply to all elements of the structure.
At this point it is possible to assign the log setting to another layer. In this case, the setting also applies to all associated sublevels.
Open the menu → System Settings.
Click Client Logs in the Cash register menu.
Select the desired log level.
retail7 offers different levels of logs, where it is possible to select what kind of display should be shown in the system. For example, it is possible to specify whether only information is displayed in store 1, but warnings are also visible in store 2.
4. enable the Log Level.
Click No to not activate the Log Level. In this case, this type will not be displayed.
5. enable the logs storage in the database.
Click No to not store the logs in the database. In this way, the logs will be displayed, but they will not be saved in the database. Thus, there is no possibility to read them again at a later time.
6. Select Save.
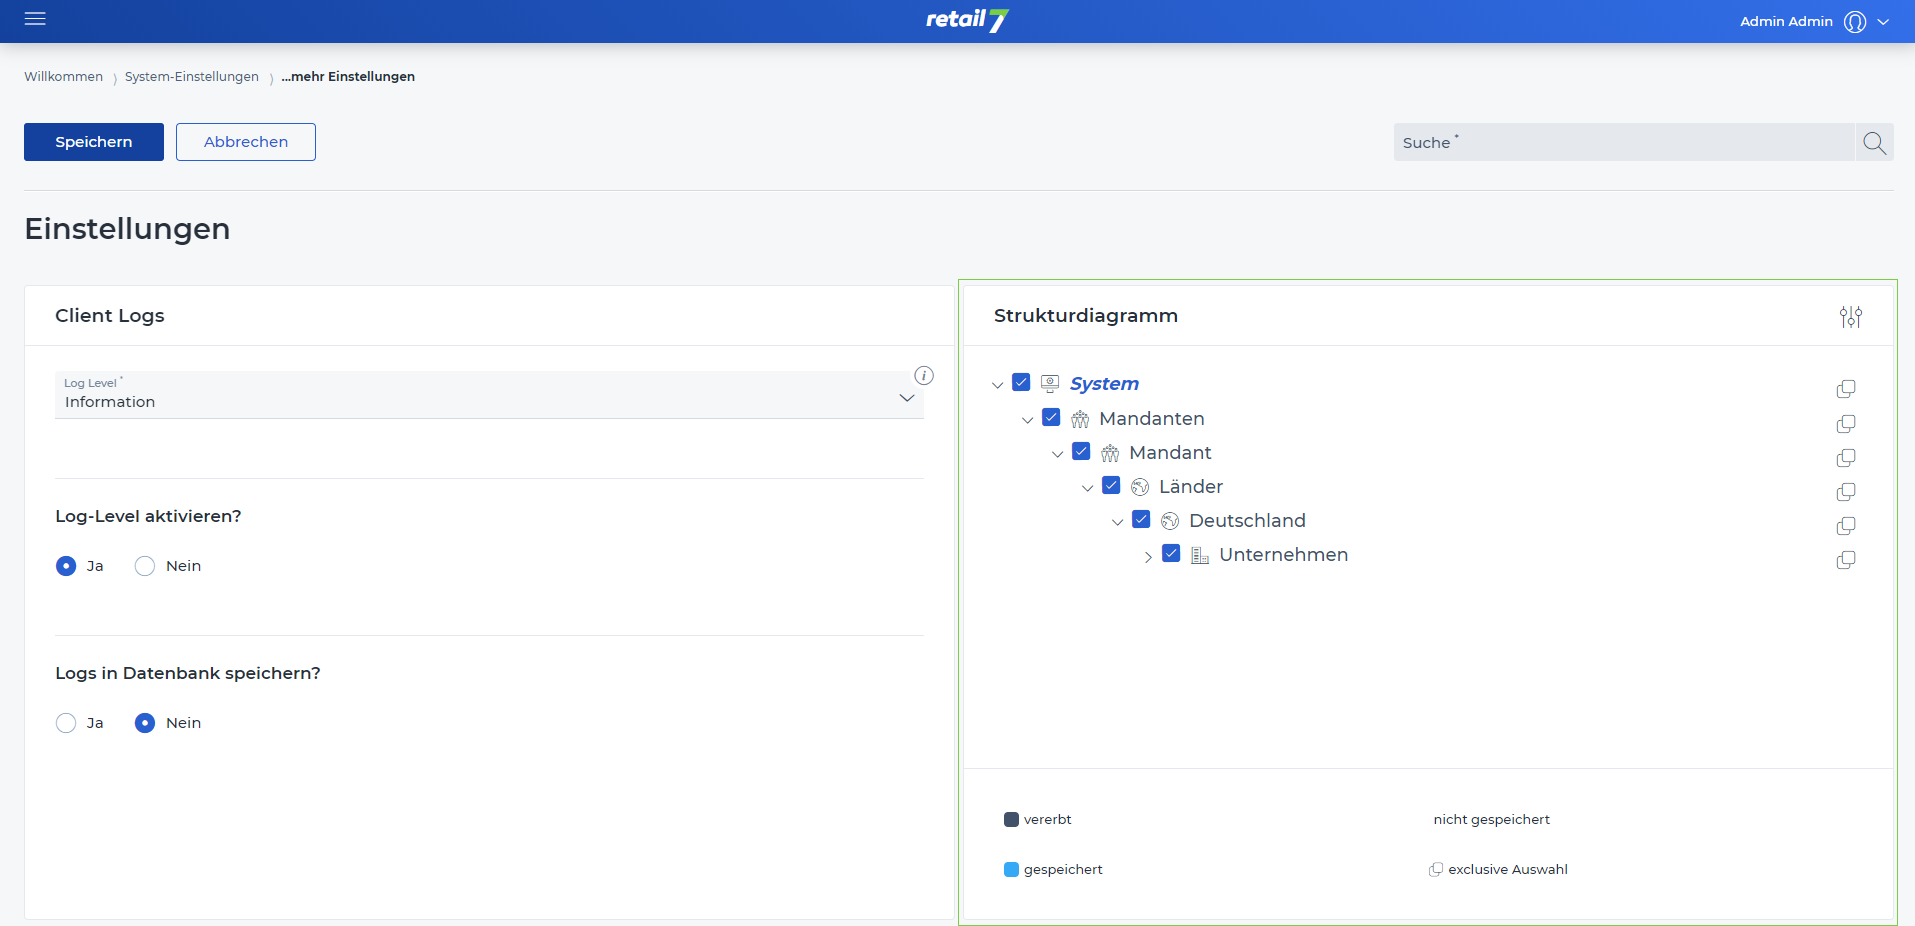
7.4.1.3.2 Assign Client Logs Structure Diagram
In retail7, a structure can be created as desired under My organization. Here you can select the levels for which the settings apply. In addition, the sub-levels also receive this setting.
Open the menu → System Settings.
Click Client Logs under the Cash Register menu.
Open the structure diagram.
All created organizational units can be seen here. These can be configured under Menu → My Organization.
3. Select the level to which the client logs are to be assigned.
All sublevels are automatically selected and thus the client logs are also assigned here. However, here, for example, store 1 logs can be assigned that do not apply in store 2.
4.Select the desired log level.
retail7 offers different levels of logs, where you can select what kind of display you want to see in the system.
5. Activate the log level.
NOTE: Click No to not activate the log level. For example, you can specify whether only information is displayed in store 1, but warnings are also visible in store 2.
6. Activate the saving of the logs in the database.
Click No so that the logs are not stored in the database. This means that the logs are displayed, but not saved in the database. Thus, there is no possibility to read them again at a later time.
7. Select Save.
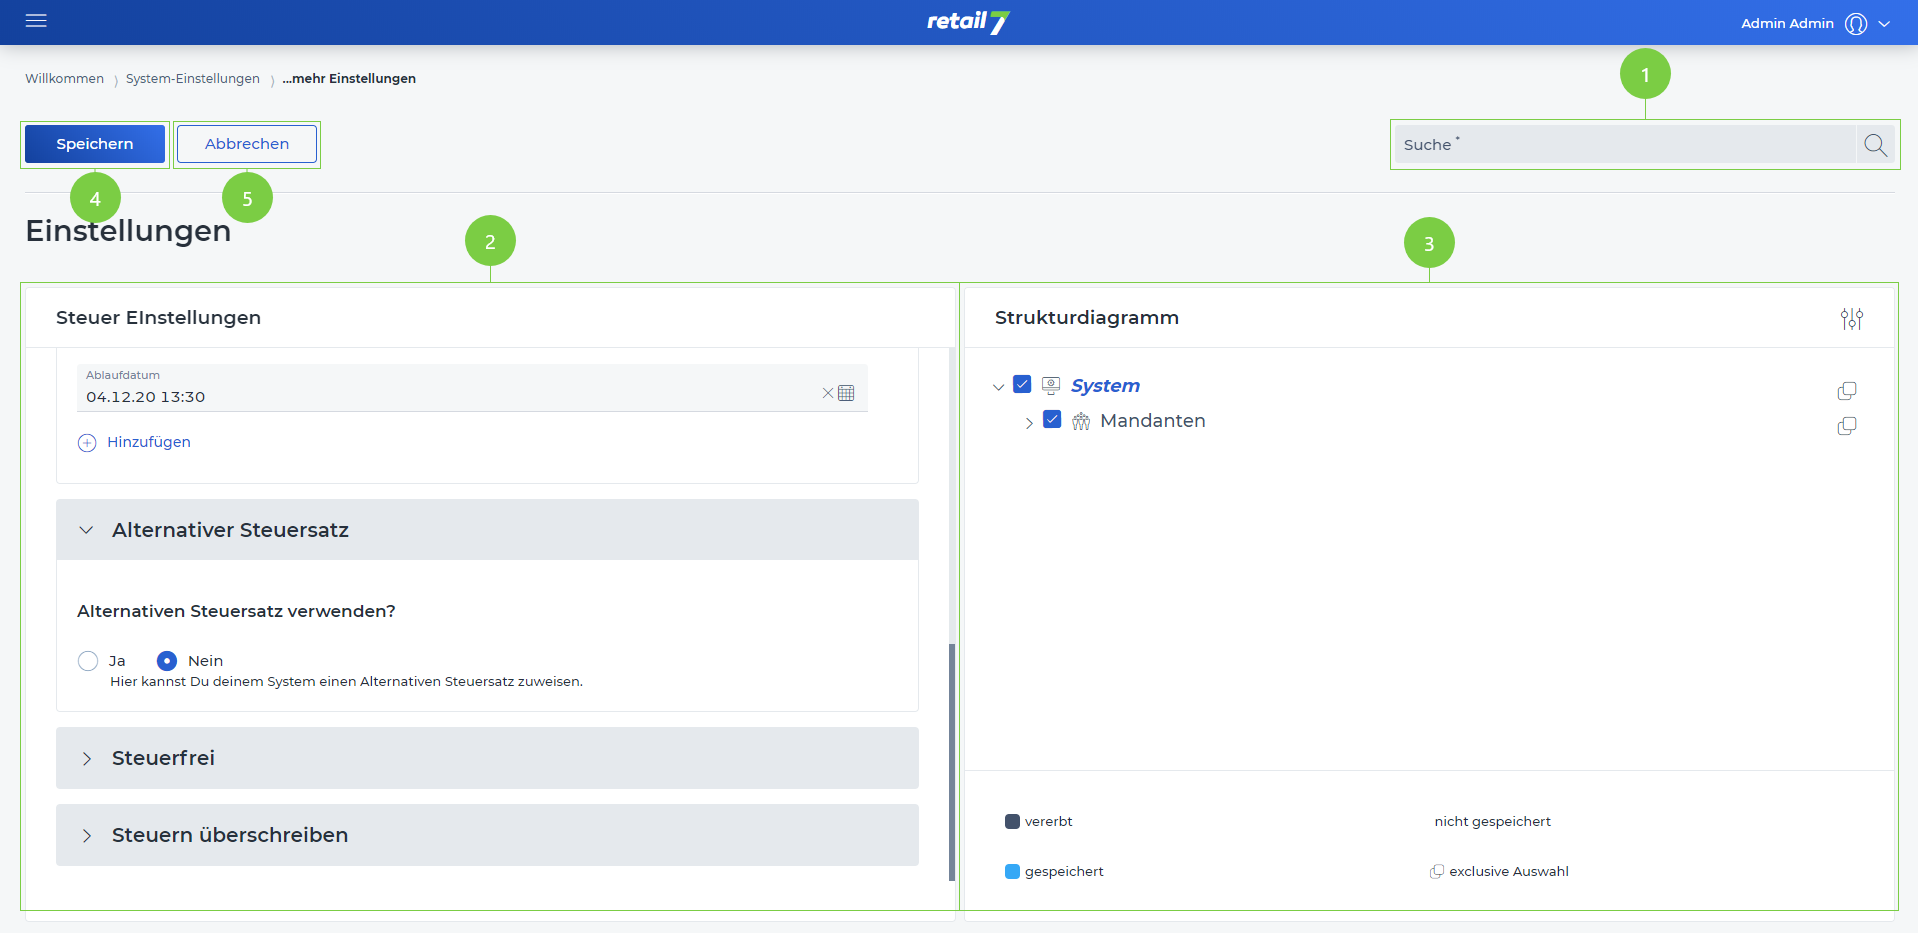
7.4.1.4 Control settings
All relevant settings regarding taxes can be made in this menu. For this function, it is advisable to consult a tax advisor.
 1 Search function
Enter the desired search term in the search.
Click on the magnifying glass.
Wait for the result and select a desired setting.
2 Editing window
3 Structure diagram
4 Save entries
5 Close editing window
7.4.1.4.1 Add tax settings
At retail7, tax-relevant information can be stored in the system at any time. We advise you to obtain further information from a tax consultant.
 ATTENTION: In the structure diagram the top level (system) is automatically selected, thus the control settings apply to all elements of the structure.
Open the menu → System settings.
Select Tax settings in the Cash register menu.
Define the tax regulation.
The tax control in this case refers to the tax history. Here there is a choice between three different modes, which are None, Authority and Full. In None, no tax data is included. Under Authority, all data up to the current date is considered. In Full, all tax data is included.
4. Specify whether the prices are calculated including taxes.
Select No so that the price is calculated without taxes.
5. Click Add to create the scheme for the tax authority.
This information is obtained from the tax consultant. With retail7, the period can be defined exactly with date and time
6.Specify the tax authority and set the validity period.
Select Add to create additional tax authorities.
7. Open the Alternative tax rate submenu.
8. Define whether an alternative tax rate should be used.
An alternative tax rate can be used, for example, for items that are taxed again abroad.
9. Open the Tax-free submenu.
10. Select whether a tax exemption is possible.
11. Establish a reason for the tax exemption.
This defines whether a reason must be specified in the system why the item is exempt from tax.
12. Specify whether to register the identification number.
The identification number is assigned only once and is therefore uniquely assigned.
13. Select the desired customer identification.
The customer ID is only assigned once. This ensures a unique assignment.
14. Open the Overwrite taxes submenu.
15. Define the minimum and maximum tax rate.
This function defines how low or high the tax rate may be that is used to overwrite the original tax rate.
16. Select whether a reason is required for the tax exemption.
This defines whether a reason must be specified in the system why the item is exempt from tax.
17. Establish a reason.
For the retail7 POS system it is possible to create several reasons for tax exemption.
18. Define a minimum and maximum amount.
Specify the lowest or highest amount used for tax exemption.
19. Click Save.
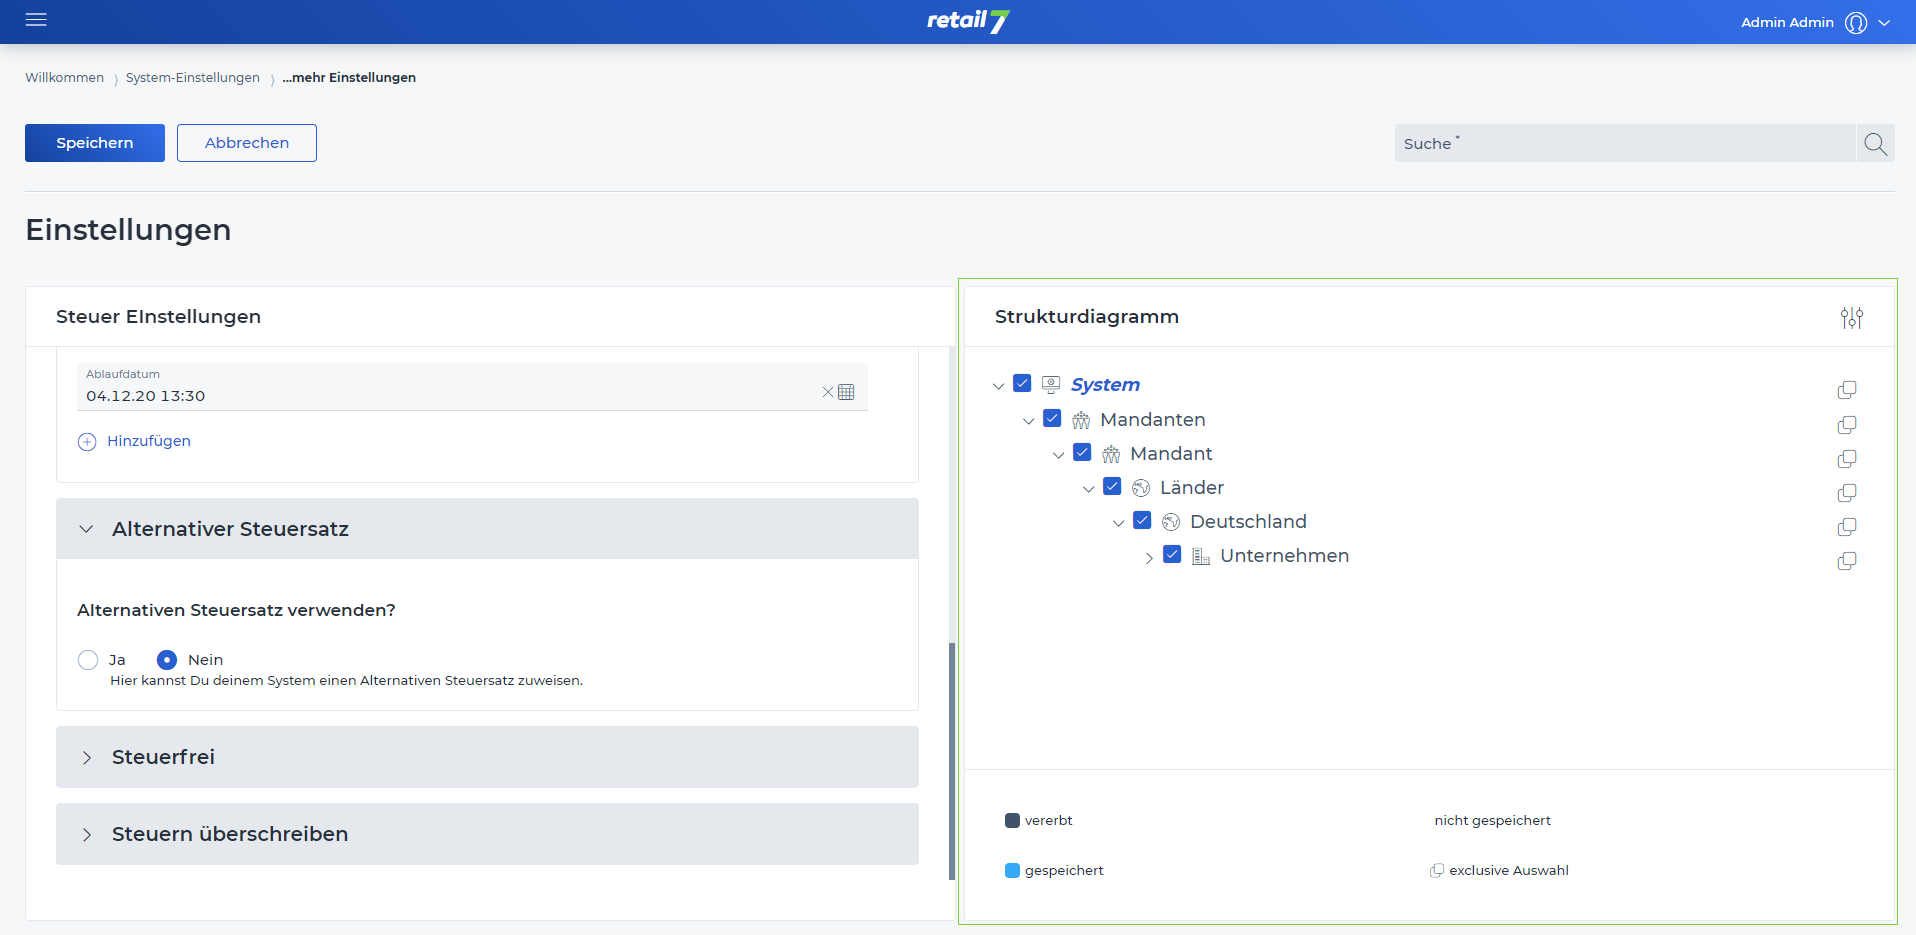
7.4.1.4.2 Assign control settings structure diagram
In retail7, the desired structure for the system can be defined under My organization. In the process, levels can be created which are visually represented in a tree structure. Settings can be assigned to each level with the associated sublevels.
Open the menu → System settings.
Click Tax Settings under the Cash register menu.
Open the structure diagram.
All organizational units at retail7 are based on a superordinate system. The structure diagram can be created via Menu → My organization → Organizational units.
4. Select the level to which the tax settings are to be assigned.
All sublevels are automatically selected and the tax settings are assigned here as well. Here, for example, a setting can be assigned to store 1, but this setting does not apply to store 2.
5. Define the tax regulation.
The tax control in this case refers to the tax history. Here there is a choice between 3 different modes. ...
6. Define the tax regulation.
NOTE: The tax regulation in this case refers to the tax history. Here there is a choice of 3 different modes, which are None, Authority and Full. In None, no tax data is included. Under Authority, all data up to the current date is considered. In Full, all tax data is included.
7. Set whether the prices are calculated including taxes.
Select No to calculate the price without taxes.
8. Click on the Add button to create the scheme for the tax authority.
This information can be obtained from the tax advisor. In retail7, it is possible to set the period exactly with date and time.
9. Specify the tax authority and set the validity period.
Select Add to create additional tax authorities.
10. Open the Alternative tax rate submenu.
11. Define whether an alternative tax rate should be used.
An alternative tax rate can be used, for example, for items that are taxed again abroad.
12. Open the Tax-free submenu.
13. Select whether a tax exemption is possible.
When an item is sold tax-free, the item price is lower because, for example, no VAT is added to the base price.
14. Establish a reason for the tax exemption.
This defines whether a reason must be specified in the system why the item is exempt from tax.
15. Specify whether to register the identification number.
The identification number is assigned only once and is therefore uniquely assigned.
16. Select the desired customer identification.
The customer ID is only assigned once. This ensures a unique assignment.
17. Open the Overwrite taxes submenu.
18. Define the minimum and maximum tax rate.
This function defines how low or high the tax rate may be that is used to overwrite the original tax rate.
19. Select whether a reason is required for the tax exemption.
This defines whether a reason must be specified in the system why the item is exempt from tax.
20. Establish a reason.
For the retail7 POS system it is possible to create several reasons for tax exemption.
21. Define a minimum and maximum amount.
Determine the lowest or highest amount used for tax exemption.
22. Click Save.
7.4.1.5 Drawers
The cash drawer is used to store cash. Depending on the model, it is possible for the drawer to be locked electronically or mechanically. Always ensure that no unauthorized persons have access to the drawers.
 1 Search function
Enter the desired search term in the search.
Click on the magnifying glass.
Wait for the result and select a desired setting.
2 Editing window
3 Structure diagram
4 Save input
5 Close editing window
7.4.1.5.1 Add drawers
In retail7, drawers can be assigned to the stores. Here it is possible to create or configure additional drawers at any time.
ATTENTION: In the structure diagram the top level (system) is automatically selected, thus the drawer settings apply to all elements of the structure.
Here, each level can be assigned individual settings that apply to all associated sublevels. Thus, it is possible to assign a drawer to store 1 with its configurations, but these do not apply to store 2.
Open the menu → System settings.
Click Drawers under the Cash register menu.
Specify the difference tolerance for the drawer.
A starting balance is defined for the drawer. In the course of the day, the store generates revenue and returns the corresponding change to the customers. This function regulates how high the difference between the start and end credit in the cash drawer may be.
5. Click Save.
7.4.1.5.1 Assign drawers structure diagram
In retail7, a structure for the system can be created via My organization. This structure is displayed visually as a tree diagram. Now it is possible to assign settings to each level that apply to it but also to the associated sublevels.
Open the menu → System settings.
Click Drawers under the Cash register menu.
Open the structure diagram.
4. Specify the difference tolerance for the drawer.
A starting balance is defined for the drawer. In the course of the day, the store generates revenue and returns the corresponding change to the customers. This function regulates how high the difference between the start and end credit in the cash drawer may be.
5. Click Save.
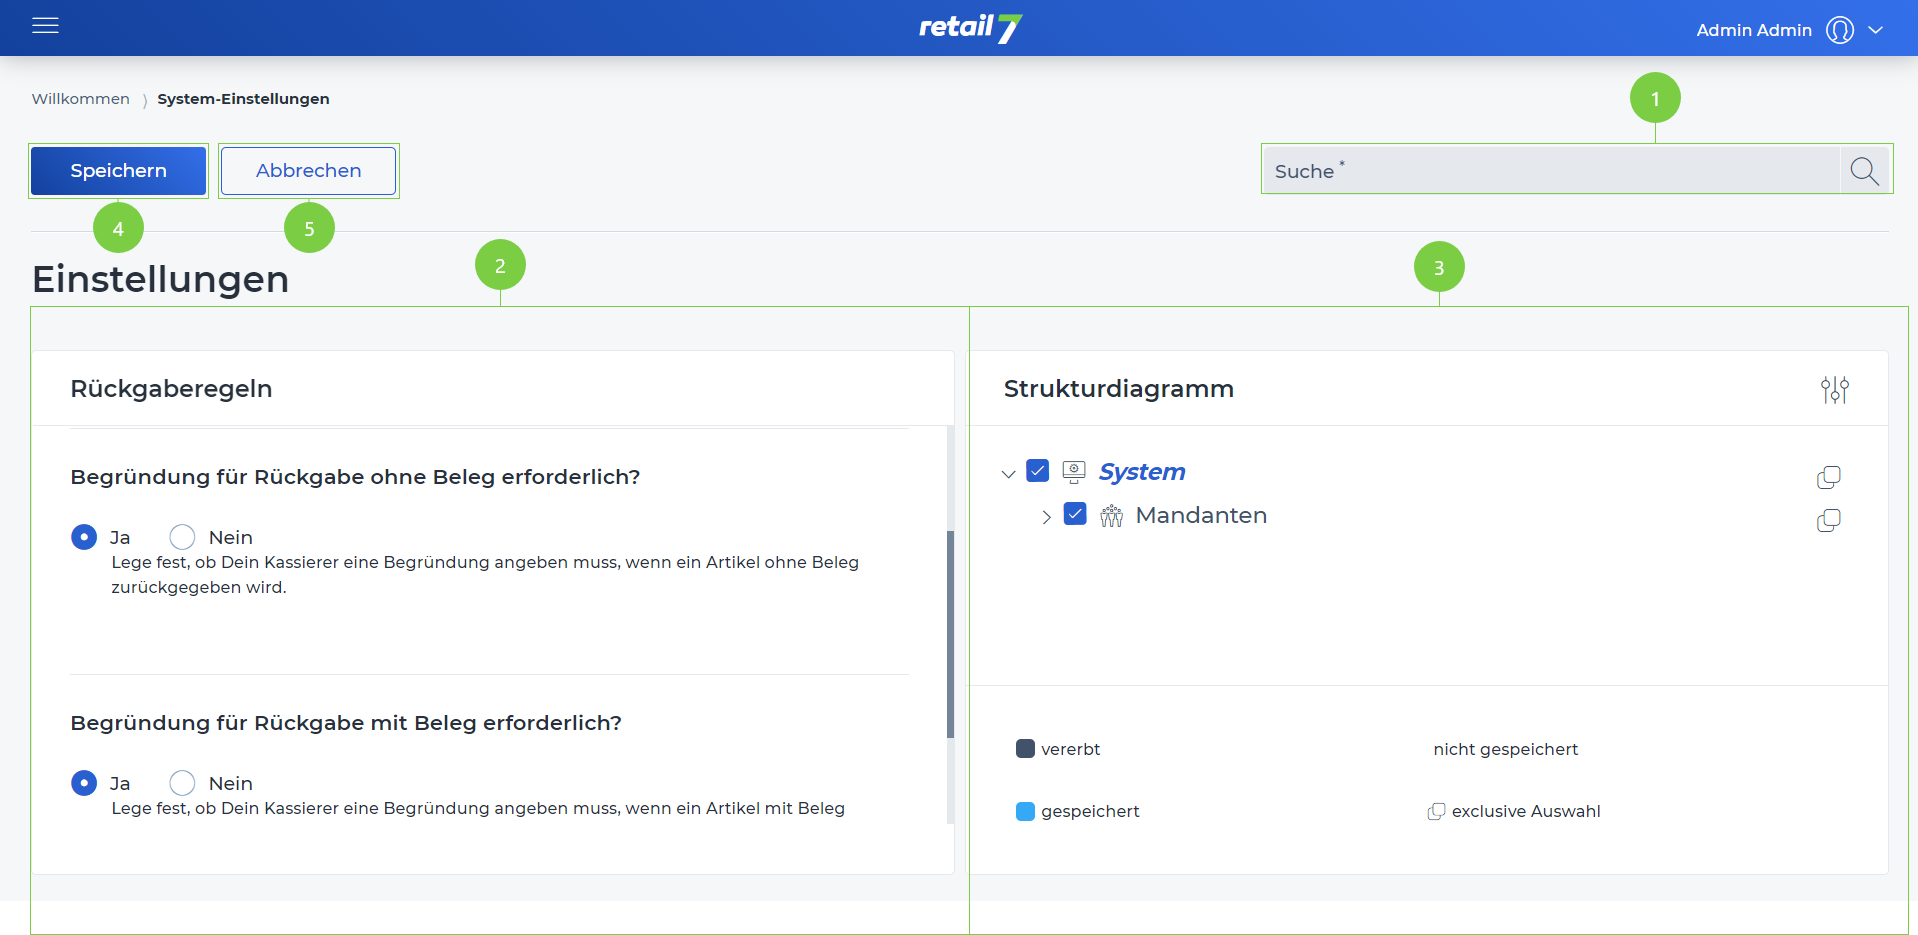
7.4.1.6 Return rules
 1 Search function
Enter the desired search term in the search.
Click on the magnifying glass.
Wait for the result and select a desired setting.
2 Editing window
3 Structure diagram
4 Save input
5 Close editing window
7.4.1.6.1 Add return rules
These settings are used to configure how item returns are regulated for the system. Basically, it is always advisable to accept a return only with a valid receipt. Only in this case, the user can be sure that the item was really purchased from the store. If, however, the situation arises that a return is possible without a receipt, the user can protect himself by storing a reason in the system why the return of the item was possible. This also makes it possible to track the return at a later date.
Open the menu → System settings.
Click Return Rules under the Cash register menu.
Activate the return for items.
Thus, it is allowed to return an item after purchasing it. This function can be combined with the inventory management, because this way the system counts which articles are returned. How to configure an item with all possible settings can be found in Menu → Master data → Items → Item list.
4. Specify whether it is possible to return the item without a receipt.
If this function is active, it is possible that the item may be returned without a receipt. However, it is advisable to define a return with a receipt, because this way it is comprehensible for third parties whether the item was really purchased in this store. This situation is especially relevant for larger stores.
5. Define whether a reason for item return with receipt is required.
If this function is active, a reason for the return must always be registered in the system as soon as an item is returned with a receipt. In this way, it is also possible to trace at a later date why certain items were returned. Based on this reason, a decision can also be made as to whether the item should continue to be sold in the store.
6. Select the reason.
With the retail7 POS software it is possible to store several reasons, such as a defective item.
7. Click Save.
7.4.1.6.2 Assign return rules structure diagram
retail7 offers the possibility of assigning return rules to the individual levels. It is therefore possible for a rule to apply in store 1, but not in store 2. This means that the system can be configured as desired.
Open the menu → System settings.
Click Return rules under the Cash register menu.
Open the structure diagram.
All organizational units at retail7 are based on a superordinate system. The structure diagram can be viewed via Menu → My Organization → Organizational Units.
4. Select the level to which you want to assign the return rule.
NOTE: All sublevels are automatically selected and therefore the return control is assigned here as well.
5. Activate the return for items.
Thus, it is allowed to return an item after purchasing it. This function can be combined with the inventory management, because this way the system counts which articles are returned. How to configure an item with all possible settings can be found in Menu → Master data → Items → Item list.
6. Specify whether it is possible to return the item without a receipt.
If this function is active, it is possible that the item may be returned without a receipt. However, it is advisable to define a return with a receipt, because this way it is comprehensible for third parties whether the item was really purchased in this store. This situation is especially relevant for larger stores.
7. Define whether a reason for item return with receipt is required.
If this function is active, a reason for the return must always be registered in the system as soon as an item is returned with a receipt. In this way, it is also possible to trace at a later date why certain items were returned. Based on this reason, a decision can also be made as to whether the item should continue to be sold in the store.
8. Select the reason.
With the retail7 POS software it is possible to store several reasons, such as a defective article.
9. Click Save.
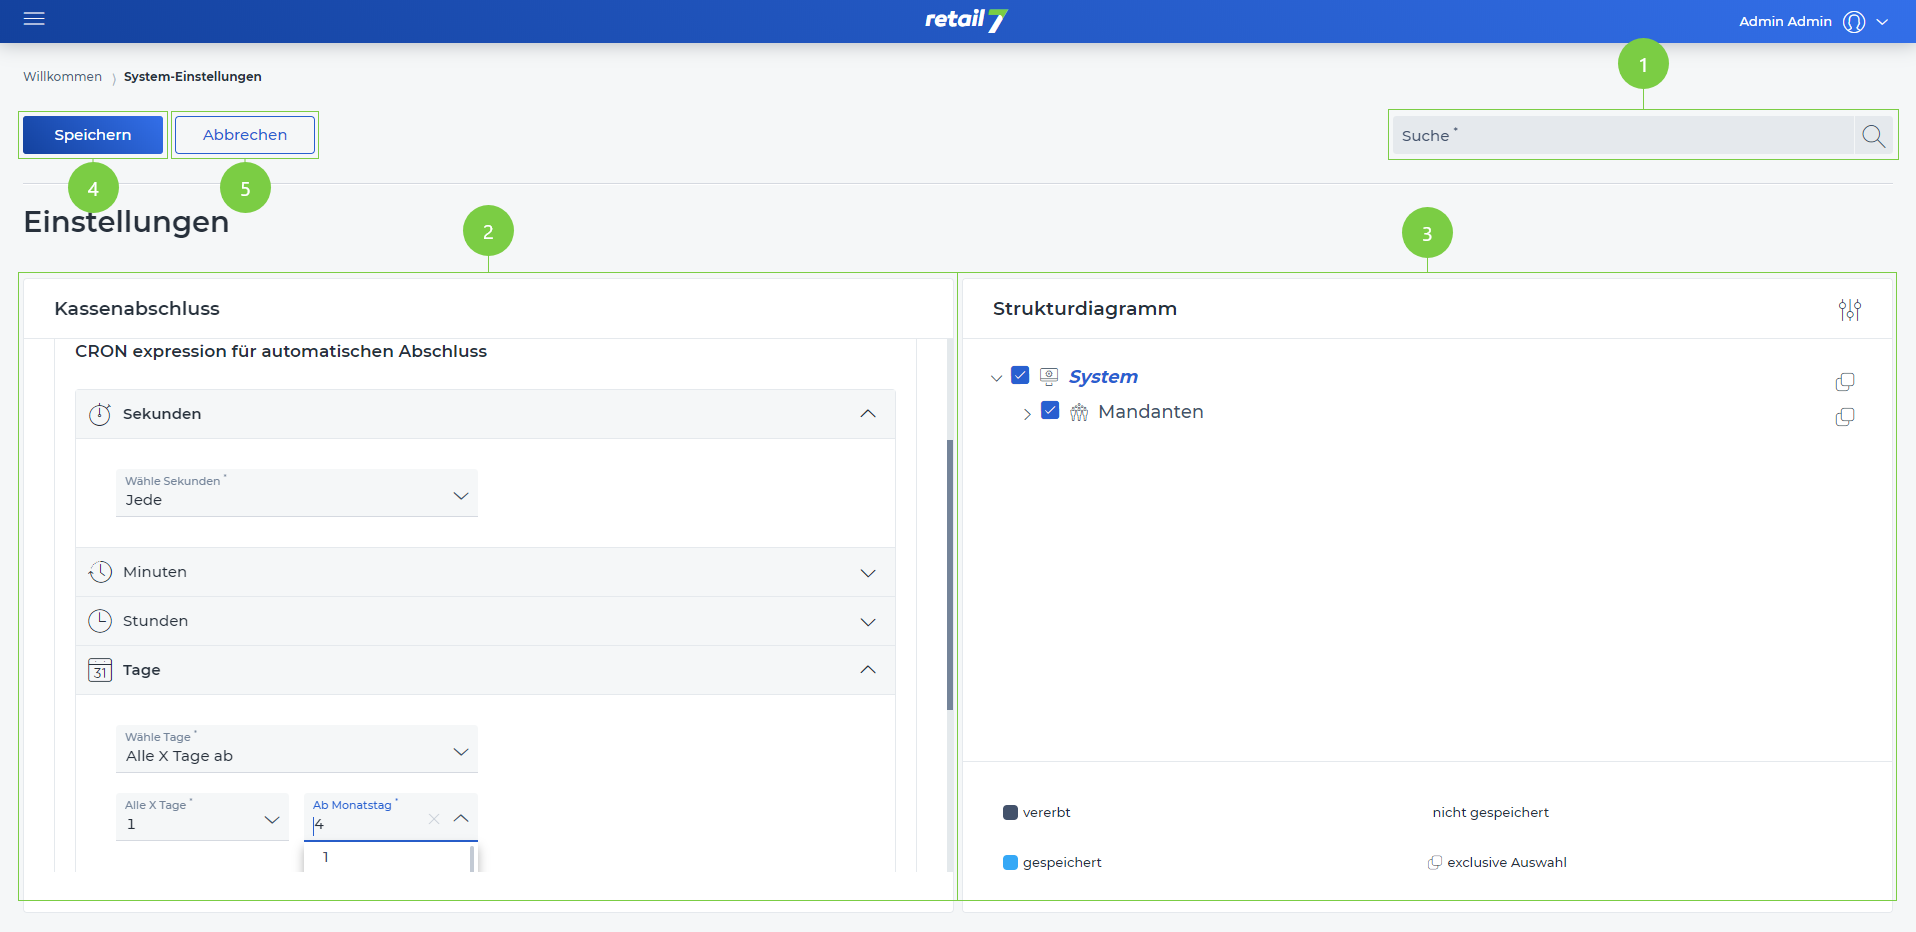
7.4.1.7 Cash balance
 1 Search function
Enter the desired search term in the search.
Click on the magnifying glass.
Wait for the result and select a desired setting.
2 Editing window
3 Structure diagram
4 Save entries
5 Close editing window
7.4.1.7.1 Add cash balance
A cash balance summarizes all booking entries. The receipts and expenditures that are stored in the system are taken into account. Therefore, it is possible to compare, for example, how many receipts and expenditures were made via the cash register.
ATTENTION: In the structure diagram, the top level (system) is automatically selected, so the cash closure settings apply to all elements of the structure.
The settings can also be assigned to other levels. In addition, the configurations apply to all associated sublevels.
Open the menu → Cash balance.
Click on Cash balance under the Cash register menu.
Check the box if the cash balance is required.
If this function is active, a cash closing must be performed at the end of the day. Otherwise, it is also possible to perform it the next day.
4. Define at what time the automatic cash balance should take place.
This setting is divided into seconds, minutes, hours, days and months.
SECONDS: For seconds there is the possibility to select Every second, Every second from, Every second with multiple selection, Every second between.
MINUTES: For minutes there is the possibility to define Every minute, Every minute from, Every minute with multiple selection, Every minute between.
HOURS: For hours there is the possibility to define Every hour, Every hour from, Every hour with multiple selection, Every hour between.
DAYS: For days there is the possibility to select Every day, Every day from, Every x days from, Specific weekday, Specific weekday in month, Last day of month and Last weekday of month.
MONTHS: For months, it is possible to select Every month, Every month from, Every month with multiple selection, Every month between.
5. Open the Advanced submenu.
6. Check the box if you want the store closing to be automatic.
If the check mark is not set, the cash closure must be performed manually. Otherwise, the store closing does not need to be monitored, as it is performed automatically at the defined time. The closing can then be viewed in the system.
7. Specify after how many seconds a message with timeout should be displayed at the cash register.
Here you can define after how many seconds the cash register will be switched to standby mode and a display will appear informing that the cash register system is in timeout.
8. Specify after how many seconds a timeout should occur at the cash register after the cash register balance.
This function can be used to specify when the cash register is switched to timeout after the cash register balance.
9. Open the Expert submenu.
10. Insert the flow name for the cash balance.
The flow is a sequence of program-technical work steps that carries out the checkout closing for the retail7 checkout software.
11. Check the box if the flow can be performed in parallel with the cash balance.
When this function is active, another flow can be performed in parallel with the cash closure.
12. Specify the flow for automatic cash balance.
The flow is a sequence of program-technical work steps that carries out the checkout closing for the retail7 POS software.
13. Click Save.
7.4.1.7.2 Assign cash balance structure chart
In retail7, it is possible to assign the checkout closing to the individual levels. This means that it is possible for a checkout closing to take place at 11 p.m. in store 1, but not in store 2, where the closing takes place at 7 p.m., for example. Thus the system can be configured according to own desires.
Open the menu → System settings.
Click on Cash balance under the Cash register menu.
Open the structure diagram.
All organizational units at retail7 are based on a superordinate system. The structure diagram can be accessed via Menu → My Organization → Organizational Units.
4. Select the level to which you want to assign the cash closure.
All sublevels are automatically selected and therefore the cash closure is also assigned here.
5. Check the box if the cash balance is required.
If this function is active, a cash closing must be performed at the end of the day. Otherwise, it is also possible to perform it the next day.
6. Define at what time the automatic cash balance should take place.
This setting is divided into seconds, minutes, hours, days and months.
SECONDS: For seconds there is the possibility to select Every second, Every second from, Every second with multiple selection, Every second between.
MINUTES: For minutes there is the possibility to define Every minute, Every minute from, Every minute with multiple selection, Every minute between.
HOURS: For hours there is the possibility to define Every hour, Every hour from, Every hour with multiple selection, Every hour between.
DAYS: For days there is the possibility to select Every day, Every day from, Every x days from, Specific weekday, Specific weekday in month, Last day of month and Last weekday of month.
MONTHS: For months, it is possible to select Every month, Every month from, Every month with multiple selection, Every month between.
7. Open the Advanced submenu.
8. Check the box if you want the store closing to be automatic.
If the checkmark is not set, the cash closing must be done manually.
9. Specify after how many seconds a message with timeout should be displayed on the cash register.
Here you define after how many seconds the cash register will be switched to standby mode and a message will appear informing that the cash register system is in timeout.
10. Specify after how many seconds a timeout should occur at the cash register after the cash register balance.
This function is used to specify when the cash register will timeout after the cash register closing.
11. Open the Expert submenu.
12. Insert the flow name for the cash balance.
The flow is a sequence of program-technical work steps that carries out the checkout closing for the retail7 checkout software.
13.Check this box if the flow can be performed in parallel with the cash closure.
If this function is active, a further flow can be carried out parallel to the cash closure.
The flow is a sequence of program-technical work steps that carries out the cash closure for the retail7 POS software.
15. Click Save.
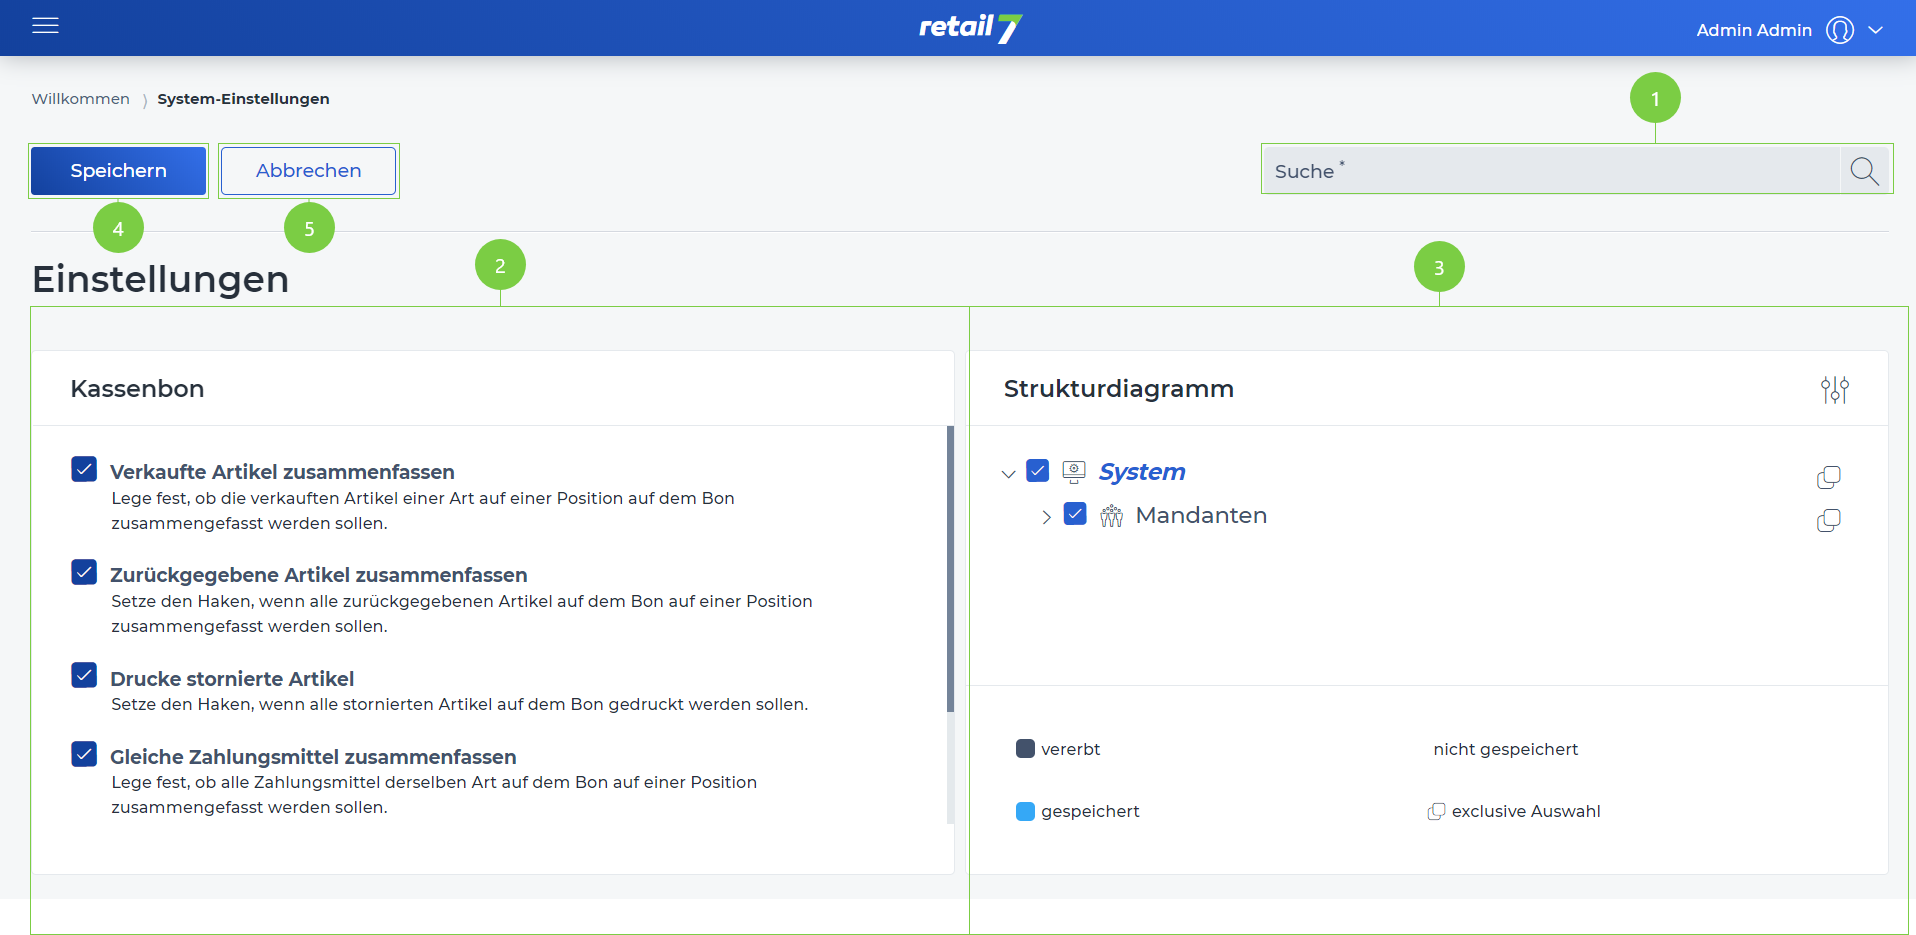
7.4.1.8 Receipt
 1 Search function
Enter the desired search term in the search.
Click on the magnifying glass.
Wait for the result and select a desired setting.
2 Editing window
3 Structure diagram
4 Save input
5 Close editing window
7.4.1.8.1 Set receipt
All items that are registered and cashed out during a transaction are listed on the receipt. Additional information, such as the business address or the number of the receipt, is also stored on the receipt. This number indicates how many cash receipts were generated via the POS system.
Open the menu → System settings.
Click on Receipt under the Cash register menu.
Check the box if you want all sold items with the same item number to be grouped on one receipt item.
If this function is active, all items with the same item number will be grouped on one position on the receipt. If the setting is disabled, articles, including those with the same article number, will be displayed one below the other on the cash register receipt. More information about the created items in the system can be found in Menu → Master data → Items → Item list.
4. Check the box if all returned items with the same item number are to be combined on one receipt item.
If this function is active, all returned items with the same item number will be grouped on one position on the receipt. If the setting is disabled, articles, including those with the same article number, will be displayed one below the other on the cash register receipt. More information about the created items in the system can be found in Menu → Master data → Items → Item list.
5. Check the box if all canceled items are to be printed on one receipt.
If this function is active, all canceled items with the same item number will be grouped together on one item on the receipt and then printed. If the setting is deactivated, articles, including those with the same article number, will be shown one below the other on the cash register receipt. More information about the created items in the system can be found in Menu → Master data → Items → Item list.
6. Check this box if all means of payment with the same ID are to be grouped together on one receipt item.
If this function is active, all means of payment with the same ID will be summarized on one position on the receipt. If the setting is disabled, means of payment, including those with the same ID, will be shown one below the other on the receipt.
7. Check the box if all canceled means of payment should be printed on one receipt.
If this function is active, all canceled means of payment with the same ID will be grouped on one position on the receipt. If the setting is disabled, the means of payment, including those with the same ID, will be printed one below the other on the receipt.
8. Click on the Save button.
7.4.1.8.2 Assign cash receipt structure chart
retail7 offers the possibility of assigning the structure of the receipt to the individual levels. It is therefore possible for a receipt in store 1 to have different settings to those in store 2. This means that the system can be configured as desired.
Open the menu → System settings.
Click on Receipt under the Cash register menu.
Open the structure diagram.
All organizational units at retail7 are based on a superordinate system. The structure diagram can be accessed via Menu → My Organization → Organizational Units.
4. Select the level to which the receipt should be assigned.
All sublevels are automatically selected and the receipt is assigned here as well.
5. Check if all sold articles with the same article number should be summarized on one receipt position.
If this function is active, all articles with the same article number will be summarized on one position on the receipt. If the setting is disabled, items, including those with the same item number, will be shown one below the other on the receipt. More information about the created items in the system can be found in Menu → Master data → Items → Item list.
6. Check this box if all returned items with the same item number are to be grouped together on one receipt item.
If this function is active, all returned items with the same item number will be summarized on one position on the receipt. If the setting is deactivated, items, including those with the same item number, will be shown one below the other on the receipt. More information about the created items in the system can be found in Menu → Master data → Items → Item list.
7. Check the box if all canceled items are to be printed on one receipt.
If this function is active, all canceled items with the same item number will be grouped together on one item on the receipt and then printed. If the setting is deactivated, items, including those with the same item number, will be shown one below the other on the receipt. More information about the created items in the system can be found in Menu → Master data → Items → Item list.
8. Check this box if all means of payment with the same ID are to be grouped together on one receipt item.
If this function is active, all means of payment with the same ID will be summarized on one position on the receipt. If the setting is disabled, means of payment, including those with the same ID, will be shown one below the other on the receipt.
9. Check the box if all canceled means of payment should be printed on one receipt.
If this function is active, all canceled means of payment with the same ID will be grouped on one position on the receipt. If the setting is disabled, means of payment, including those with the same ID, will be shown one below the other on the receipt.
10. Click Save.
7.4.1.9 Gift cards
7.4.1.9.1 Add gift card
It is possible to load credit on a card and give it as a gift after purchase. After purchasing or receiving a gift card, a third person is encouraged to also purchase an item in the store, as the credit is redeemable only for that store.
Open the menu → System settings.
Click on Gift Cards under the Cash register menu.
Specify the card prefix.
The prefix determines with which sequence of numbers the card number starts.
4. Select the calculation method.
5. Define the article ID.
The ID is only assigned once. Thus articles can be assigned unambiguously, since not two receive the same number.
6. Set the maximum recharge.
This specifies the maximum amount of credit that can be loaded on the card. The balance must not exceed this value, but it is possible that it is lower.
7. Check mark if the gift card may be returned by the customer.
If this function is active, the card may be returned after purchase.
8. Specify whether it is possible to reload credit to the gift card.
If this function is activated, it is possible to reload the same card after the credit has been used up. However, this reload is also tied to the redemption period. When the period has expired, the recharge is no longer available.
9.Define whether partial redemption is possible with the card.
This function allows to spend only a part of the credit. If the credit has not been used after the redemption period, the credit is expired.
10. Click Save.
7.4.1.9.2 Assign gift card structure chart
In retail7, it is possible to assign the gift cards to the individual levels. Thus, it is possible that a gift card in store 1 has different settings than in store 2. For example, it is possible to configure that gift cards can be returned in one store, but not in another. Thus, the system can be configured as desired.
Open the menu → System settings.
Click on Gift Cards under the Cash register menu.
Open the structure diagram.
All organizational units in retail7 are based on a superordinate system. The structure diagram can be configured via Menu → My organization → Organizational units.
4. Specify the card prefix
The prefix determines with which sequence of numbers the card number starts.
5. Select the calculation method.
6. Define the article ID.
The ID is only assigned once. Thus articles can be assigned unambiguously, since not two receive the same number.
7. Set the maximum recharge. The balance must not exceed this value, but it is possible that it is lower.
This indicates the maximum amount of credit that can be loaded onto the card.
8. Check if the gift card may be returned by the customer.
If this function is active, the card may be returned after purchase.
9. Specify whether it is possible to reload credit to the gift card.
If this function is activated, it is possible to reload the same card after the credit has been used up. However, this reload is also tied to the redemption period. When the period has expired, the recharge is no longer available.
10. Define whether partial redemption is possible with the card.
This function allows to spend only a part of the credit. If the credit has not been used after the redemption period, the credit is expired.
11. Click Save.
7.4.1.10 Item setting
In this area, all settings related to the created items in the system can be made. These settings must be made with particular care. The article data form the basis of the POS system.
7.4.1.10.1 Add item setting
In retail7, it is possible to add settings for an item at any time. In this case, these settings apply to all created items. Under Menu → Master data → Items → Item list, the settings can be made individually for each item. More information can be found in the section Item list.
Open the menu → System settings.
Click on Item settings under the Cash register menu.
Open the Variant items submenu.
Select Enable if you want to be able to create variant items for the system.
With retail7, it is possible to create different item types. Under the section item list or Menu → Master data → Items → Item list more information about the different item types is available.
5. Open the Item Options submenu.
6. Check the box if a check should be made when returning an item.
If this function is activated, a query will be made regarding the article return. If the function is not activated, an article return is not possible.
7. Select the relevance
8. Check the box if you want the items to be treated separately.
9. Open the Inventory Management submenu
10. Check if inventory management may be used for sales.
If the function is active, the system counts which items have been sold. Based on this number, it can be recognized when a reorder needs to be placed.
11. Check the box if inventory management should be allowed for the return.
By activating this function, the system counts which items are or have been returned. Based on the reasons given for the return, it can be decided, for example, if the reason is a defect, whether the item should be removed from the range.
12. Check the box if you want to enable inventory management for the reservation.
When this function is active, the system counts which items are or have been reserved.
13. Click Save.