4.1.1 Item list
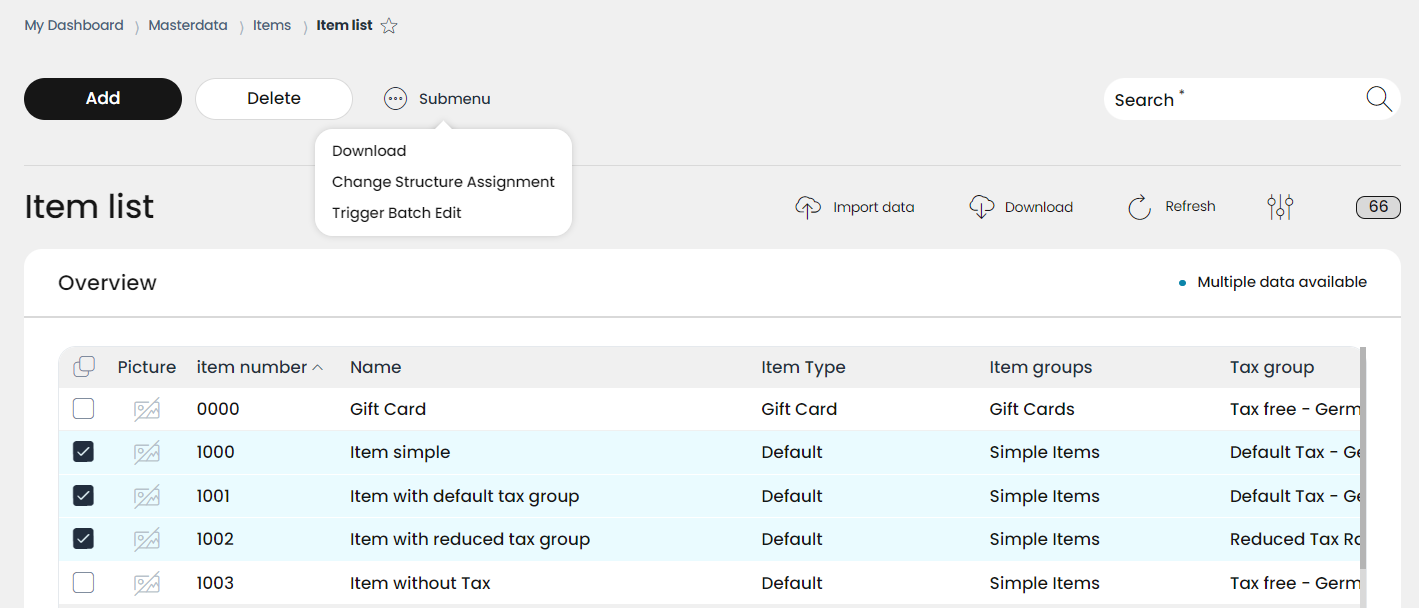
All available items are listed in the Item list, which can be found under Menu → Masterdata → Items → Item list.
Below you can find the functions and explanation of the icons:
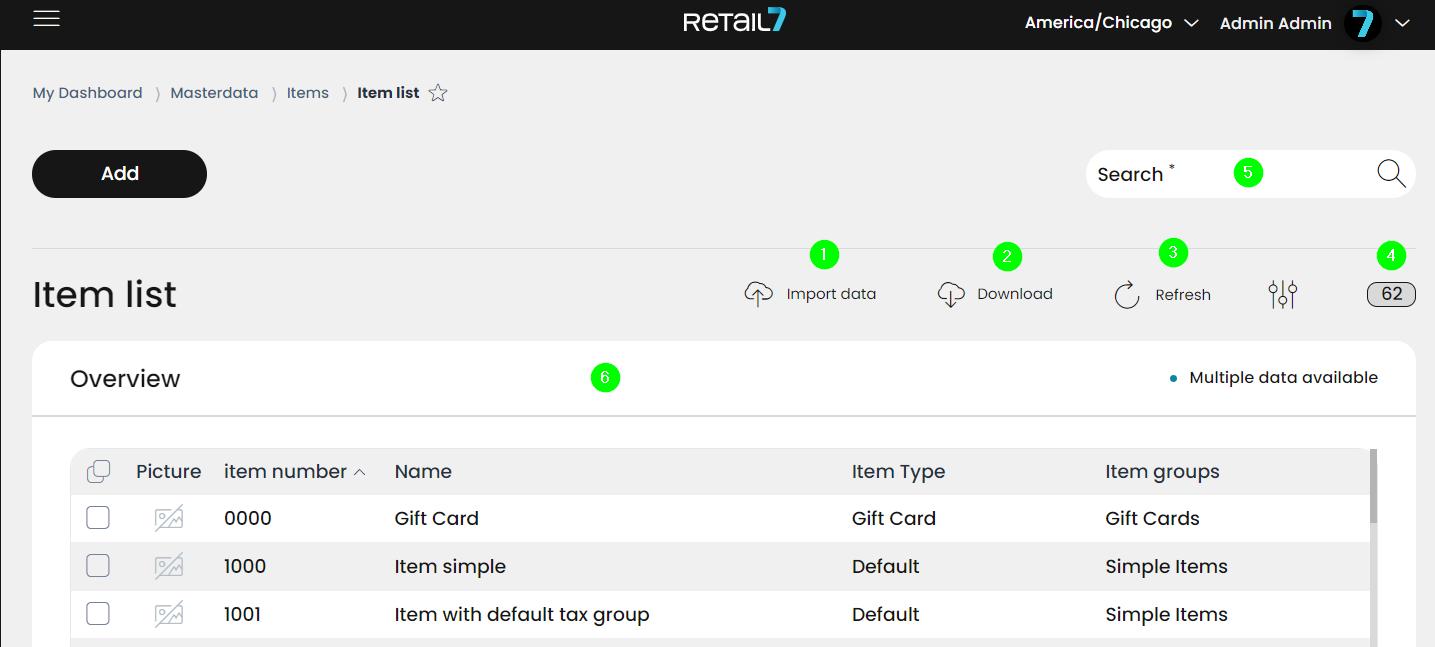
Import data
Download data
Refresh item list
Number of listed items
Search listed items
Item list details
In this chapter you can learn how to use them.
Managing items in the item database
To add new items, click on the Add button. If you need to edit or delete an existing item, locate the item in the list and click the checkbox in front of the item's name to select it. Once the item is selected, the Edit and Delete buttons will appear, allowing you to make changes or remove the item as needed.
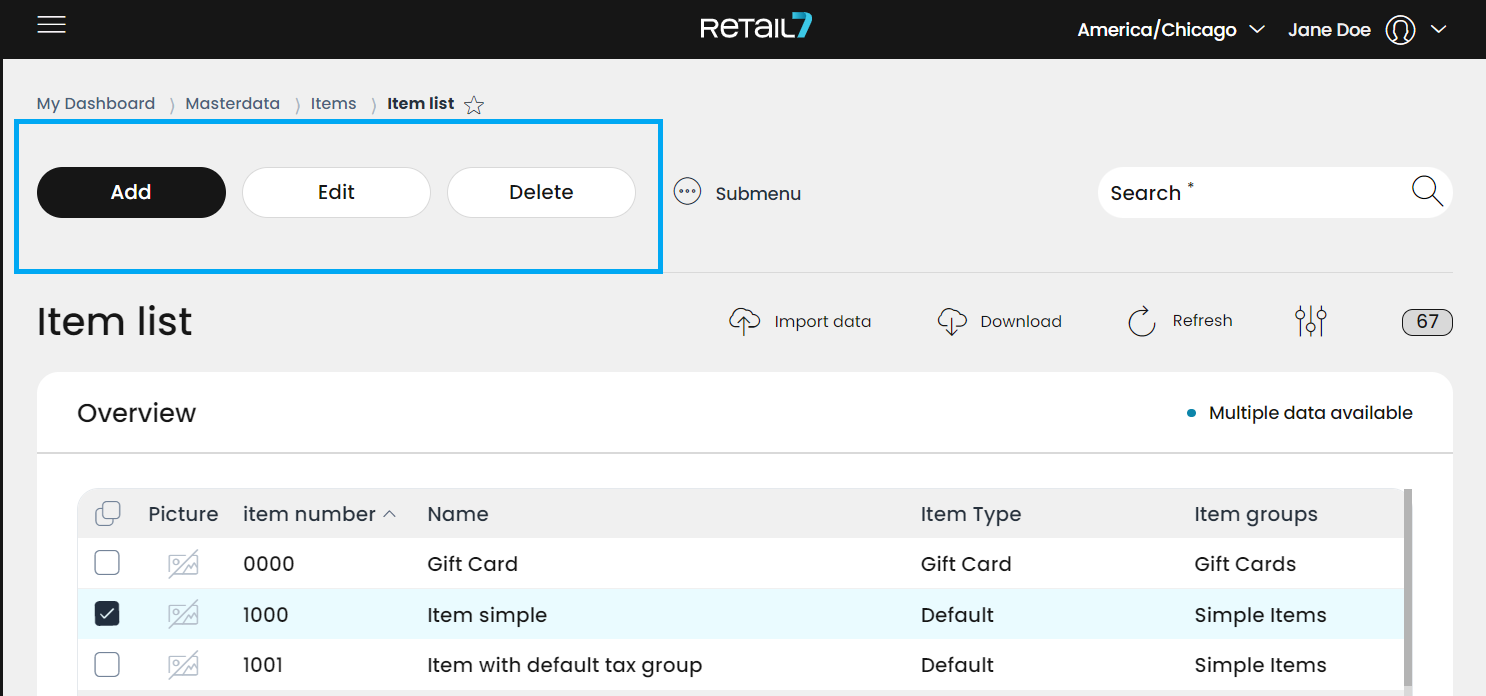
In addition to editing or deleting, various other management options are available. A submenu is displayed beside the buttons, providing access to additional functions. By clicking on this submenu, you can access the following features to effectively manage your items:
.PNG)
The detailed explanations of the buttons and submenu features are as follows.
Creating (adding) new item(s)
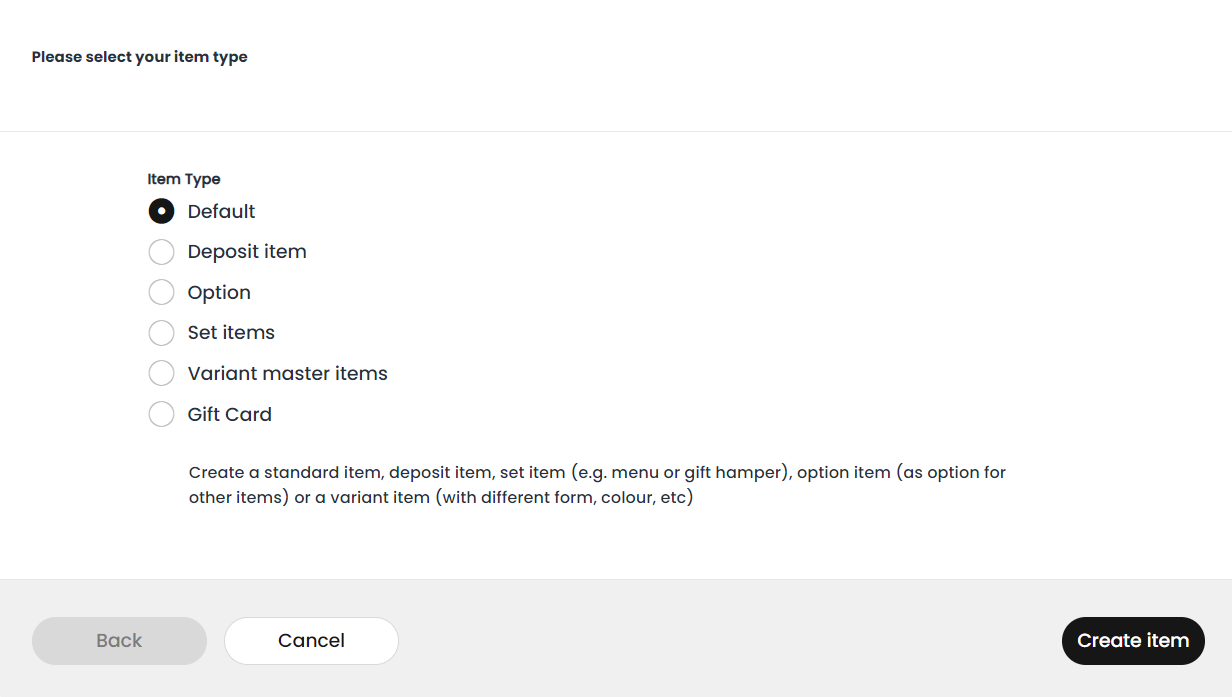
If a new item needs to be added to your items database, you can create it here, in the Item list menu. For this, you have to click on the Add button. Also, if more than one new elements are to be created, there is an option for that by using the Create another checkbox.
When doing this, first you get the pop-up window where you have to choose the type of the item to be created. You can learn more about the item types used by the RETAIL7 system in the 4.1. Items chapter.
After you choose the needed item type with the radio buttons, click on Create item.
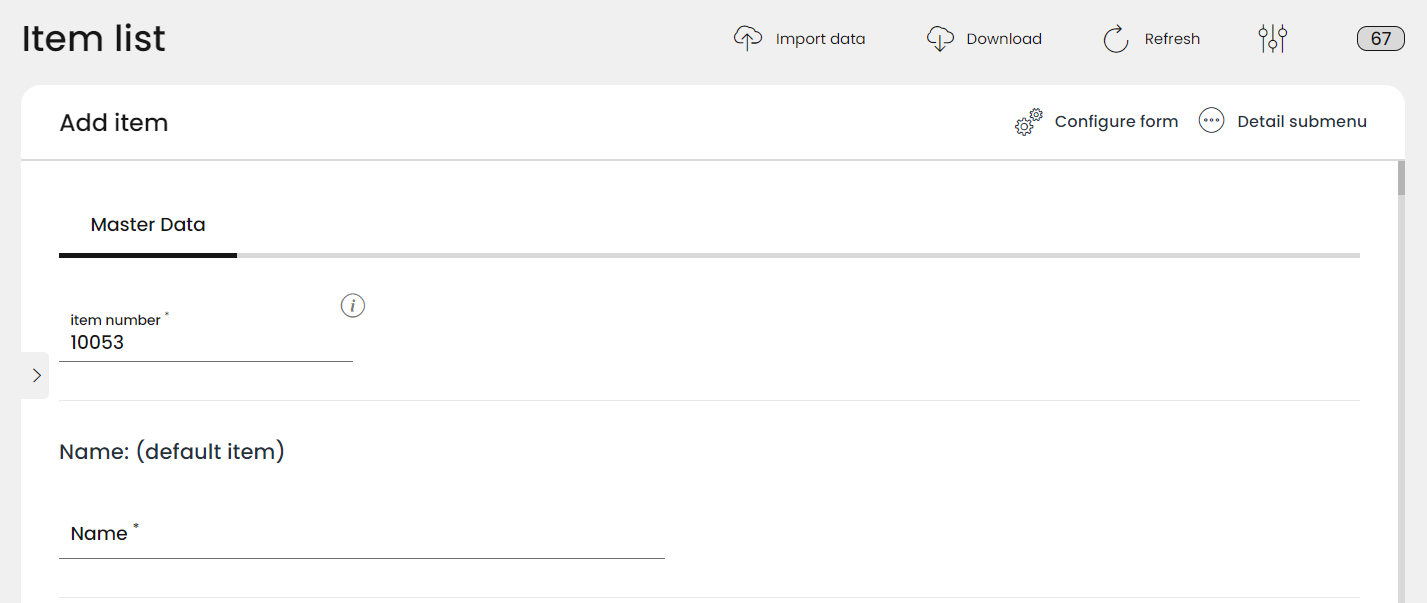
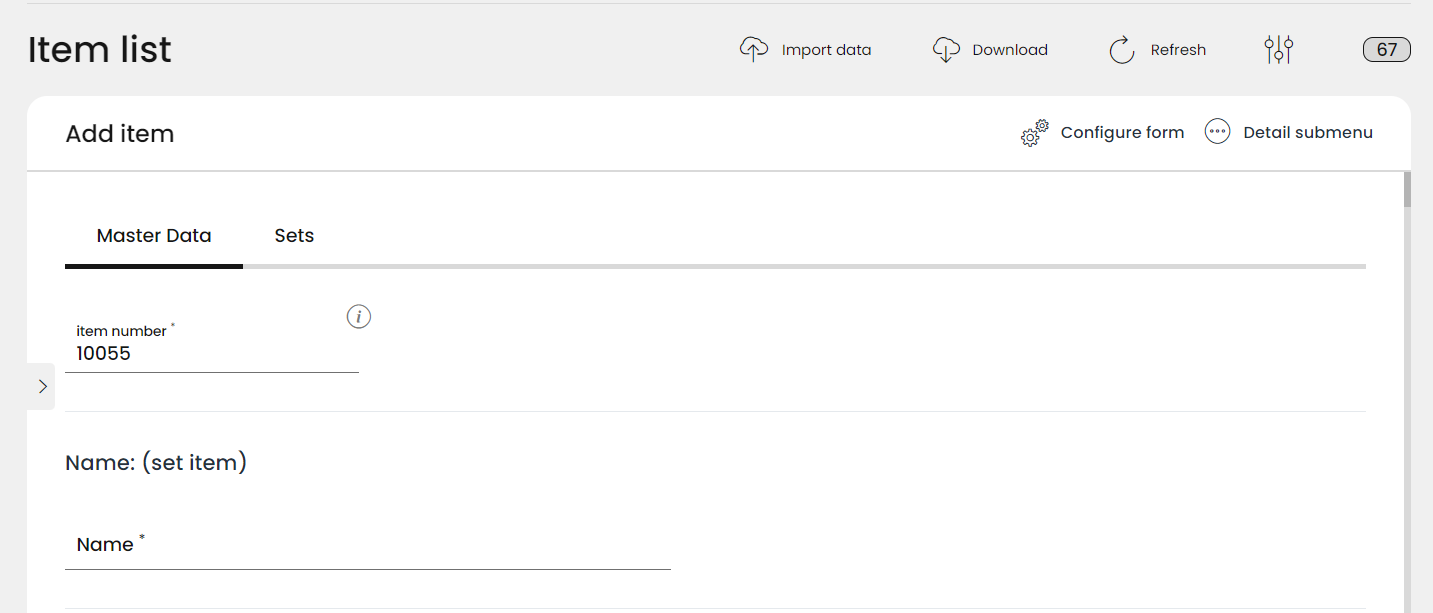
Now the Add item mask is displayed.
To make it as easy as possible to understand how to get started with item management, we initially show only the absolutely necessary fields of the Add item mask.
These are:
Item number
This identifies an item uniquely in the RETAIL7 system.
Item name
This is the name of the item, which can also be found in the statistics and on the receipt.List selling price
It´s the price at which the item is sold (without taking into account promotions, graduated prices or the like).Tax group
Each item must be assigned to a tax group, which is also shown in the reports and on the receipt.Which item menu(s) you would like to add this item
Item choices
Additional item fields can be activated under the "Configure form" link. Here you get a popup, where you can choose the "Advanced" form option and save. This extends the view of the master data sheet with additional fields. Please note that all mandatory fields are marked with *, i.e. these fields must be filled in to create an item.
Now you are on the Master data sheet of the item.
As you can see, the item already has an Item number, which is generated by the system. This gives each item a specific number and allows it to be uniquely identified in the system. But, you can change it manually, if items already exist in the system, and the item number is to be continued in ascending order. In addition, the number is only assigned once in the system.
Enter the Item name.
Define the item price under List price.
In order for the POS system to be able to carry out a checkout process, the price of the item must be defined here, otherwise making a calculation is impossible. This means that this price is displayed in the RETAIL7 cash register after it has been registered for a transaction.
Select the required Tax group.
Note: tax rates are country and area-specific. In this case, a tax advisor should be consulted, as this information is relevant for the competent tax authority.
Assign the item to an Item menu.
The item menu with the items it contains is displayed in the cash register app and can be customized (see: Menu → Masterdata → Item menu).
Define Item choices (if needed) with the Add link.
When clicking on it, you can choose the needed choice group from the rolldown menu. The item group serves as a superordinate element for the items and thus supports a structured overview of the items available in the system.
Now, you have successfully created the master dataset of the item, and you can add it to the database right away, by clicking on Save.
But if you choose to extend the Add item form with the "Configure form" menu, by switching to "Advanced" view, you can expand the item properties further below.
For example, you can select the out-of-house tax rate, if relevant.
E.g. in the catering industry, Take Away meals are taxed at a higher rate than if the guest consumed them in the shop.
You can specify the Unit of measurement with the scroll-down menu.
The setting defines, for example, that an item is sold in liters, kilograms (and their sub-units), or by the piece. For example, a cucumber is sold by the piece in the supermarket, but the price for the milk is based on liters.
The next step could be adding Pictures.
For this, insert an image into the import window using drag & drop. When you added an image, click on Add to create further images (e.g. for other languages).
Add a Short and a Long description as text for the item.
With this function, short and detailed descriptions can be created for every article. For example, the short description could be: "Black T-shirt", and the long one is "The black T-shirt with V-neck is available with two different prints in sizes S, M, L and XL".
In case the created item is a Deposit item, you can configure the Deposit quantity here. You also can assign more than one deposits by clicking on Add and repeating.
You can also assign Optional deposit items to the item in the creating.
You can use this option if you have different deposit items for one item (e.g. a box). Here you can define the deposit assembly per count.
In the next field, called Other part numbers you can assign one or more item idents to identify the item.
With these, the item can be scanned, searched via EAN, PLU, SKU or other identification numbers. The barcode type depends on the item type. For example, fruit or vegetables are defined with a GTIN barcode. Barcode types can be created, edited and deleted in the Menu → Masterdata → Items → Item idents. For more information on this topic, see the 4.5. Item idents chapter.
In the Print use cases field you can configure on which printer the order should be printed.
This field is only relevant in hospitality, and allows orders to be printed on different printers. E. G. all items served at the bar can be printed on the printer at the bar, and all items produced in the kitchen an be printed in the kitchen.
The next step is to define the Sales restriction age, if any is relevant to the item.
This means that the customer must be at least a certain age, to be able to purchase this item. This setting is particularly relevant for the sale of stimulants, such as alcohol or cigarettes, because these items can only be purchased from a certain age. The age limits are defined country-specifically, so the concerning value must be added manually here.
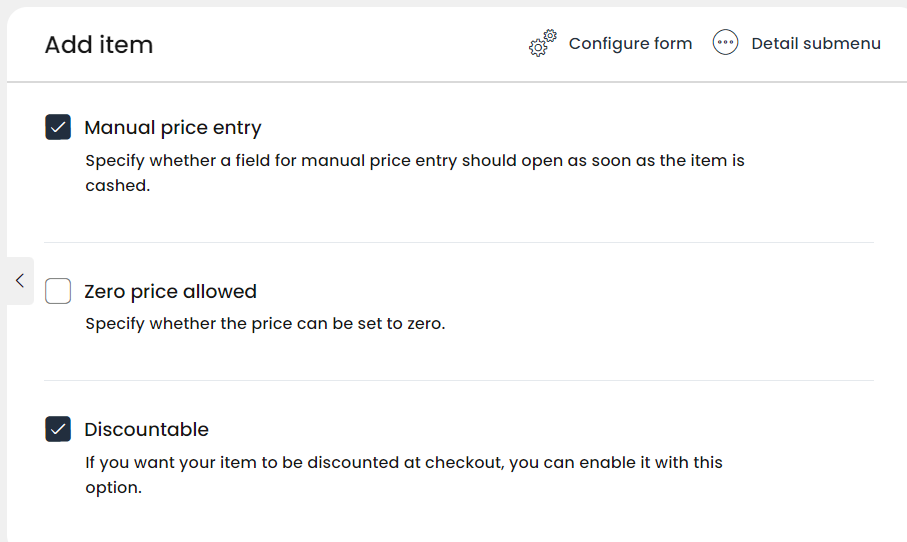
In the following section, you can choose by checking the boxes, from several options, concerning if manual price entry, zero price, or discount is allowed for the item:
Check the box for manual price overwrite if the price of the item can be changed manually via the POS software. This option in the POS software only available if the access right is enabled for the logged-in user. If all rights are enabled, the price stored in the system can be overwritten directly by the logged-in user at the checkout app. This means that the active checkout process does not have to be interrupted, the item list called up, the item configured and saved again.
Define whether manual price entry is allowed. The manual price entry is only available if the access right is enabled for the logged-in user. If all rights are available, the price stored in the system can be entered directly by the logged-in user at the checkout app. This means that the active checkout process does not have to be interrupted, the item list called up, the item configured and saved again.
Select if zero price is allowed to be set. This function can be used, for example, when a pack of dog food is purchased and a free food sample is included. In this case, the food sample is marked as zero price in the system.
Specify if the item is discountable, so it can be combined with a discount. With the RETAIL7 POS system, discounts can be defined under Menu → Masterdata → Promotions and these can be combined with items, but only if this function is enabled for the item here. More information on this topic in chapter 9. Promotions.
Tick if the item is prohibited for tax-exemption. In principle, all sales in Germany is subject to tax. However, there are "real" and "unreal" tax exemptions that apply to some industries. If you want to prevent this item from being sold as tax free, using exemption at checkout, you can check this box. Please ask your tax advisor about the conditions of tax exemption in your country.
Define whether the item can be returned. This function allows the item sold to be exchanged due to damage, for example. If the function is not enabled, the item is excluded from exchange.
In the next steps set up the Cost center to which the item should be transported, and the Cost center, which define the payer, who is responsible for the item. These two functions can be used for the transaction export, as it is used to enter the cost center. At this point it is important to obtain further information from the tax advisor.
In the Key / Values pair / Additional information section you can assign any special internal information about the item, and set the value (if needed). After you added a record here, you can add more by using the Add function.
You can enable Stock management in the next step. With the help of this function, you can be always up-to-date about which items are sold or returned, or are low on stock, because the system counts them. It is also possible to define here, from which quantity the stock of goods counts as "too low", and the system can do an inventory at any time.
Select whether the item is to be counted for selling and returns in stock management, and also, if the item is allowed to be reserved (when a customer can reserve an item and pick it up later).
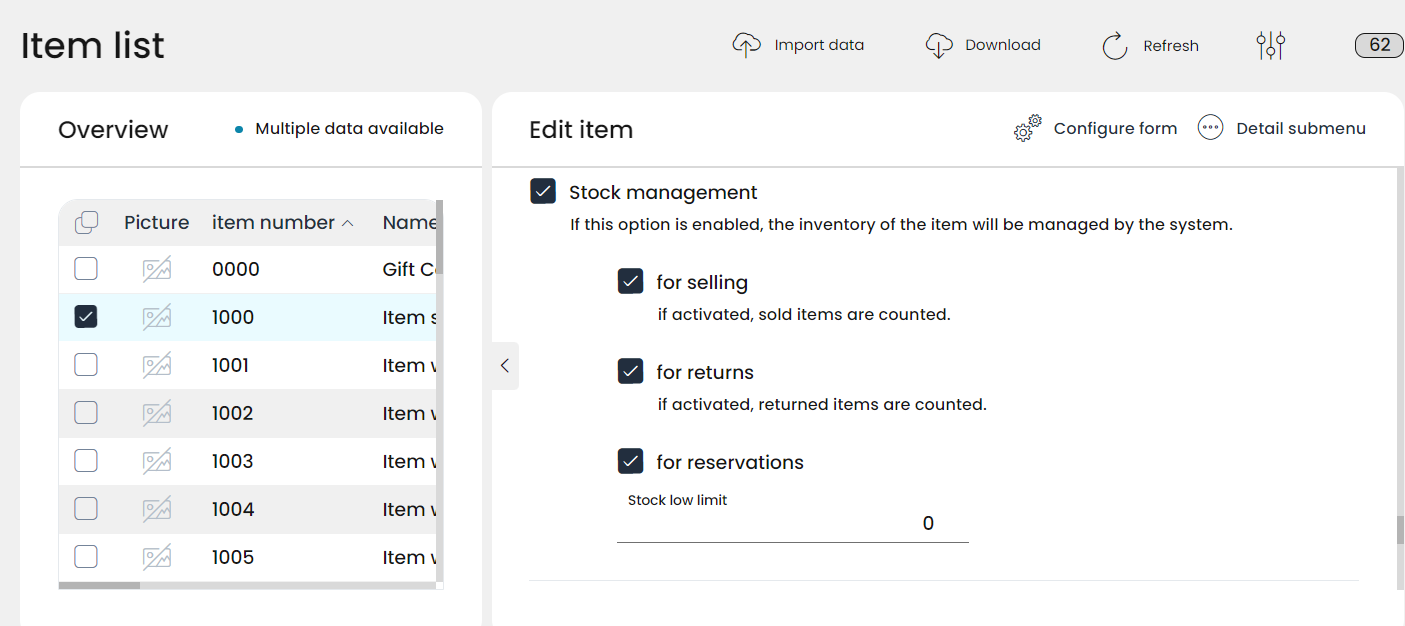
With this function, the system keeps a record about how many items of a type are sold and/or returned. This can be useful to get an overview of which item is sold particularly frequently, or is returned, e.g. for reasons of defects.
Specify the Stock low limit for the item. When the quantity of this item in the present system has reached this value, it is time to reorder. The value is entered manually, and will use the unit based on the item's unit of measure.
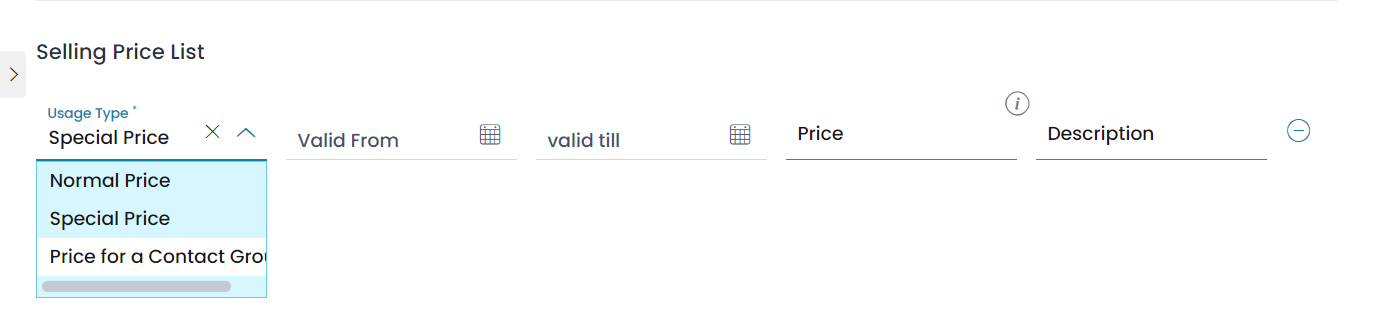
In the Selling Price List section you can define more than one price for the same item. These prices are not deducted at registration by discounts or any promotions, these are entered manually and are valid only for a defined time period.
After filling in all the needed fields of the Add item form, click on Save - your item is created, added to the database and can be sold right away.
Creating set items and variant items is bit different from the other item types, since these require extra information to be added, thus they have an extra tab beside the Master data sheet tab.
How to use the set item tab
When creating a set item, you have to begin with choosing the Set items option at the first step, at the Create item pop up window. After clicking on the Create item button, you will see the already familiar Master Data sheet of the new item - and beside that, another tab, called Sets.
After configuring the master item on the Master Data tab, as described above, you can assign several set(s) to it on the Sets tab. For this, you have to
enter a name of the new component (Set part No. 1 - you can change this manually),
choose the item to be added to the set from the scroll-down menu (Set item)
and enter a value as Quantity.
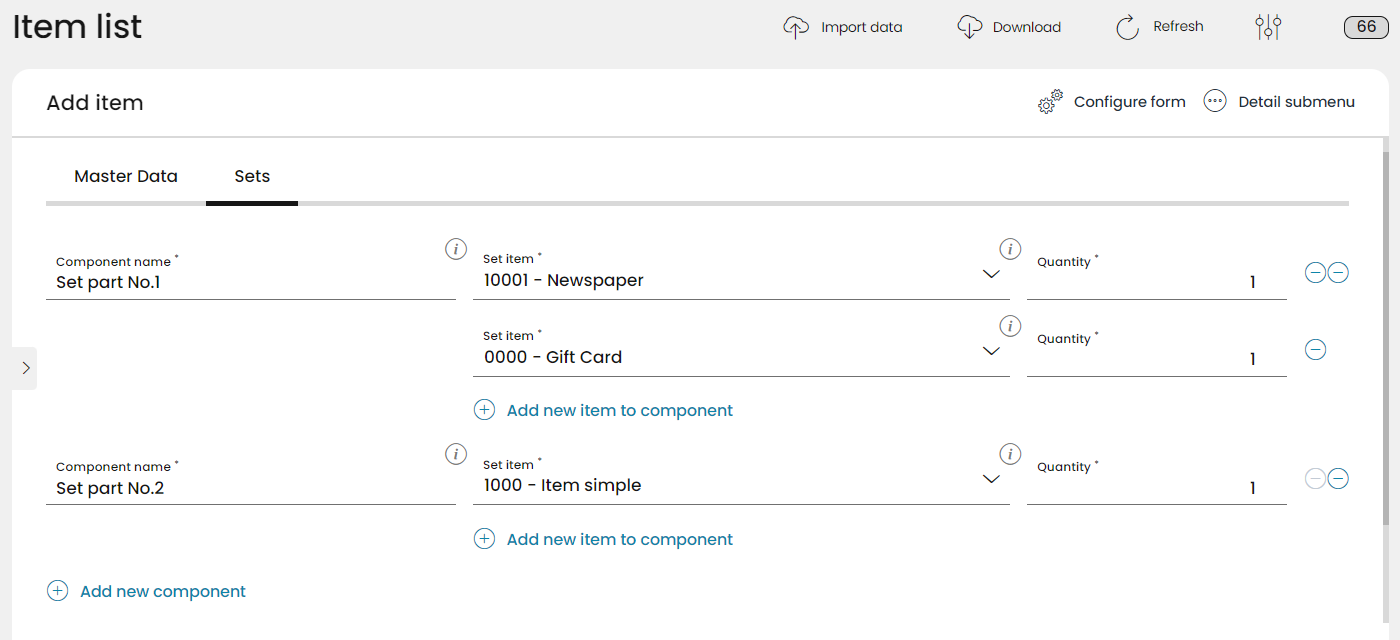
You can add more than one items to the same set component with the Add new item to component button under the Set item section, and also, you can create more than one set components (Set part No. 2, Set part No.3 etc. - or as you name them) with the Add new component button.
You have to finish configuring the item and its sets with the Save button.
How to use the variant item tabs
When creating a variant item, you have to choose the Variant master items option at the first step, at the Create item pop up window. After clicking on the Create item button, you will see the familiar Master Data sheet of the new item - and beside that another tab, called Variants.
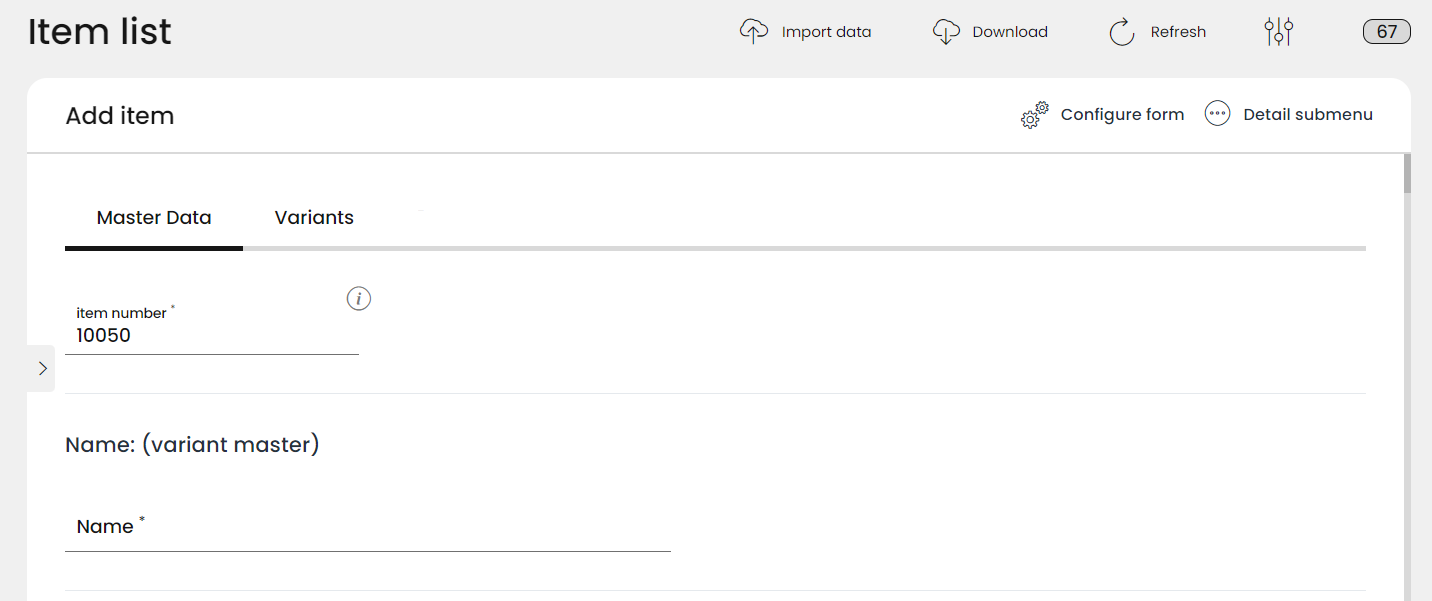
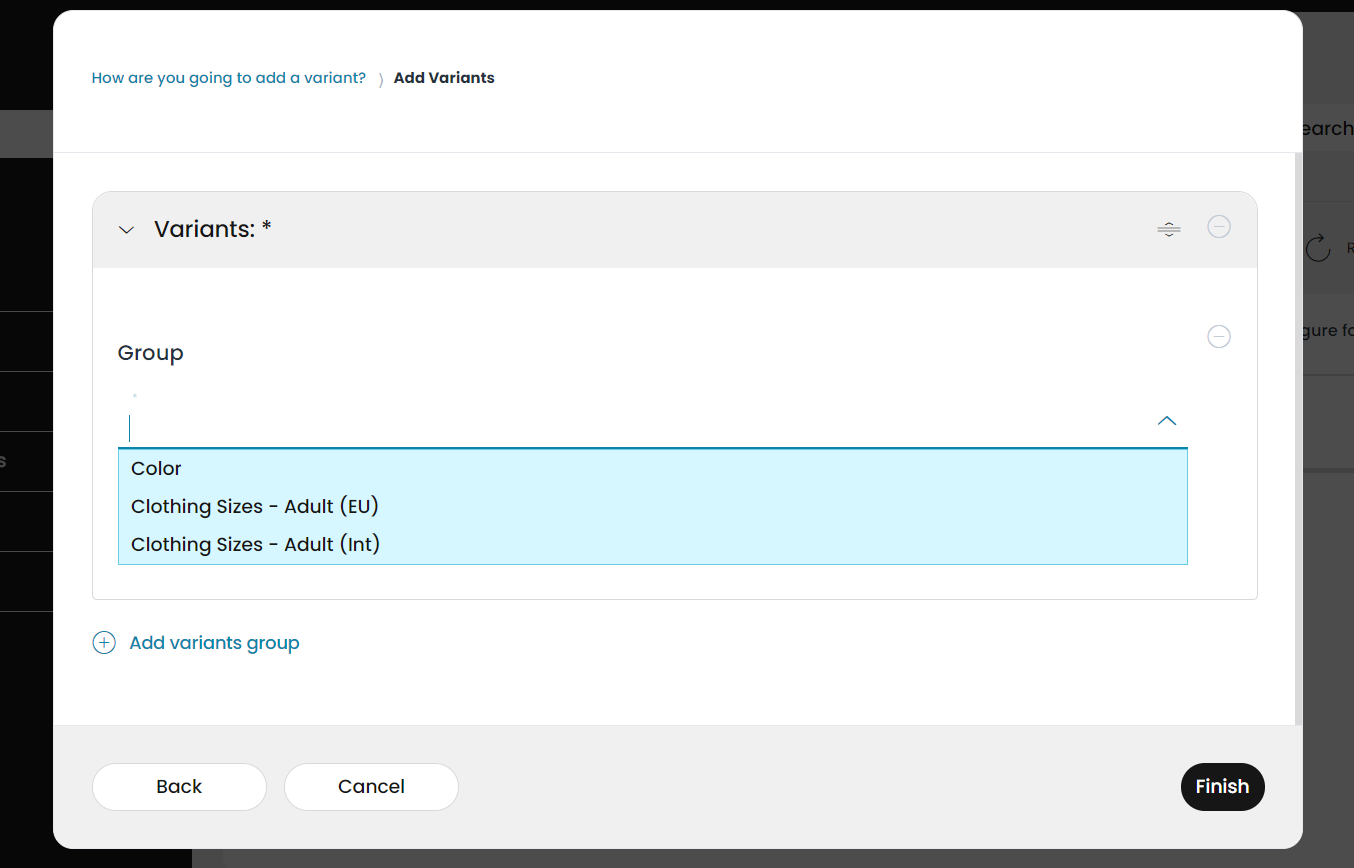
After filling and saving the data of all relevant fields of the Master data sheet, thus the master item is already created, you have to continue by clicking on the Variants tab, so you can configure what kind of variants to add to the master item. For this, click the Add variants group button.
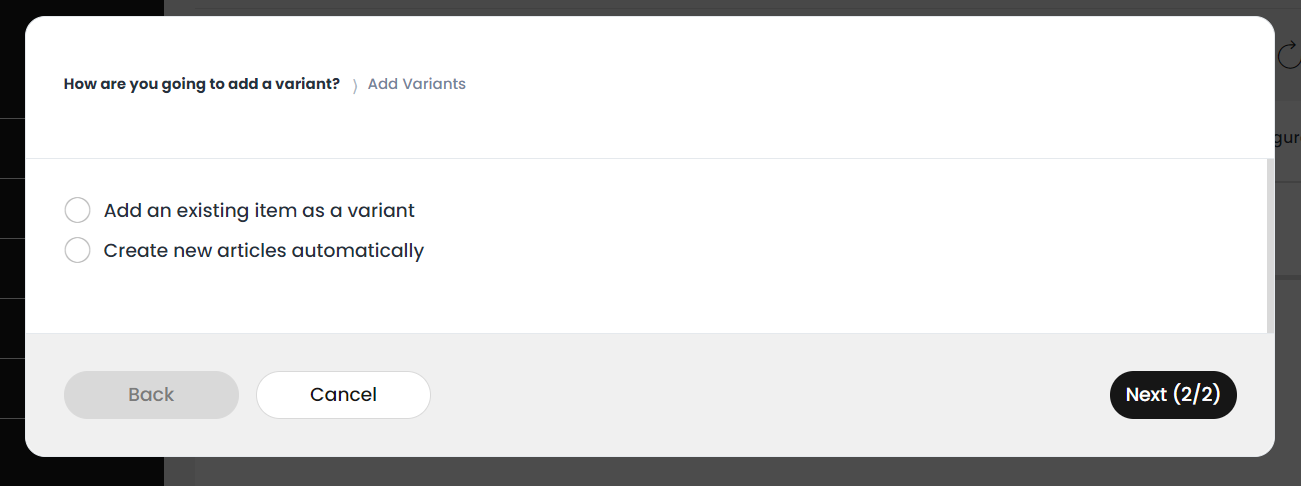
Now you have to choose if you would like to assign an already existing other item as a variant, or create new articles.
If you choose to Add an existing item as a variant to your master item, by clicking the Next button, you are offered to choose the needed item from a scroll-down list of items.
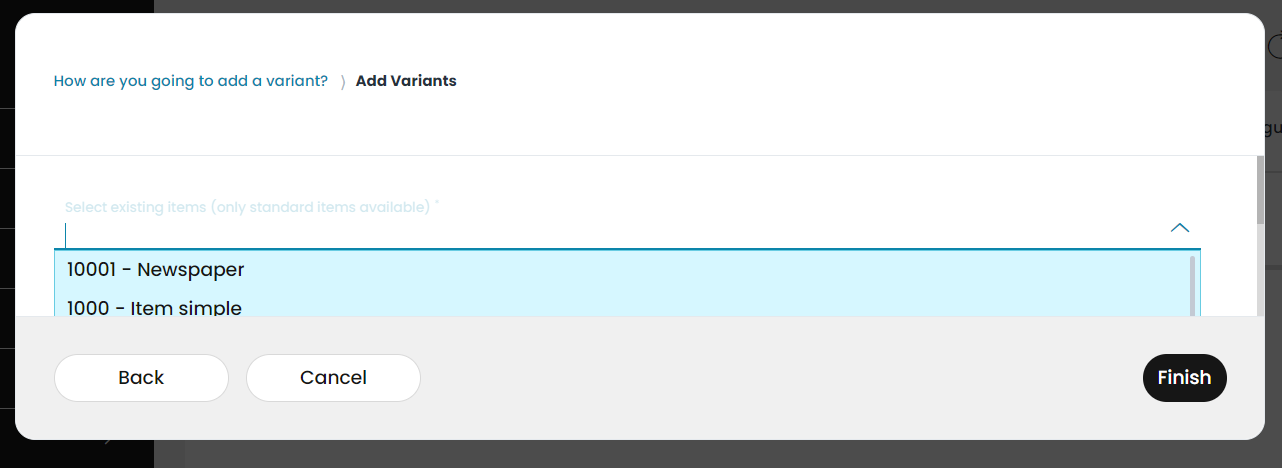
After choosing from the item list, you can assign the chosen item as a variant to your master item, and complete the procedure by clicking on the Finish button.
If you choose the Create new articles automatically, by clicking the Next button, you are offered to choose the group of item variants you would like to create. For this, you have to choose a Variants group, such as size or color.
When you choose Clothing size, you can choose the exact sizes you need for this item by ticking the needed checkboxes.
When you choose the Color, you can choose from several colors by ticking the needed checkboxes.
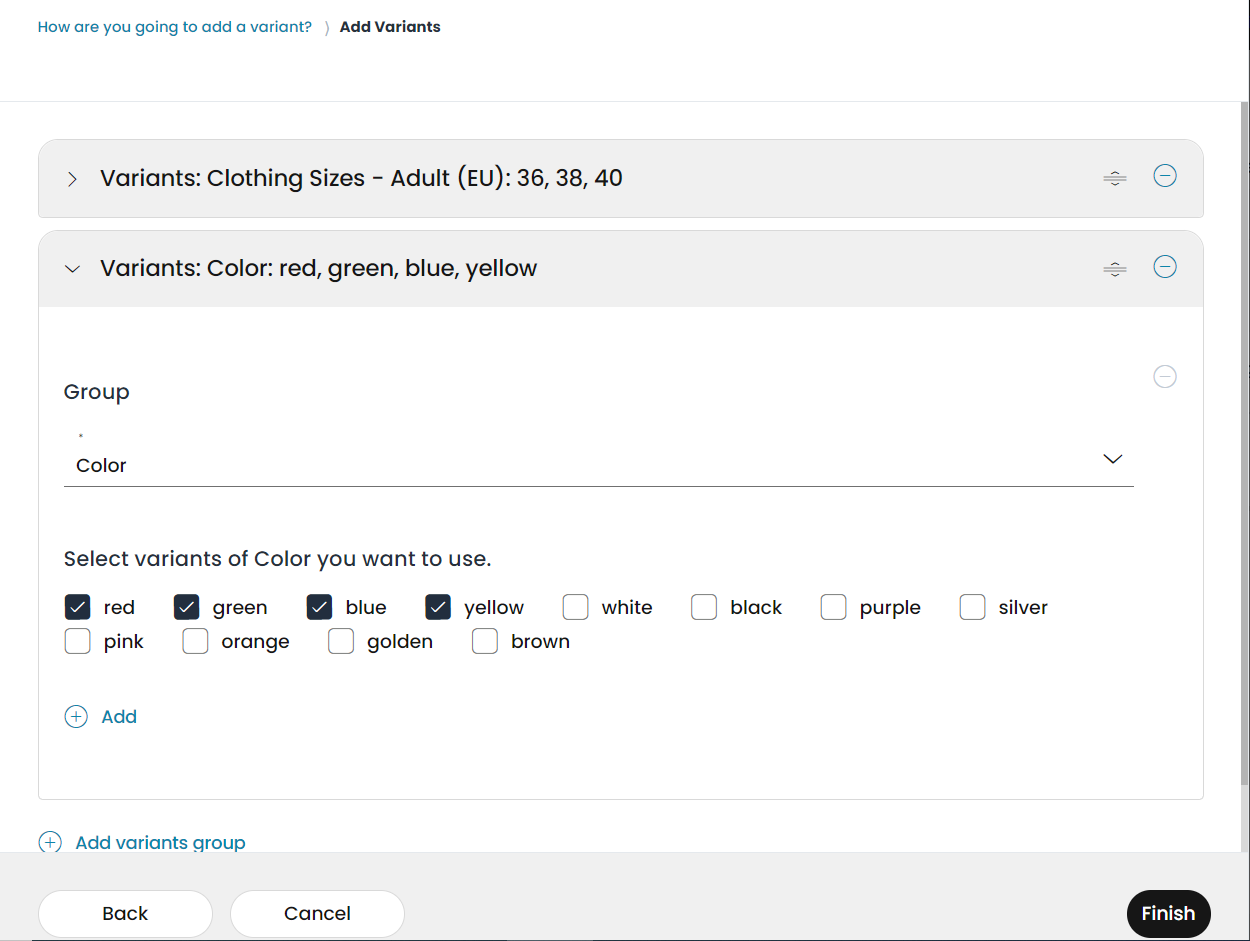
You can add more than one variants with the Add button, and complete the procedure by clicking on the Finish button.
You can finish creating your master variant item and its variants by clicking on the Save button.
If you used the Create another option, the Add item mask remains open so you can create and save the next needed new elements. The loop ends only when you remove the tick from the Create another checkbox before the last Save.
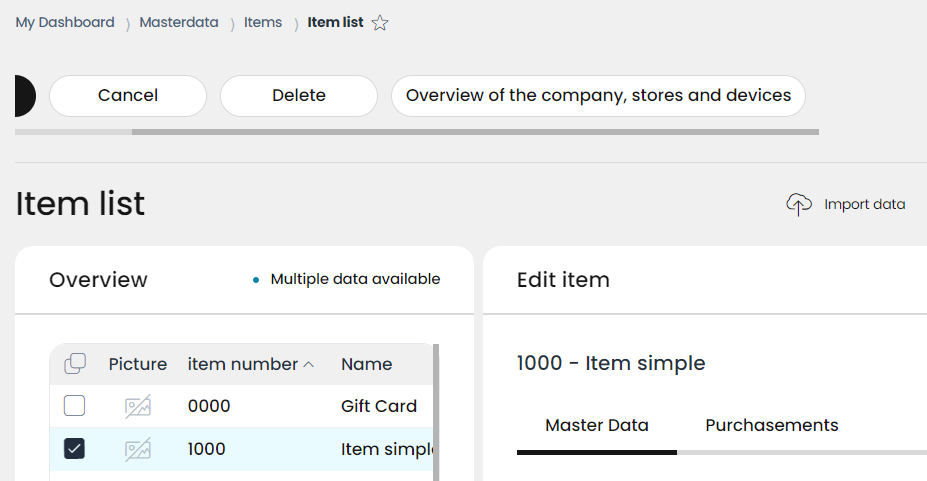
Editing items
Items that have already been created with the Add button, can be edited and deleted with the Edit and Delete buttons. This makes it possible to open all items again after saving them for the first time, to configure and save them with the changes, or delete them from the system.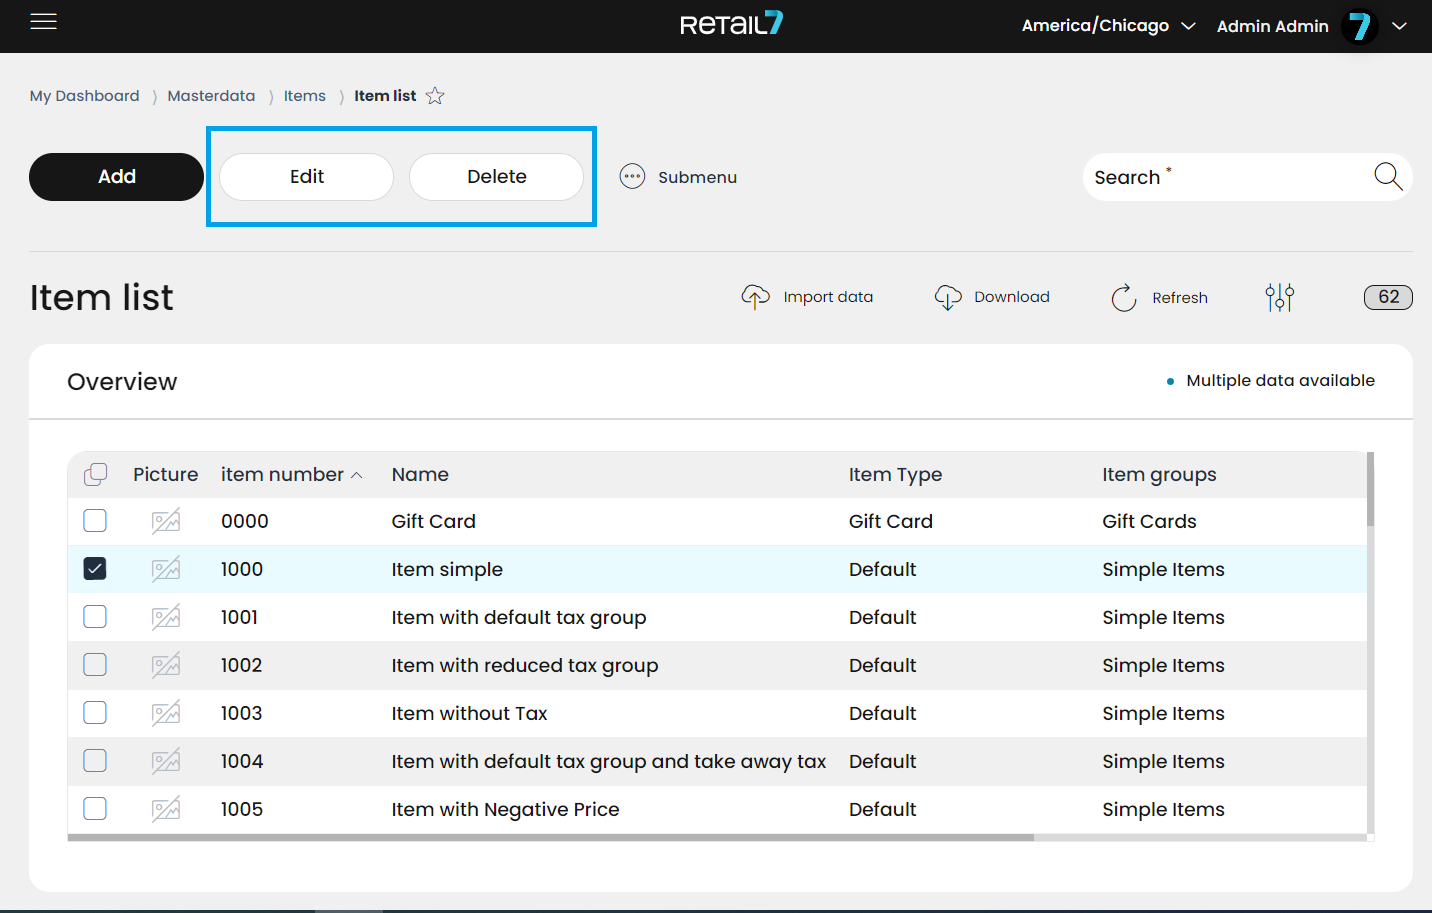
If you would like to edit an item:
1. Select the preferred item from the item list.
2. Click on Edit.
3. Apply the needed changes.
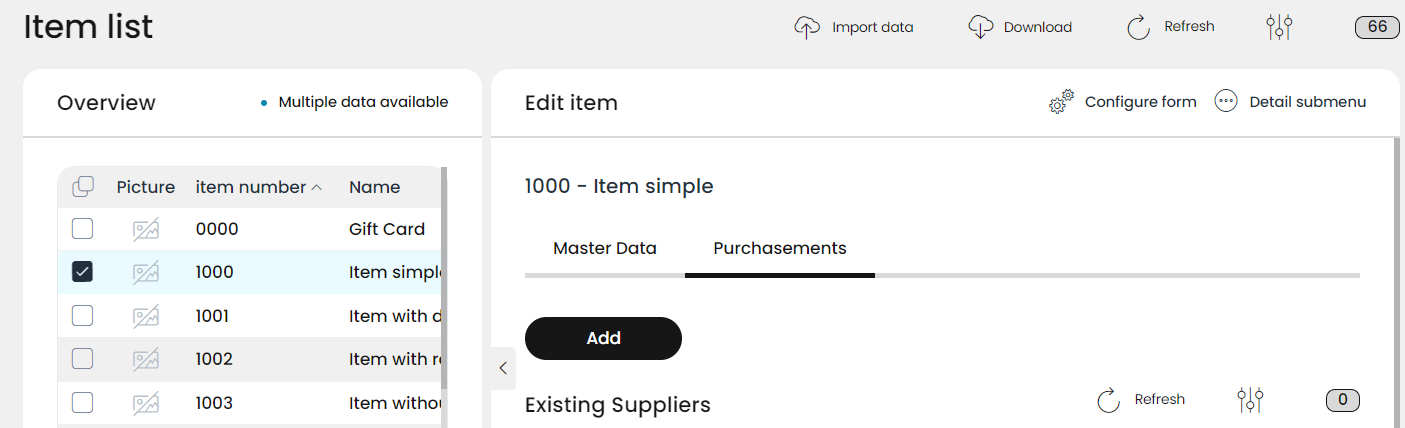
Note: when editing an item, you can see a new tab on the Edit item data sheet, beside the Master Data sheet, called Purchasements. This feature lets you to assign the suppliers of this item directly from your contact list to the item, making it easier to see, whom to contact for a new order. The suppliers are listed under the Existing Suppliers, and you can assign them to the item with the Add button.
For the suppliers to be listed as Existing Suppliers here, you first have to add them under Menu -> Masterdata -> Contacts, create Contact groups (e.g. Customers, Suppliers, etc.), and assign your contacts to the correct contact group (in this case, to the Suppliers). You can learn more about this in our "6. Contacts" chapter.
4. Click on Save.
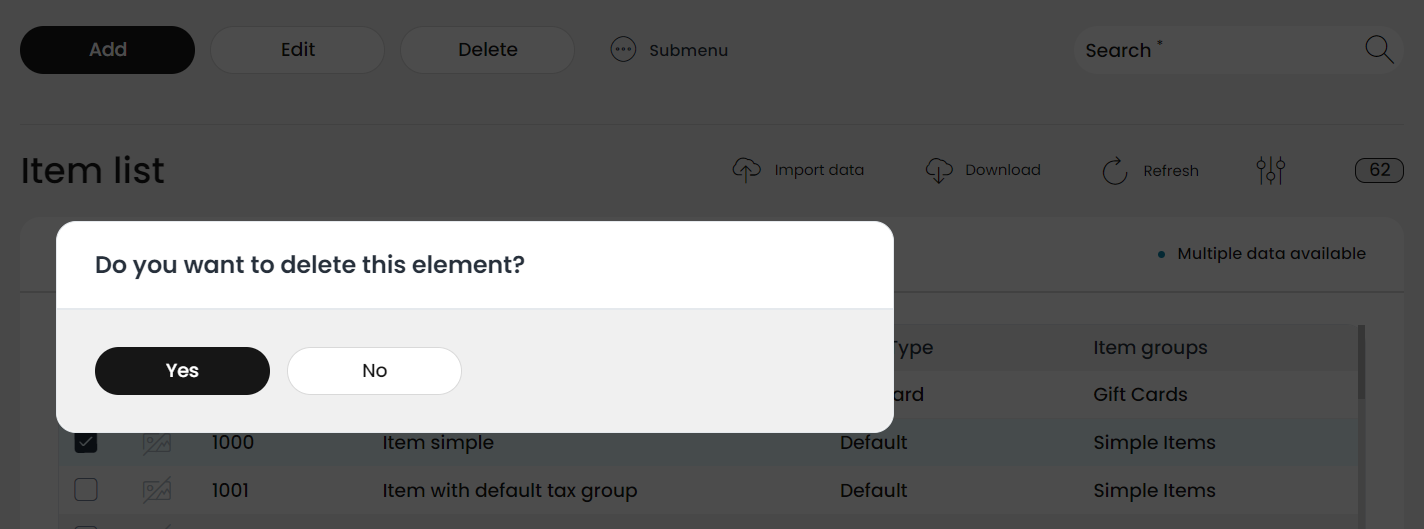
Deleting items
In case you would like to delete an item:
1. Click on the preferred item in the Item list.
2. Click on Delete.
3. Confirm your decision by clicking on Yes.
Duplicating items
If you would like to add a new item, and there is already an item in the database similar to it, the new one can be added more quickly and easily by duplicating the existing one. Of course, the new item is given its own item ID, and can then be edited, according the differences. This means that no need to set up all the details from scratch, like in creating a new item, but time can be saved and the small customizations can be set.
1. Click on Submenu.
2. Select Duplicate.
3. The item is duplicated in the item list with all the specified settings.
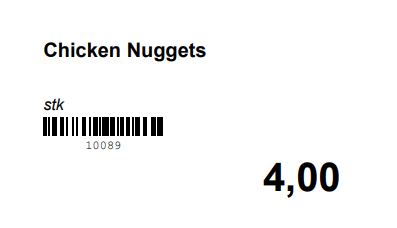
Downloading labels
The download labels feature is a very convenient and particularly important feature because, these labels will be placed on the shelves in the shop, so the customers can find all the important information about the item.
1. For downloading the labels:
2. Select the required item.
3. Click on Submenu.
4. Select Download Labels.
5. A PDF is downloaded to the system, so it is possible to print out the label and attach it to the shelves of the respective items, for example.
6. Open the PDF file.
7. Save the file to the preferred location of your system and print the label.
Change structure assignment
Each item can be assigned to the organizational structure (for example, to one or more stores) - either in its entirety or individual fields can differ (for example, the price). Reasons for this, for example, different prices can be applied to an item in your snack stand or street window, or because food and drinks are sold with a different price than in your connected café, with service.
You can change a structure assignment of an item here in the Item list, by selecting the item and clicking on the three dots Submenu to get the option Change structure assignment.
Please note: changing the organizational structural assignment is part of a more complex system function, which you can find under the My Organization -> Units menu of the Management Console, and you can learn about it more under the My Organization chapter of this user documentation.
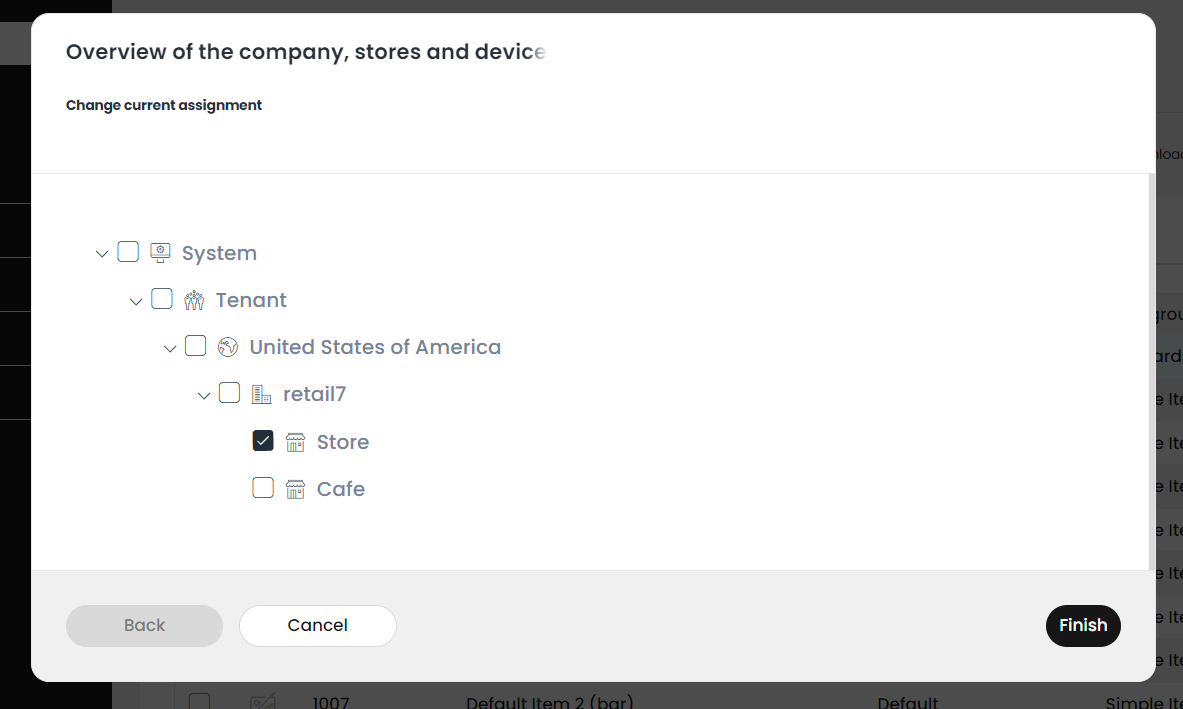
As you can see, the "system-level" setup is pre-selected here, which means that the item is available and has the same data in all stores.
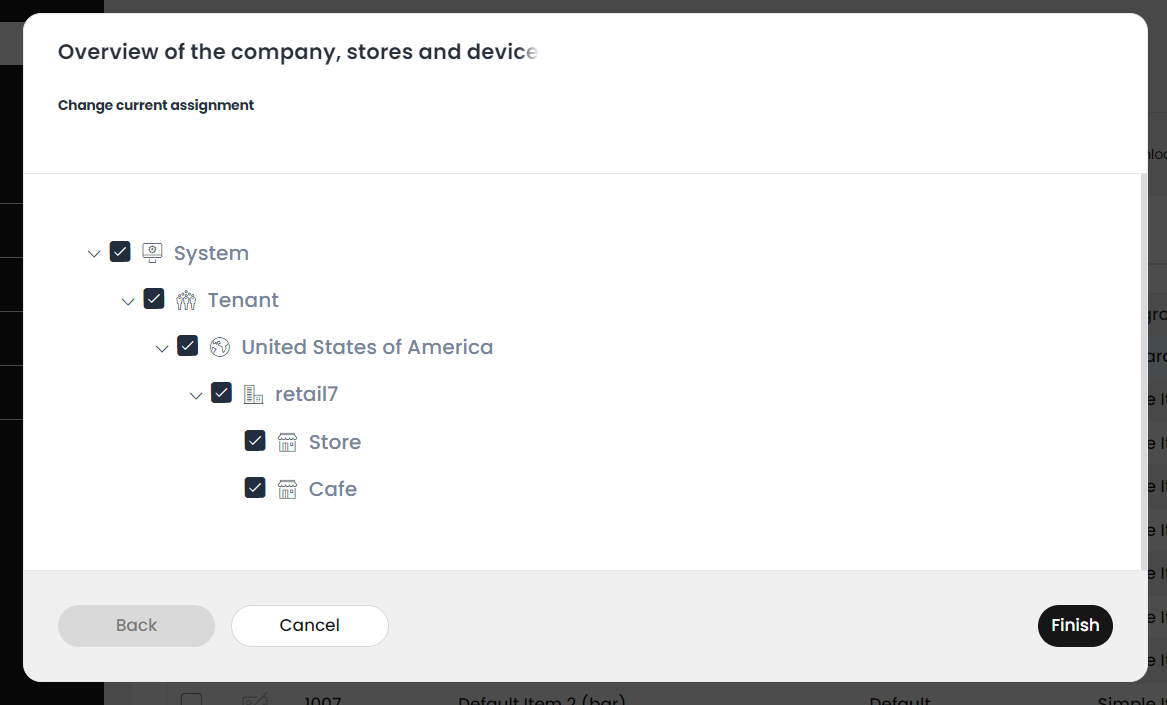
First de-select them by clicking on any of the checkboxes.
Now click on the desired store(s) where you would like the item to be available and click Finish.
In the next step you are asked if the system should set the stock amount to zero in the stores where the item was previously available.
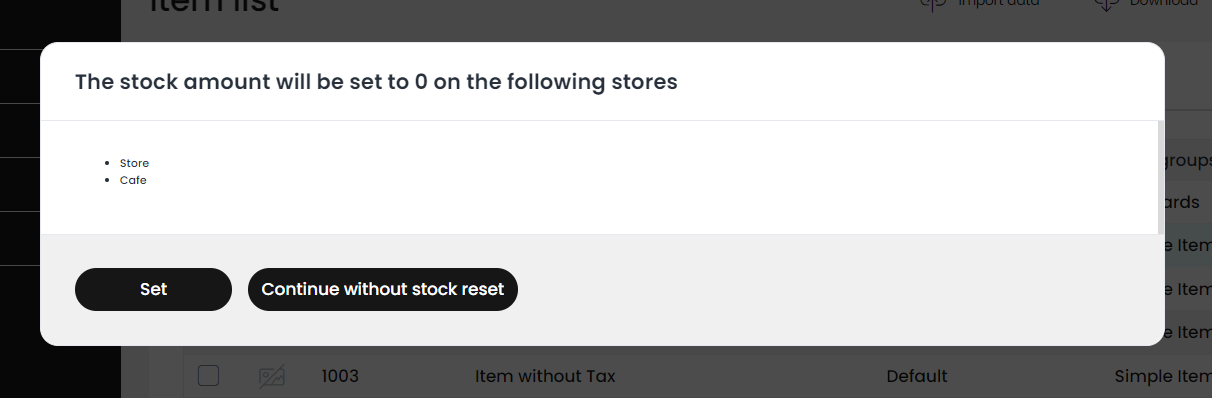
You can decide here to choose
Set which means, that the stock low limit of the item will be updated in the affected store(s) as zero, and you have to set them manually with the Edit item function, or
Continue without stock reset: in this case, all stores keep their stock amount of the item, and you have to manually "move" them under Masterdata -> Stock management -> Stock movement menu.
Your adjustments are now active in the previously selected stores. The configuration of the item remains unchanged in all other stores.
Note: when editing an already existing item, you can also change the structure assignment. For this, beside the Save, Cancel and Delete buttons, there will be an Overview of the company, stores and devices button displayed, which has this same function.
The only difference is, when using the function from here, that you have to Save your changes of the item, before the question popup about the stock reset is displayed. From then on, you can follow the steps we described here earlier.
Trigger batch edit
With this function, you can edit some properties of several items at once, aka in one batch.
First you have to check the items of the item list you would like to batch edit, and go to the Submenu button and choosing the Trigger Batch Edit menu.
By clicking on this menu, the first panel of the batch editing function, the Entity Selection is displayed. Here you can see the full item list with the originally selected items, but you can add or (by unclicking it) remove other items here. Also, if you click on the checkbox, you can select all items on the list.
Once you have made the needed adjustments, you can move to the next step of the batch editing by clicking Next.
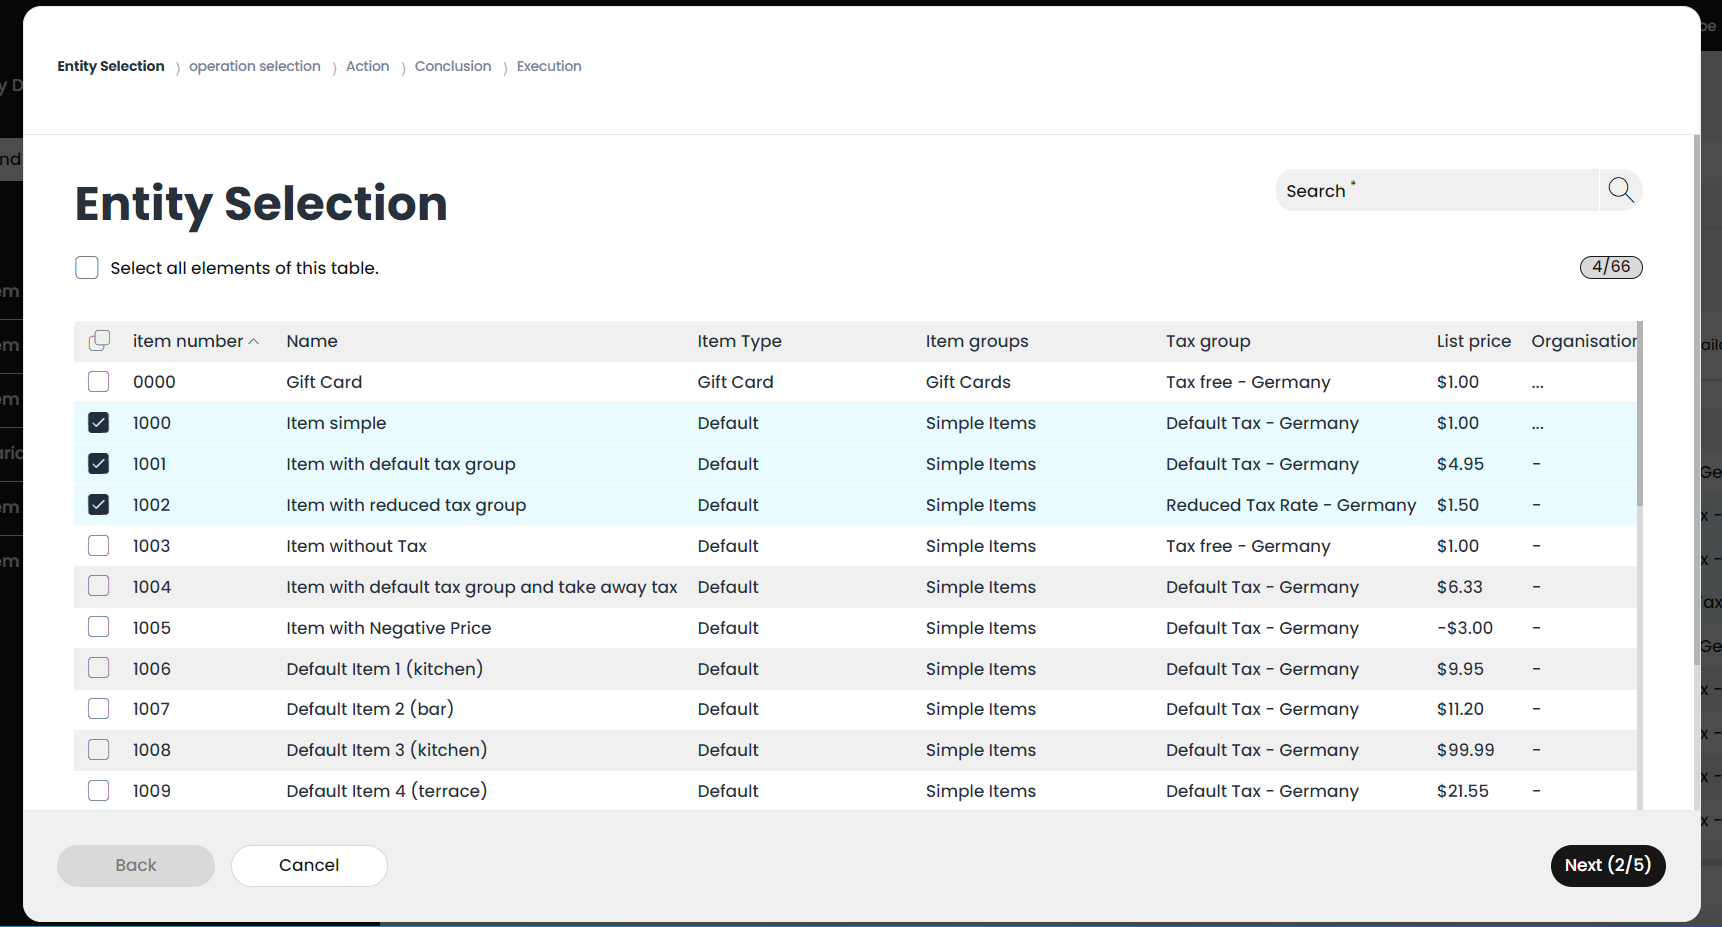
Please note: at every panel, there is a Back and a Cancel button in the lower left corner. With them, you can return to the previous panels at any time (e.g. to change some adjustment), or just cancel the whole operation.
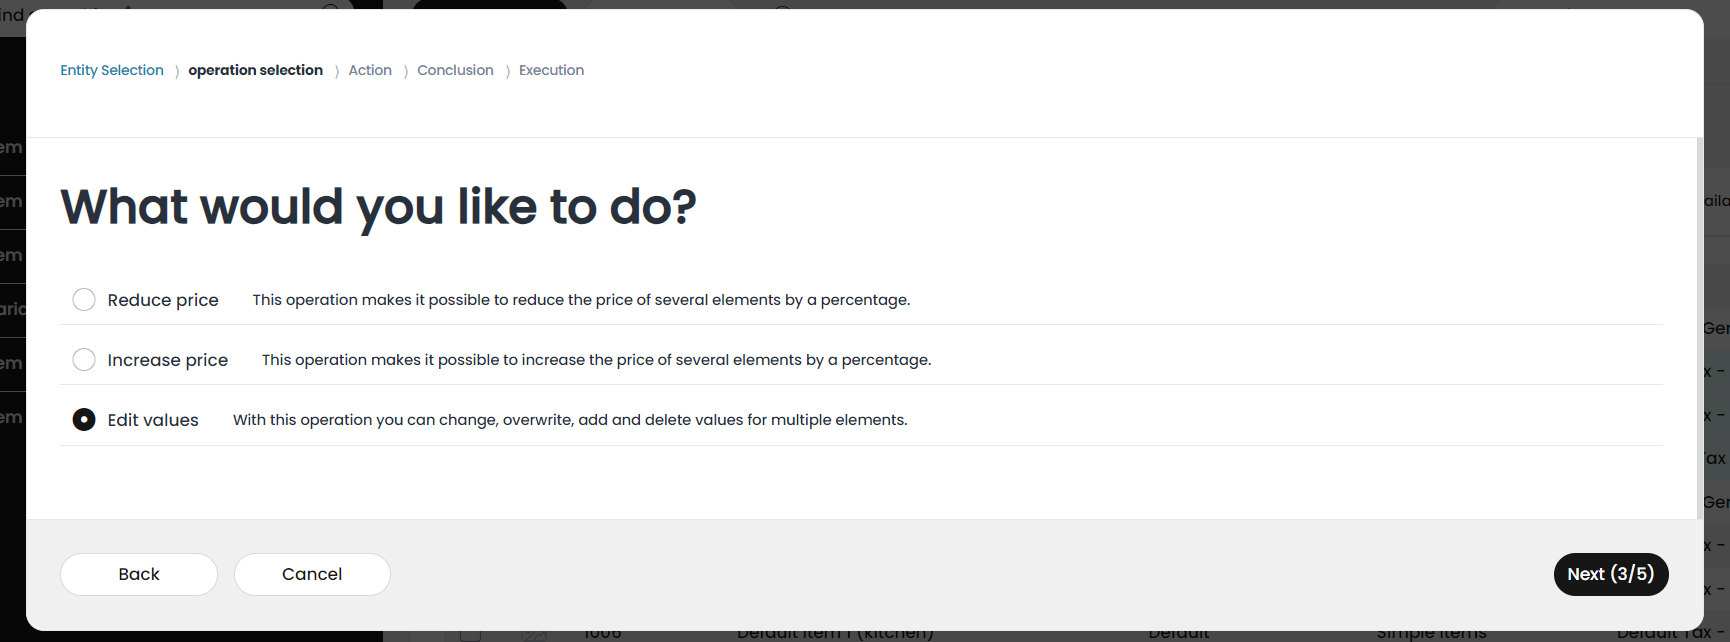
The next step is, to decide, what operation to be executed on the selected items. For this, on the Operation selection panel, you have the following options:
reducing the price: this will reduce the price of the selected items by a percentage
increasing the price: this will increasing the price of the selected items by a percentage,
or edit values: by choosing this, you can change, overwrite, add or delete values for the selected items at once.
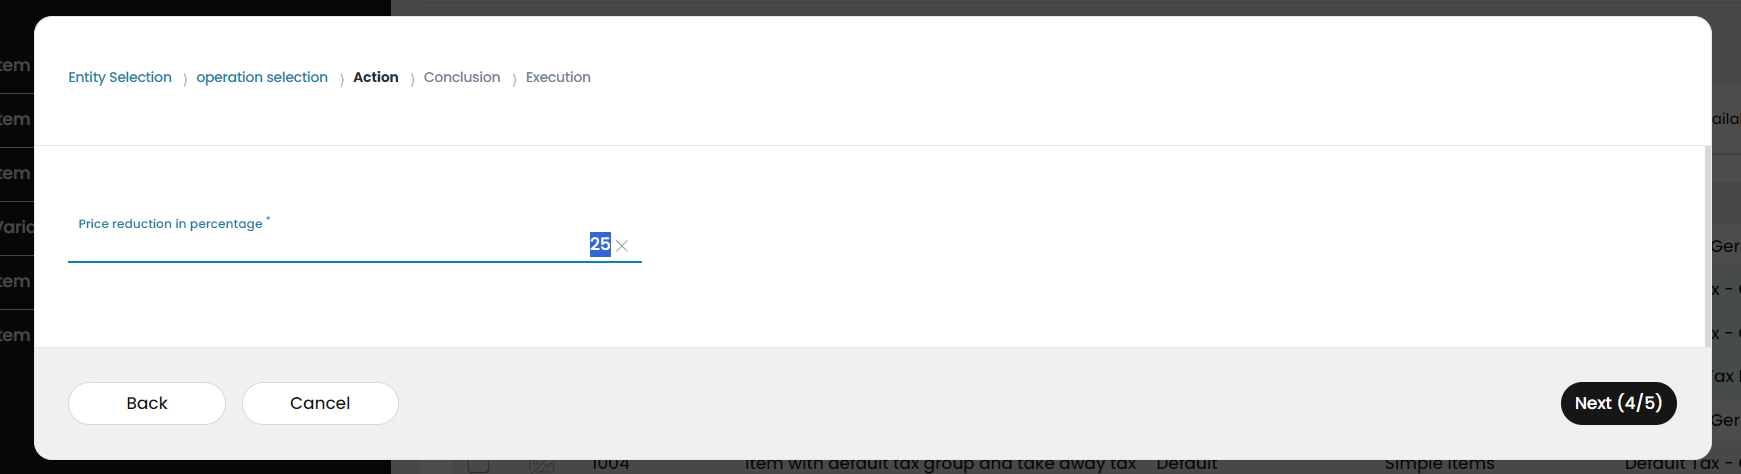
Reducing the price by batch editing
By choosing the reducing price option, you are directed to the Action panel, where you can manually enter the value of the Price reduction percentage. In this example, we would like to reduce the price of 4 selected items by 25%, so 25 is entered here.
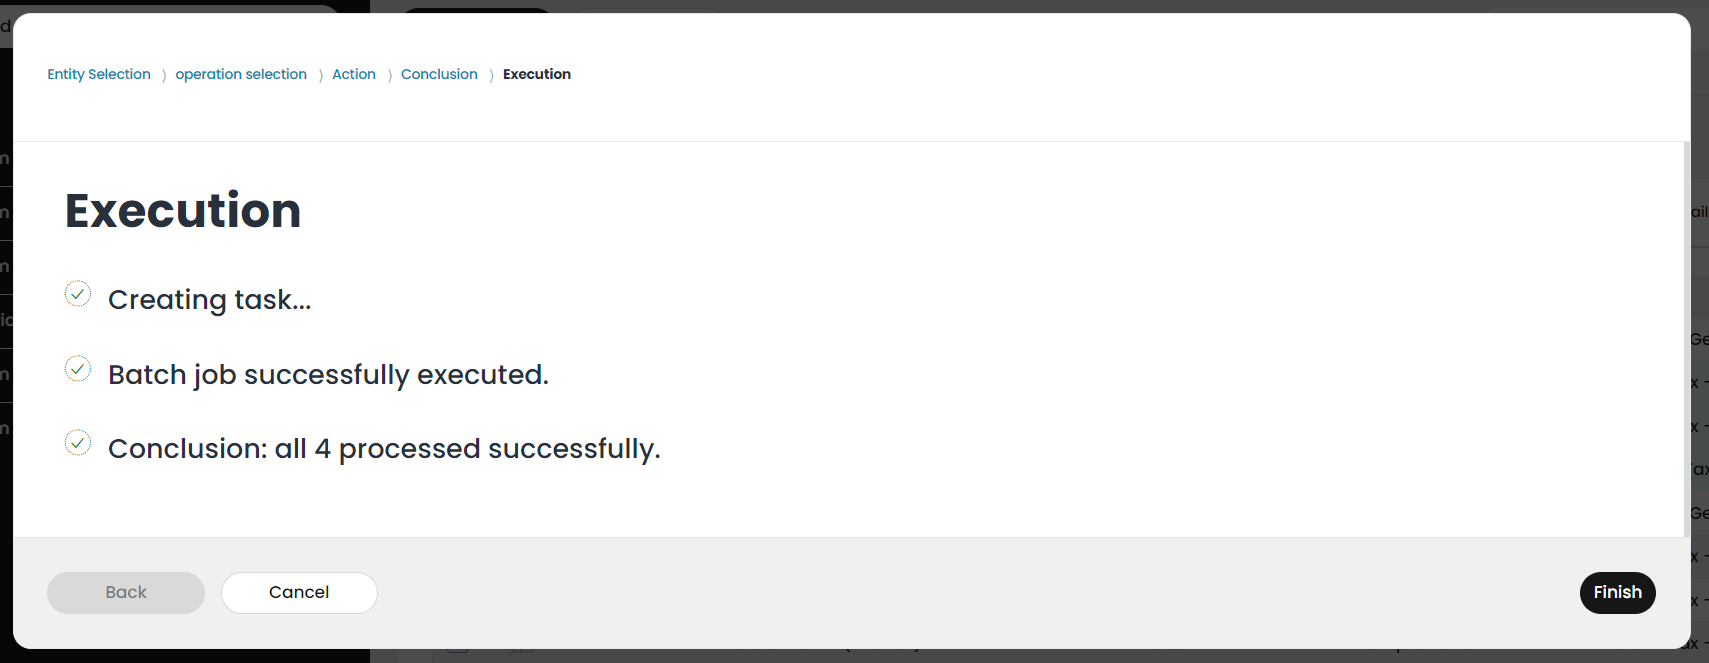
Clicking Next forwards us to the Conclusion panel, so you can check before execution, what operation will be implemented on which items. Here you still have the option to go back to any of the previous panels and change any data, or cancel the whole operation.

This is the last step before execution, so if you change your mind about any of the previous configurated elements, you can do it here. By clicking the Next button, the edition will be executed on all selected items with the previously set up configuration, and the results are displayed on the Execution panel. By clicking Finish you are directed back to the Item list.
Increasing the price by batch editing
Here the steps are essentially the same as the steps described above, in the decreasing the price section, except that on the action panel now you have to enter the percentage for increasing the price of the selected items.
Editing values by batch editing
The batch editing function offers the opportunity to change, overwrite, add or delete several values of more than one item, all at once. As you have already seen, this option is offered on the Operation selection panel.
When choosing the Edit values option and clicking on Next, you are forwarded to the Batch Edit form on the Action panel. On this form (and by scrolling down on it) you can see several variables of the items and you can configure these variables by choosing the proper value from the scroll-down menus, and clicking on the boxes to confirm your changes.

The possible variables to be changed here are
Tax group
Alternative tax rate
Item group
Item menu
Unit of measurement
Sales restriction age
Manual price override
Manual price entry
Prohibited for tax exemption
Discountable
Item can be returned
Print use cases
Zero price allowed
Cost unit
Cost center
It is also possible not to set any new value, just delete the current ones, by clicking on the checkbox. At some parameters (e.g. Item groups, Item menu, or Unit of measurement), you can see a rolldown menu paired: here you can not just delete the current value, but instead, it´s possible to override it, or to add the selection to the current values.
After setting the needed properties, you get to the Conclusion panel, with a summary of the changes to be executed. The execution will be implemented by clicking on the Next button, the results of the successful implementation are displayed on the Execution panel. By clicking on Finish, you are directed back to the Item list.
Import the whole database of items
If you have your own item database, you don´t need to create your items in the Management Console manually. As it was already mentioned at the beginning of this chapter, the Item list has the function of importing data (Nr. 1.)
To use this function:
Go to Masterdata -> Items -> Item list
Click on Import data (1).
Move the file with your mouse into the object import field from your hard disk (Drag & Drop), or click on the import window to browse your files and select the corresponding one from your hard disk.
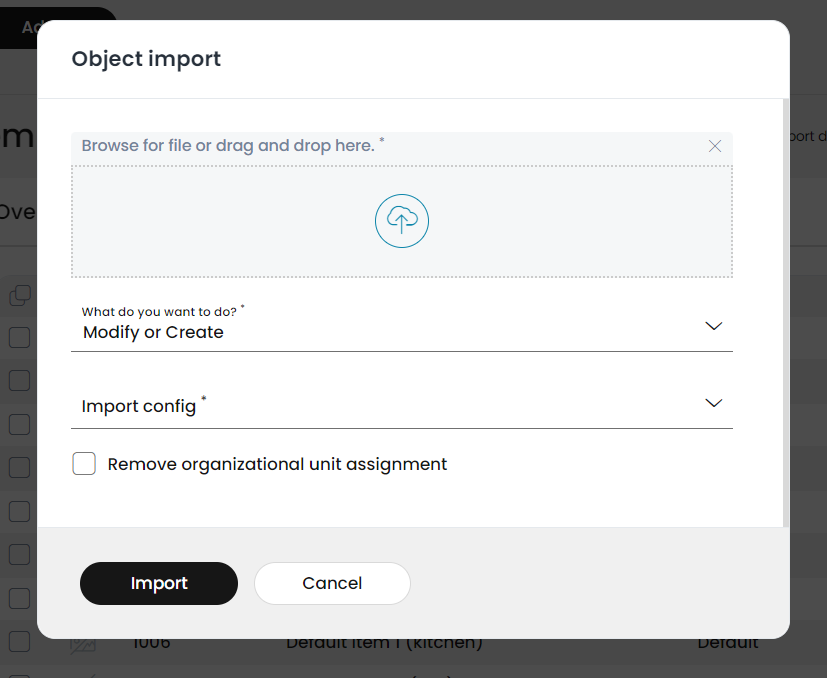
Select from the rolldown menu what you want to do with the data.
Select from the rolldown menu your desired import configuration.
Click on Import.
Download the full database of items
If you would like to download your full item database from the Management Console, you can also do that with the Download (Nr. 2) function.
Go to Masterdata -> Items -> Item list
Click on Download (2).
Select a desired file format and config of the data.
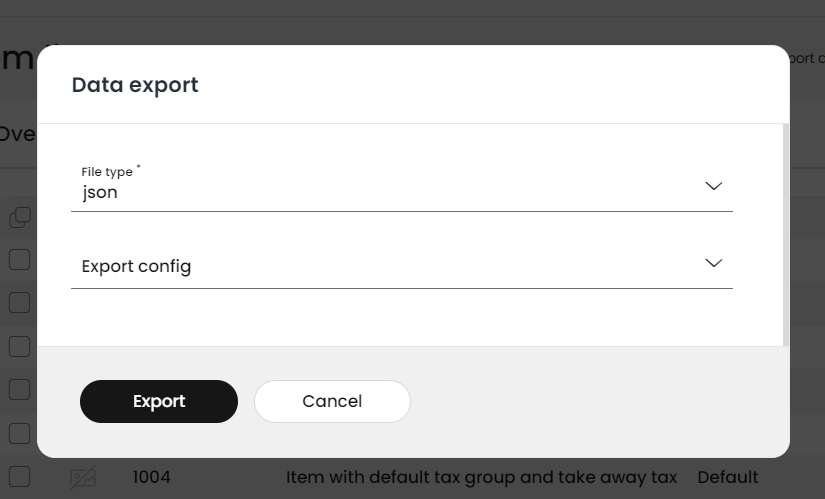
Click on Export. With this, an email will be sent to the email address you are logged in with.
Open your mailbox and download the file to your own system.