Epson TM-T88VI
Let's set up the new Epson TM-m30 receipt printer together! We'll be happy to help so that the printer can be used on the POS device of your choice without any problems.
From wiring to loading the roll paper, we explain everything in small and easy to understand steps. Following these instructions, you should be able to use the printer without any problems.
How to assemble the printer?
1. First check whether the printer model has a serial or a parallel port. This port is used to connect the POS device to the printer.
A serial port is relatively small and rather high, while the parallel port is very wide. Depending on the port, a null modem cable (for the serial port) or an IEEE 1284 cable (for the wide parallel port) is required.
2. Is the printer off? Then the power supply and all other cables can be attached to the back of the Epson printer without any problems. The shapes of the connectors can be seen here:
 3. Connect the printer to the cash register device by connecting the null modem cable or the IEEE 1284 cable to both devices. Then the printer can be attached to the power without any problems.
How to protect the cables?
The next step is to install a connector cover for the printer. This will protect the cables on the printer from all external influences and make them last longer.
1. First turn the Epson TM-T88VI printer upside down.
2. On the rear side, the cover can be hooked into the printer housing with two hooks first. When pressing the connector cover down, it should now automatically snap into the housing.
3. Afterwards, the enclosed screw can be used to secure the cover from the outer side as well. Simply use a wrench or your hand to screw the screw into the cavity provided for this purpose.
NOTE: To remove the cover once, first unscrew the screw. Then the cover can be pushed downwards and then the two outer sides inwards to lift both hooks out of the housing.
4. In order to protect the cables also from the lower side, the lower cover can be additionally attached.
How should the cables be distributed?
There are various cable openings on the Epson TM-T88VI printer, which should be optimally assigned to the corresponding cables.
On the sides of the terminal cover, some cables can be led from the plug to the outside. However, a cable should also be fed through in the cavity where the screw can be placed. It is possible to fix this cable extra in the case so that it doesn't slip. For this purpose, there is a hook in the center of the lower side of the printer to which the cable (for example, a USB cable) can be attached.
When placing the printer upright at the end, it is necessary to check again:
Are there no cables trapped?
Are the cables sufficient over the selected distance to all devices, such as router or cash register device?
Did the cables come loose inside when they were attached, or does the transmission work without problems?
How to protect the network switch?
n the package of the Epson TM-T88VI printer there is also a network switch cover. This can be placed over the network switch to avoid accidentally turning the network on or off.
Despite the cover, however, the network can be switched on and off at any time with a pointed pen or other object. This only has to be inserted into the holes of the cover. The entire cover can also be removed with a pointed pen if it is no longer to be used.
Place the network cover exactly over the open network switch. If anything goes wrong in the process, the network cable MUST be pulled out IMMEDIATELY. Otherwise, there may be dire consequences, such as fire.
How to load a paper roll into the printer?
In just a few steps, you can start cashing up. However, the Epson TM-T88VI printer needs a roll of paper for this. Here we explain how to insert it.
1. To do this, first open the roll paper cover. The switch for this can be found at the edge on the upper side of the printer, next to the various connections. If a roll has already been loaded into the printer, it must be removed first.
2. Then take a new roll of paper and place it in the cavity of the printer. NOTE: But make sure that the paper is unrolled from the bottom side at the end.
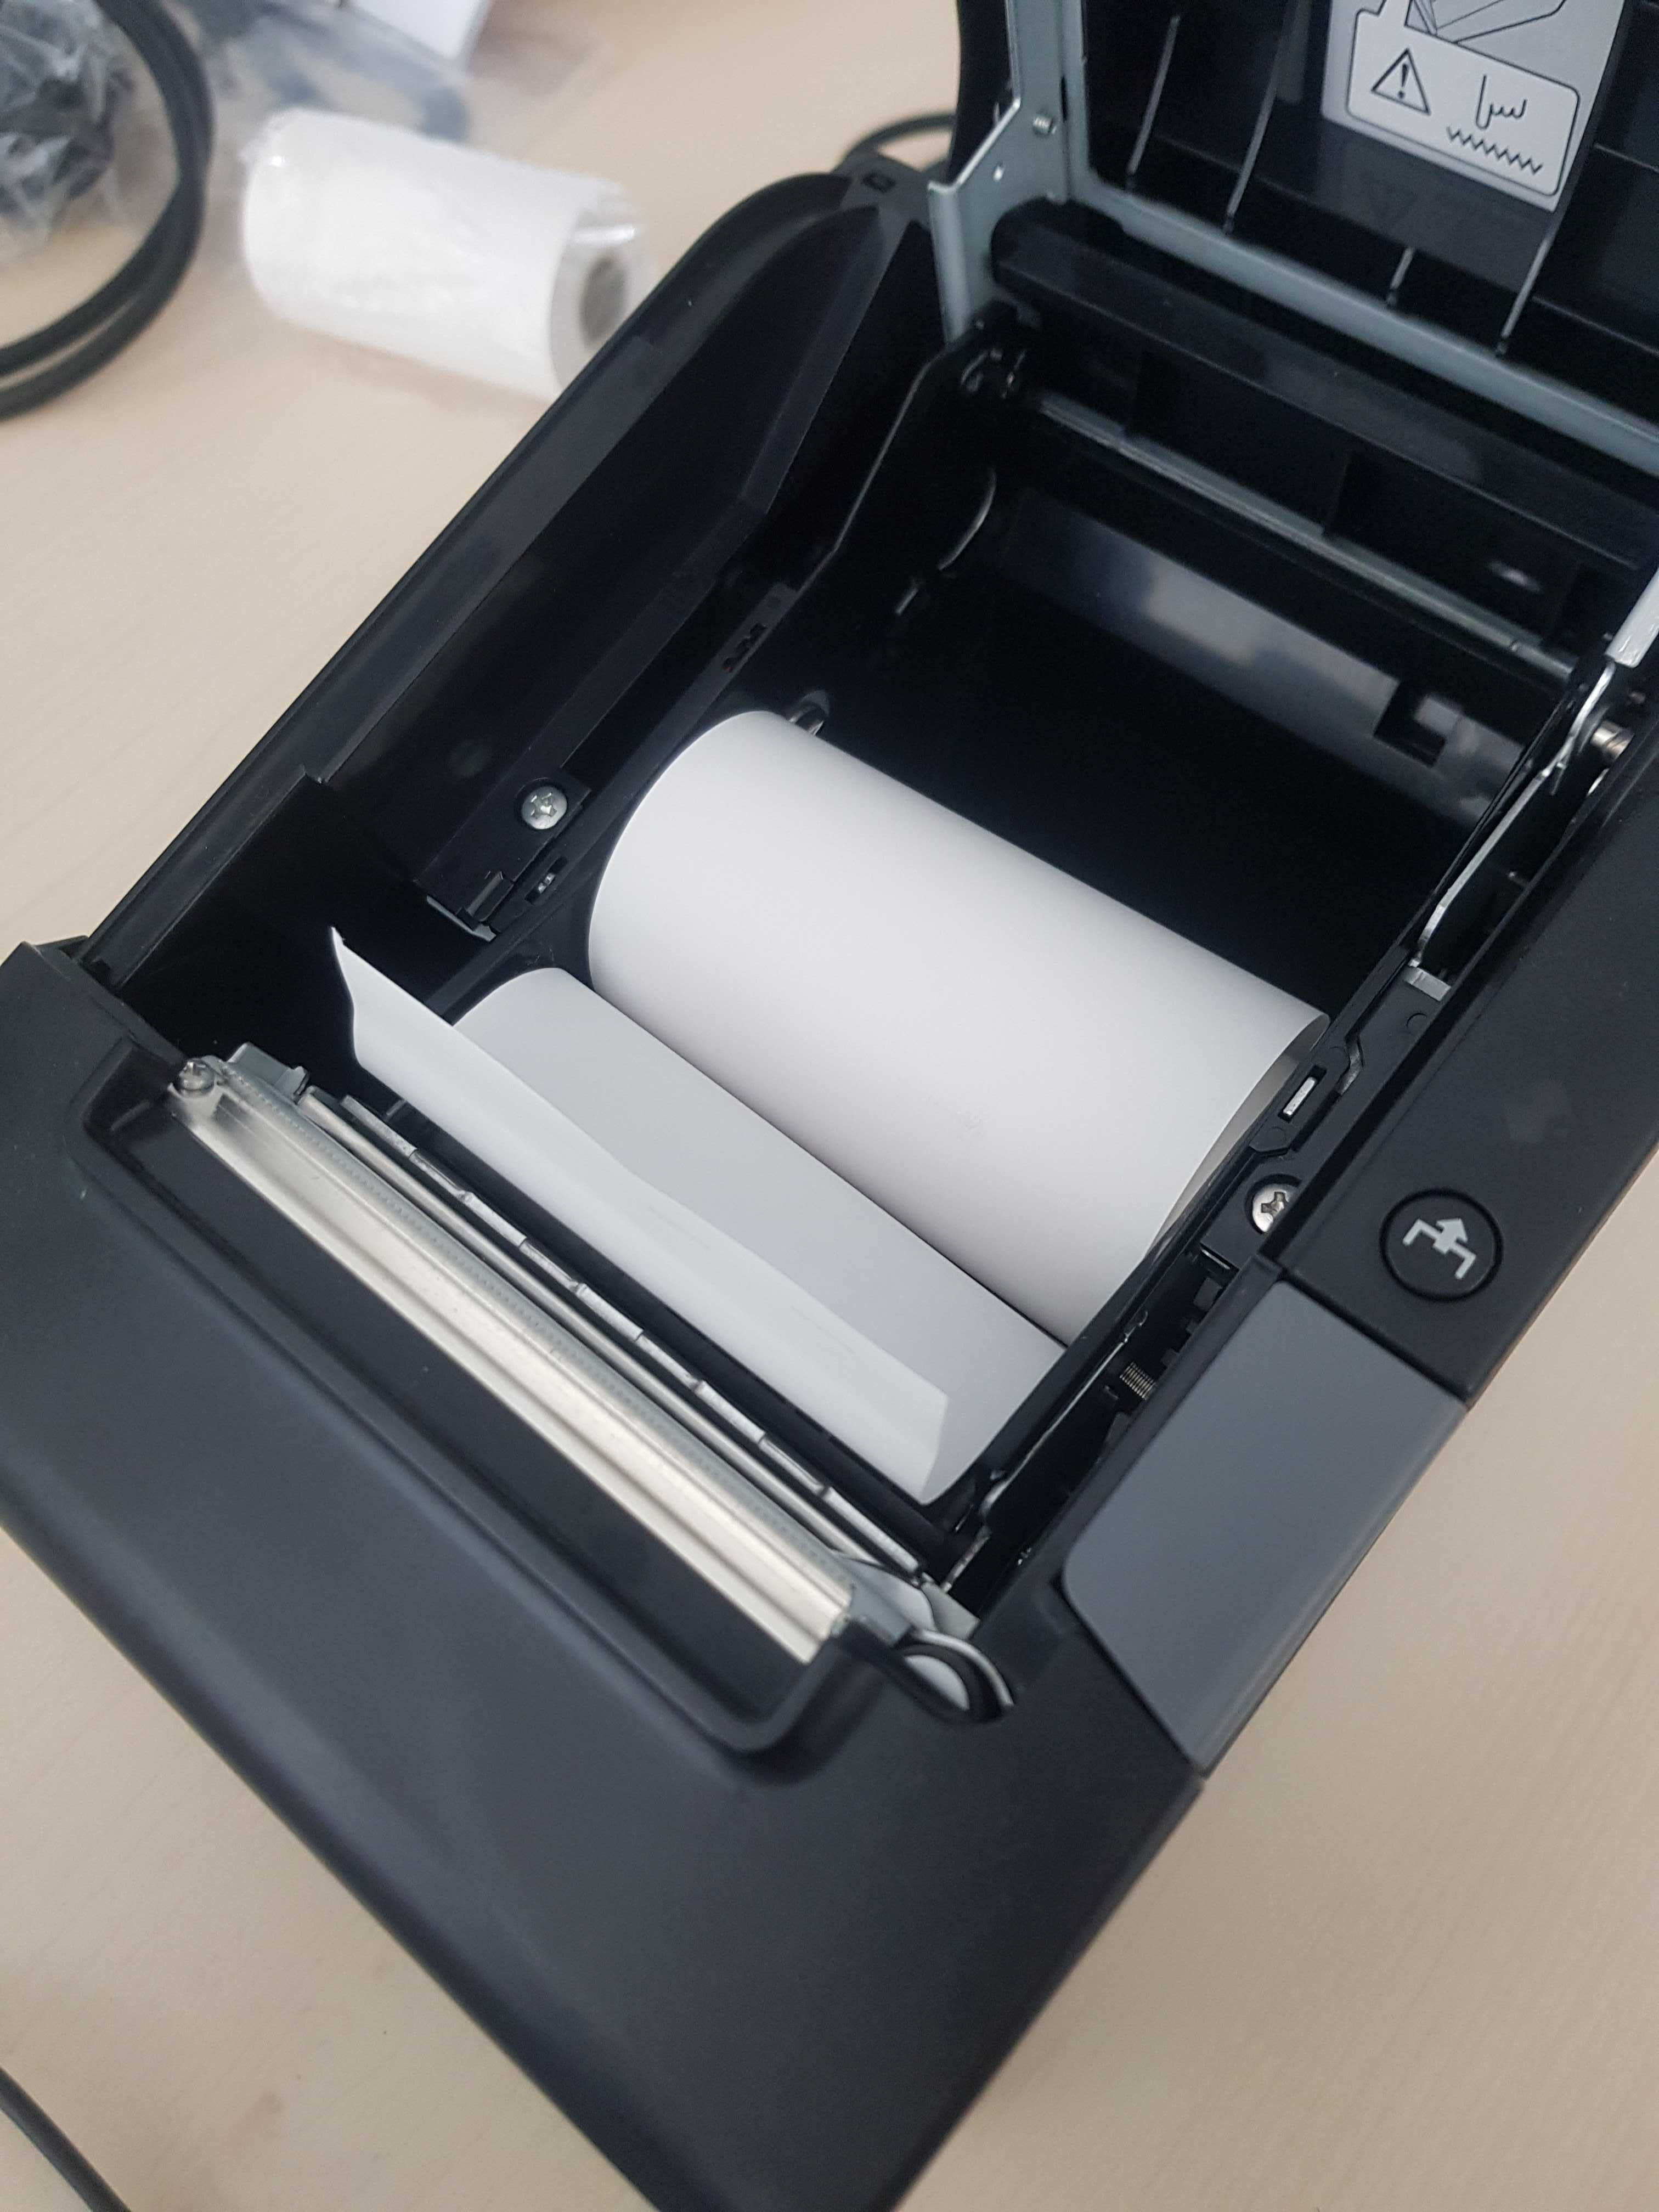 3. Immediately roll out a few centimeters of paper and let it hang downward out of the printer. This allows the paper to be cut automatically.
4. Then simply close the cover for the paper roll and tear off the first piece of paper. The receipt paper is ready for the first invoices!
How to change the paper width from the printer?
To change the paper width in the printer, we show how to do it. The Epson TM-T88VI has two different paper width options: 80 millimeters and 58 millimeters.
It is important to remember that the printer cannot be reset to 80 millimeters once the 58 millimeter paper roll has been used. In addition, the technical instructions for the printer should also be followed.
This is because the settings for the paper width in the software settings must also be changed. This can be done via the memory switch.
1. To be able to change the paper size, the printer should be switched off first.
2. Then simply open the cover for the paper.
3. Now reposition the holder for the paper roll so that the knobs fit exactly into the recesses on the side leading upwards.
The bracket can also be attached with additional screws that are included in the package with the Epson TM-T88VI printer.
4. Finally, simply insert the paper roll into the tray and replace the cover for the printer. After the software in the printer has been changed over, the device can be used!
How to connect the printer to the network?
After the printer has been completely set up, it can now be connected to the network for use throughout the store. This can be done either with a LAN cable or by connecting the printer to the WLAN, for example with a stick. When the printer is then activated, the Wi-Fi and Ethernet must be activated once.
1. To do this, press the start button and the paper feed button.
2. You will then receive the device information.
3. Then go to the following menu items Mode Selection → Interface Setup → Wi-Fi & Ethernet Setup and then SimpleAP. NOTE: Press the paper feed button as many times as the number in front of the menu item indicates. Do not let too much time pass in between or you will have to start over!
4. After that, the printer can be easily found in the network and the cash register can connect to it directly. The password is by default: 12345678
The printer is to be connected to a PC?
The following items should be kept on hand for this purpose:
Cable: To connect the printer to the Internet router, an Ethernet cable and a network cable for the printer are required. An Ethernet cable is available at any electronics store. It is possible to inform the supplier that an Ethernet cable is required when ordering the printer.
Make sure that the paper for the receipts is already inserted. You can read above how to proceed exactly.
If the cash drawer is also to be set up during the network setup, another cable is needed for this. This looks similar to the Ethernet cable and can connect the cash drawer with the device of your choice. At one of the two cable ends, the cash drawer cable should be slightly smaller than the Ethernet cable.
When the Epson TM-T88VI is first connected, it will not find a connection to the network.
To do this, the network settings must first be configured in the DHCP (Dynamic Host Configuration Protocol). With the DHCP all internet settings can be managed and it is not necessary to change each device individually.
A DHCP is used, for example, to manage the computers in a company, to assign IP addresses in the company's network. But the DHCP also has many other functions.
Activating the DHCP is not that difficult. In case of emergency, our retail7 support can always be reached. To access the DHCP, you have to go to your Mac or Windows computer, since it cannot be accessed on mobile devices.
How to enable the DHCP?
To do this, the printer must first be connected to the computer via Ethernet cable. After that, the IP address on the PC must be changed so that the printer can be accessed.
Windows:
1. To do this, search for the Network & Internet item in the computer's settings.
2. There the Ethernet network and features can be selected.
3. Under the IP Assignment item, select the Edit option. ATTENTION: It is important to note the default computer data first before changing them. This is because they will have to be re-entered later.
4. Now the following data can be changed under Edit-IP - Settings:
Connection method: Manual/Static IP
IP address: 192.168.192.xxx The last three digits can be freely selected. It must be a number between 1-254, but it must not be 168.
Subnet Mask: 255.255-255.0
Router/Default Gateway: 0.0.0.0. (individuell)
5. After that press save.
6. In browser enter http://192.168.192.xxx . The printer settings can then be found there.
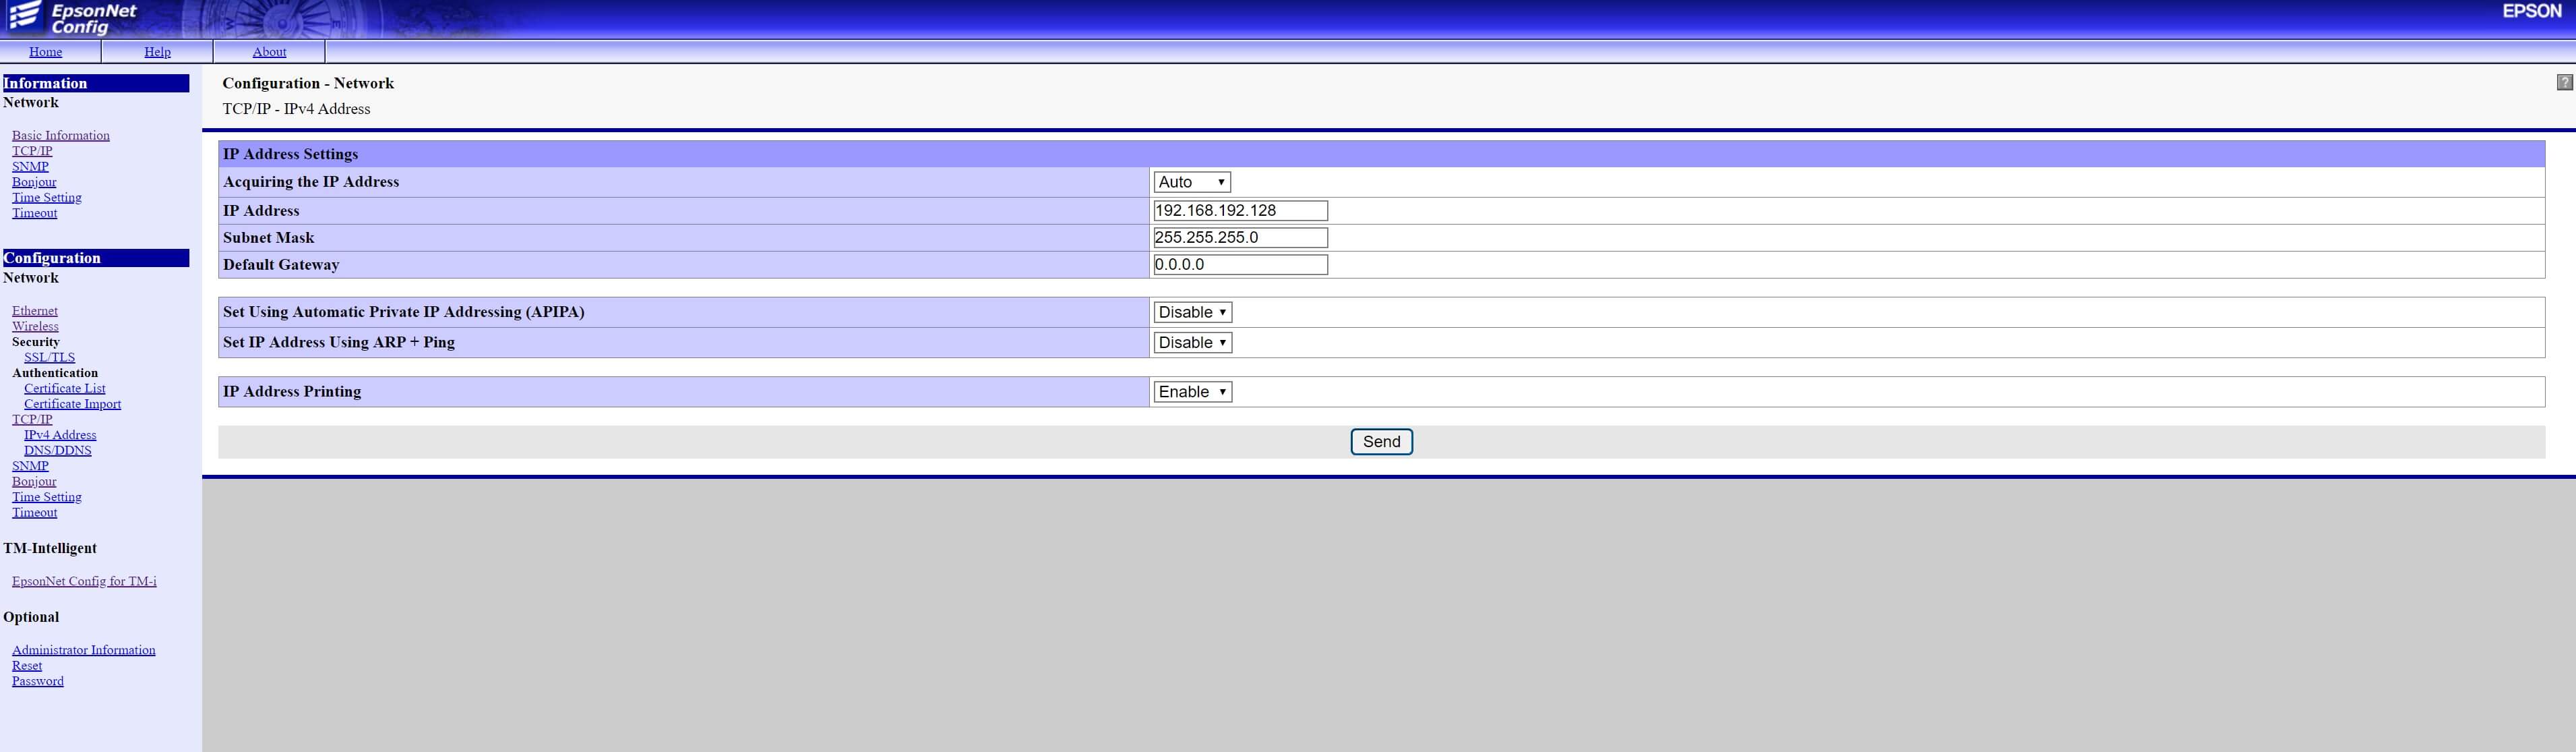
7. Then select TCP/IP in the menu under Configuration.
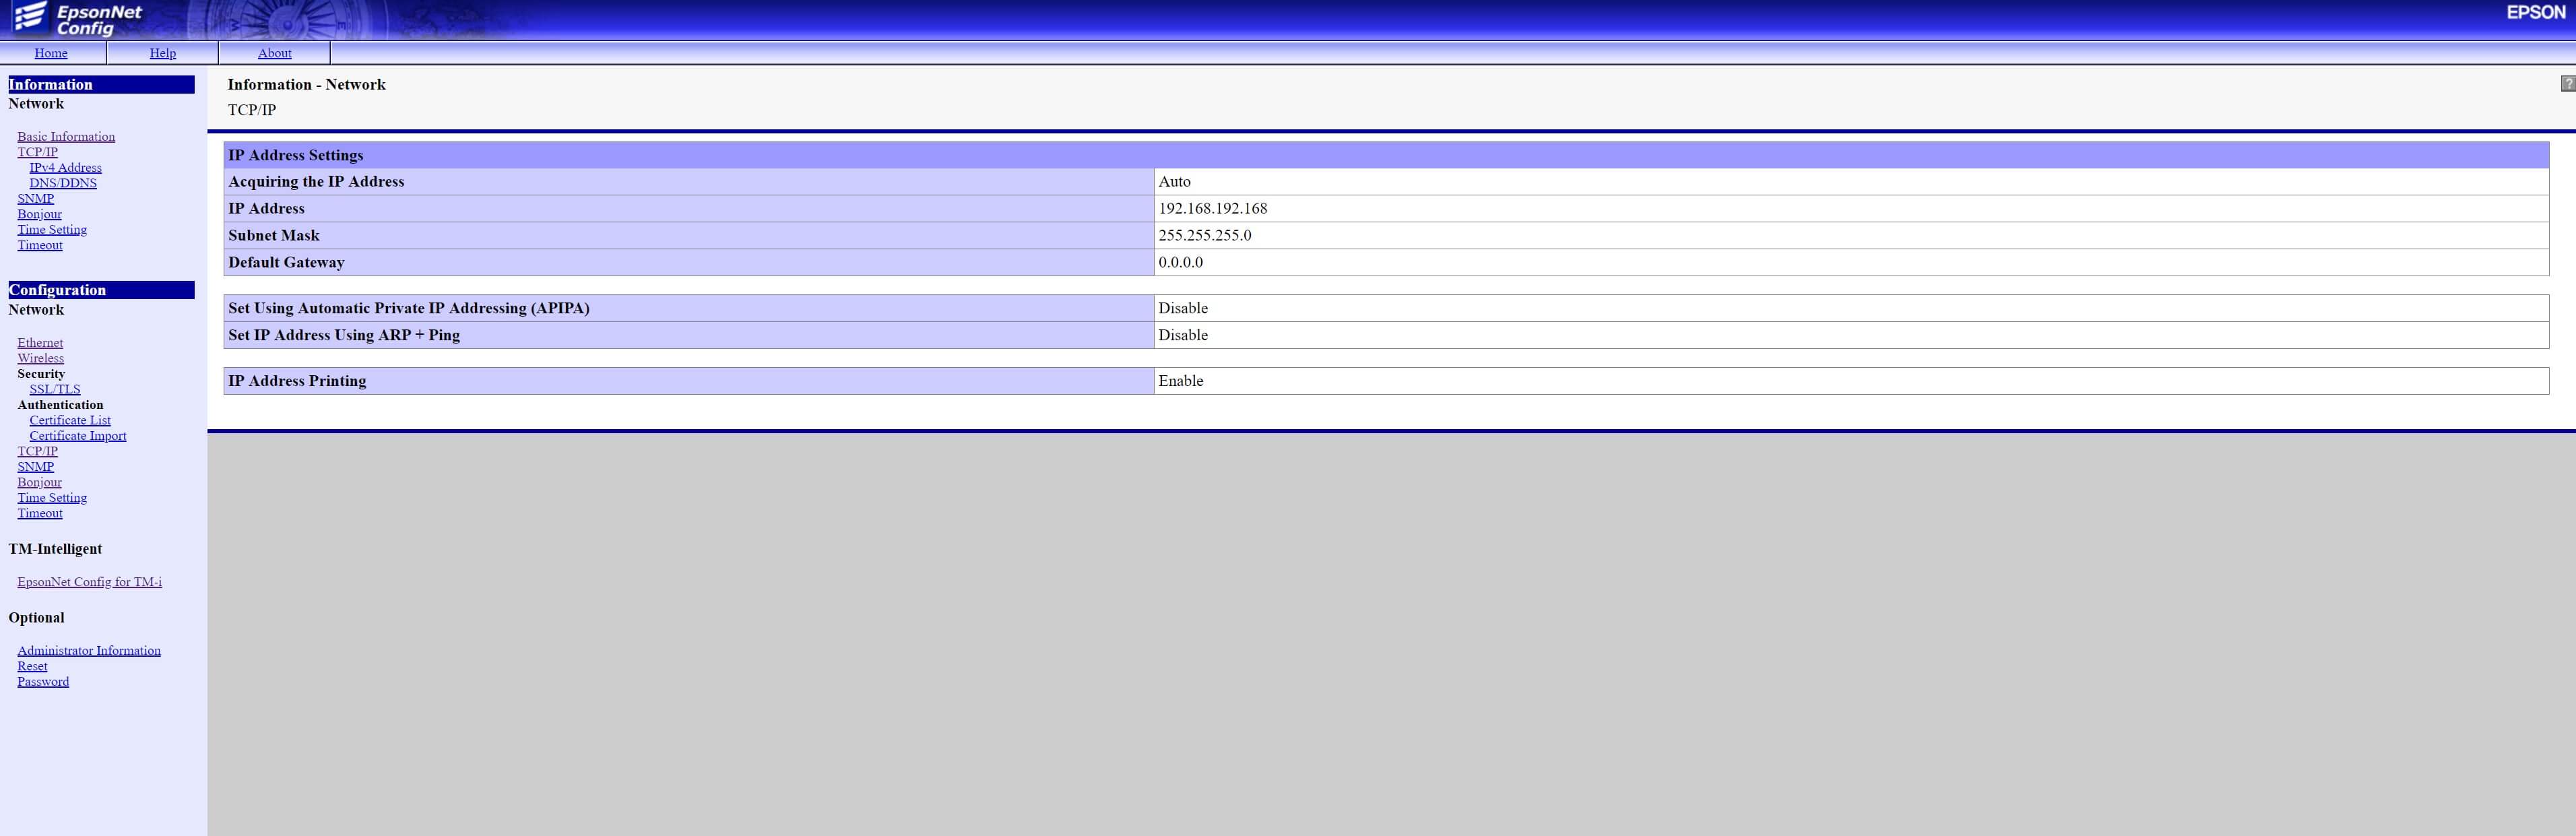 8. Under the item Get IP address you can select Automatic and then press Send.
9. A message then appears on the screen. This confirms the changes and the printer is then restarted automatically.
10. As soon as the printer is running again, the IP address of the computer can be reset to the noted settings. To do this, just follow the same steps of changing the IP.
11. After resetting the data, the computer can reconnect to the network. The printer can then be reconnected to the router without any problems.
 NOTE: It is then still important that underhttps://192.168.192.xxx/webconfig-i the print function can be activated.
12. To check if everything has been done correctly, first switch off the printer. Then press and hold the pushbutton on the upper side for seven seconds. At the same time, switch the printer on again.
The printer then prints out all network settings and the IP address can be checked. Does it say NONE or another number? Then check if the printer is connected to the network.
If the printer displays NONE, it is not connected to the Internet. In this case, check if the Ethernet cable still connects the printer and the router.
13. If the printer displays anything other than the options just mentioned, it has been set up successfully.
Then a test document can now be printed out by pressing the print button for about four seconds. There on the upper side the item IP address can be found.
14. Now the printer can be connected to the computer.
15. First install the latest driver for the printer. This is easily available on the Epson page (https://download.epson-biz.com) to find. Download the corresponding driver.
The driver can be found under the downloads afterwards. It is a ZIP file that has to be extracted via right-click. You can either click directly on the folder after downloading or select the Downloads folder in the computer.
16. After extracting the data, a folder with an installation file will open. Follow the instructions in the installation. Once the installation is complete, the Epson TM-T88V printer can be installed.
17. To do this, search for Register Epson in the search bar and find the necessary app. After launching it, a box with the print setup screen will appear. The following data must be entered there:
Model: Epson TM-T88V.
Name: Choose your own name.
Port Type: Select "Ethernet".
Port: Auto-Setup.
IP address: This can be found on the slip of paper from the printer after holding the print button for seven seconds.
Save the settings. A test print is created automatically. That's it! The printer can now be used.
The printer should be activated with the iPad, Android or iPhone?
It is no problem to establish a network connection with the printer.
1. To do so, first download our retail7 app.
2. After that, a test document from the Epson TM-T88V printer is still needed.
3. To do this, switch off the printer and then press and hold the paper feed button for about seven seconds. Your IP address can then be found on the test document. If this is not on the test document, the printer is not connected to the Internet.
In this case, the Internet connection must be checked. It should also be checked whether the mobile POS device is connected to the WLAN. To do this, just press the Internet icon and an overview is available.
It is possible to make a small test print. Then you can see if everything is set correctly. Note: it is important to remember to cancel the test purchase afterwards! If no receipt comes out of the printer, check the Internet connection again and go through the instructions again.
But it is also possible to connect the receipt printer to a mobile end device (phone or tablet) using the Epson TM utility app.